Physical Address
304 North Cardinal St.
Dorchester Center, MA 02124
Physical Address
304 North Cardinal St.
Dorchester Center, MA 02124

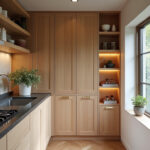
Create a wood kitchen island with soul. Diana shares 23 tips to blend Mediterranean warmth and modern function for a relaxed, stunning heart of your home.
Picture this: You’re standing in a kitchen overlooking the sea on the Amalfi Coast. The windows are open, a warm breeze is drifting in, and the scent of lemons and rosemary fills the air. In the center of the room isn’t just a workspace, but a huge, worn-in wooden island. It’s where nonna rolls out pasta, where family gathers to shell beans, where wine glasses are set down during long, lazy conversations. It’s the heart of the home.
That’s the feeling we’re after. People get so caught up in the technical stuff—spec sheets, Janka ratings, corporate jargon—they forget that a wood Kitchen island is supposed to have soul. It’s meant to be the warm, beating heart of your kitchen, a piece that invites people to gather and live. So forget the noise for a minute. Let’s talk about how to create a wood island that feels less like a piece of furniture and more like a member of the family.
This is the most important part, the bedrock of it all. It’s like laying the stone foundation for a villa. If you get this right, everything else falls into place with a sense of ease and rightness. This is where we dream, but with a tape measure in hand.
You know what people always ask me? “How big can my island be?” That’s the wrong question. The right question is, “How much space do I need to live around my island?” We’re not just creating an object; we’re creating pathways for life. It’s about flow, the easy dance between the stove, the sink, and the refrigerator. It’s making sure you can open the dishwasher and the oven door without trapping someone against the counter.

I once watched a client almost cry because they insisted on a massive island in a space that was just too small. It looked incredible in the drawings, but in reality, it created a bottleneck. The whole kitchen felt cramped and stressful. We had to take it out—a heartbreaking and expensive mistake. The real magic isn’t in the size of the island, but in the generosity of the space around it. Use painter’s tape on the floor and live with the “footprint” for a few days. You’ll feel it instantly if it’s wrong.
With your layout now feeling more like an open piazza than a crowded alleyway, it’s time to decide what will actually happen there.
So, what is the story of your island? Will it be where you roll dough for Saturday morning cinnamon rolls and chop vegetables for big family salads? Or is it where the kids will do their homework while you cook, their books spread out next to a plate of snacks? Maybe it’s a beautiful stage for serving platters of roasted fish, cheeses, and olives when friends come over. Don’t just say “all of the above.” Pick one main story, and let the other uses be supporting characters.

Trying to make it perfect for everything makes it truly great at nothing. If it’s for prepping, you want a sturdy butcher block. If it’s for dining and entertaining, a smoother, sealed surface with a generous overhang for knees is essential. I had a client who loved to bake, so we designed her island with a lower, cool marble inlay section just for rolling out pastry. Defining the island’s purpose isn’t just a practical step; it’s about infusing it with intention.
Once you know its purpose, you can dress it in the right clothes by choosing a wood that tells the same story.
Can we talk about why everyone gets this wrong? They try to find an exact match for their cabinets or floors, and the whole room ends up looking flat and soulless. Please, don’t do this. Mediterranean Design is about layering textures and tones that feel like they’ve been collected over time. The secret isn’t matching, it’s harmonizing. Look at the undertones—are your existing woods warm, with golden or red hints, or are they cool, with gray or ashen tones? Stick within the same family of warmth or coolness.

A beautiful trick is to create a gentle contrast. If you have light, sun-bleached oak floors, a slightly richer walnut island can feel grounding and sophisticated. If you have dark cabinets, a lighter ash or maple island can bring a sense of airiness into the space. Think of it like putting together an outfit: you don’t wear the exact same color from head to toe. You coordinate. Bring large samples into your home and watch how they look in the morning light versus the evening.
This choice naturally leads to defining the island’s overall personality.
What feeling do you want to evoke? When someone walks into your kitchen, what story does the island tell? A “rustic” island feels like a Tuscan farmhouse—think reclaimed wood, maybe a few nicks and scratches that speak of a life well-lived, with thick, sturdy legs. “Contemporary” is a sleek villa in Ibiza—clean lines, waterfall edges, and minimalist hardware, where the beauty of the wood’s grain does all the talking. “Traditional” is like a classic Greek island home—often painted in a soft white or sea-blue, with charming details and a timeless, comfortable feel.

Choose your main aesthetic and commit to it. This becomes your North Star for every other decision, from the edge profile to the cabinet pulls. I remember helping a family who wanted a “modern farmhouse” look. We chose a simple, Shaker-style base for their white oak island, but topped it with a clean, flat top with sharp, eased edges. We used modern, matte black hardware. The blend was perfect—warm and rustic but clean and uncluttered. It felt authentic to them.
Now that you have a vision, we need to bring it down to earth and talk about money.
Alright, let’s talk about soldi. Money. It’s not the most romantic part, but it’s what turns a dream into reality. Everyone gets sticker shock because they only budget for the wood itself. They forget the cost of the skilled hands that will craft it, the delivery, the installation, the electrician for the outlets, and the plumber if you’re adding a sink. And here’s a secret: custom work costs more, but you are paying for a piece of art tailored to your home.

Be honest about what you can spend. And always, always add a 10-15% contingency fund. You will need it. I promise. Something always comes up. The best shortcut I can give you is this: splurge on the parts you see and touch every day, like a beautiful, durable countertop and quality hardware. You can save money on the inside of the cabinets by using a more affordable material, because no one will ever see it. Get itemized quotes that break down every single cost so there are no surprises.
And speaking of those little modern details, let’s not forget about power.
Even in the most rustic, old-world-inspired kitchen, you need to plug in your stand mixer and charge your phone. Planning for outlets from the beginning is one of the single best things you can do for your island’s functionality. An island without power is just a big table. An island with power is a command center. Think about where you’ll be working. You’ll want an outlet right where you use your blender or food processor. If people will be sitting there with laptops, put outlets with USB ports on the side of the island, near the seating.

The worst thing is having a beautiful new island and then immediately having to run an ugly extension cord across the floor. It ruins the whole aesthetic and is a safety hazard. Today, there are so many brilliant solutions. You can get pop-up outlets that sit flush with the countertop until you need them, or you can tuck them discreetly under the countertop overhang. Plan for more than you think you’ll need. I’ve never once had a client say, “Darn, I wish we’d installed fewer outlets.”
This is the fun part! It’s like shopping at a bustling European market, picking out the finest ingredients. Here, we choose the textures, the features, and the little details that will make your island uniquely yours.
Your island is going to be a workhorse. It needs to stand up to dropped pans, spilled red wine, and maybe a little one banging a spoon on it. So while a soft pine might look lovely and rustic, it’s going to look beat-up in a bad way very, very quickly. You need a hardwood. Oak, maple, and hickory are fantastic, tough choices. Walnut is a bit softer but so gorgeous and still very durable. Look at the Janka hardness scale—it’s a simple rating of how well a wood resists denting. Anything over 1200 is a solid bet for a kitchen.

I had a client who was a passionate cook, and we chose a thick hard maple top for his island. Five years later, after countless dinner parties and daily meal prep, it had developed a beautiful, subtle patina—the story of his cooking—but no major dents or damage. The secret is that harder woods don’t just resist damage; they age gracefully. They get better over time, not just older.
Beyond strength, the visual story of the wood lies in its grain.
The grain is the wood’s fingerprint. It’s the most beautiful and unique part of its story. Don’t just let your cabinetmaker pick a random slab. Get involved. A plain-sawn piece will give you that classic, arching “cathedral” grain that feels very open and traditional. A quarter-sawn piece, on the other hand, will have long, straight, linear lines that feel much more calm and contemporary. Then there’s the wild beauty of burled or curly wood, which can turn your island into a true piece of natural art.

I used to think this was all just designer-speak until I worked on a project where we sourced a book-matched slab of walnut for the island top. That means they slice a thick piece of wood in two and open it like a book, creating a stunning, symmetrical mirror image of the grain. It was absolutely breathtaking. It cost a bit more, but it completely transformed the entire kitchen from nice to unforgettable. Ask to see full slabs, not just tiny samples. The pattern across a large surface is what truly matters.
Now, let’s talk about what goes on top to protect that beautiful grain.
This is a balancing act between heart and head. Your heart might scream for a soft, oiled butcher block or a stunning, porous marble. Your head needs to remind you that this is a kitchen, and things will spill. So, you have a few choices. A film finish, like polyurethane, creates a durable, plastic-like coating that is excellent at resisting stains and moisture. It’s the most practical choice for a family kitchen. An oil finish, on the other hand, soaks into the wood itself, giving it a more natural, matte look and feel. It’s beautiful but requires more maintenance.

The BS everyone tells you is that a sealed surface is indestructible. It’s not. It just buys you time. A puddle of water left overnight will still damage most finishes. I learned this the hard way with my own oiled walnut counter. I was meticulous, but a guest left a wet glass on it overnight, and in the morning, I had a perfect white ring. I was able to sand it out and re-oil it—which is the beauty of an oil finish—but it taught me that no finish is foolproof. You have to live with and care for your material.
Next, we move to what’s happening inside the island.
An island is a fantastic opportunity to hide all the stuff that makes a kitchen look cluttered. The trick is to think beyond standard empty cabinets. Big, deep drawers are infinitely more useful than deep cabinets where everything gets lost in the back. Use them for pots and pans. Think about pull-outs for trash and recycling—getting them off the floor and out of sight is a game-changer. I love designing islands with a dedicated spot for big, awkward items like a stand mixer, often on a lift so it can be brought up to counter height without breaking your back.

A great shortcut is to dedicate one side of the island for deep storage (for the cook) and the other side (the seating side) for shallower storage. A 12-inch deep cabinet on the seating side is perfect for cookbooks, serving platters, or kids’ art supplies. It makes use of what would otherwise be a blank panel. A client of mine with two little kids had me design a “homework hub” into their island, with drawers for paper and pencils and even a hidden charging station. It keeps the chaos contained.
Speaking of seating, let’s make it a place where people actually want to linger.
Seating at an island turns a workspace into a social hub. This is the heart of the Mediterranean lifestyle—cooking is rarely a solo activity. People gather, they talk, they chop, they sip wine. For this to work, the seating has to be comfortable. That means you need enough overhang for people’s knees. A stingy 10-inch overhang is a recipe for bruised knees and people perching on the edge of their stools. Aim for 12-15 inches for counter height.

Also, think about the height. I love designing dual-height islands. A section at standard table height (about 30 inches) with regular chairs is so much more comfortable for longer periods, whether for a meal or for working on a laptop. It creates a much more inviting and ergonomic spot. We did this for a family, and they told me it completely changed their mornings. Instead of a quick, standing bite, they now sit down together at the island every day. It encourages connection.
Now for the final touches that add that layer of handcrafted charm.
The edge profile is the detail that finishes the piece, like the perfect piece of jewelry. A sharp, square edge can look very modern, but it’s also prone to chipping and can be sharp to lean against. An ogee edge is very traditional and ornate. For a warm, inviting Mediterranean feel, I almost always lean towards a gently rounded or softened edge, like a bullnose or an eased profile. It just feels more comfortable and forgiving. It invites you to lean on it, to rest your arms there.

These details are a great way to add character without a lot of expense. A simple, well-chosen edge can elevate the entire piece. I once worked on a very simple, Shaker-style island, but we added a small, detailed bevel to the edge of the top. It was a subtle thing, but it caught the light beautifully and gave the whole island a more custom, handcrafted feel. Don’t just accept the standard default edge; look at the options.
For those who are serious about cooking, let’s talk about the ultimate prep surface.
There is nothing that says “this is a real working kitchen” quite like a true butcher block top. I’m not talking about the thin, laminated ones from big box stores. I mean a thick, solid slab of end-grain or edge-grain wood. The beauty of it is that you can chop directly on it. It’s kind to your knives, and it has natural antimicrobial properties. It’s a surface that is meant to be used, not just admired.

An end-grain top, where the wood fibers are facing up, is the king. It’s “self-healing,” meaning the knife slips between the fibers, which then close back up, showing fewer marks over time. The main thing to know is that it requires care. You have to oil it regularly with a food-safe mineral oil to keep it from drying out and cracking. But this ritual becomes part of the pleasure of owning it. It gains character with every knife mark and stain, telling the story of the thousands of meals prepared on its surface.
You’ve designed a beautiful island. Now we need to make sure it works in harmony with the rest of your kitchen. It should feel like a partner in the dance of cooking, not a clumsy obstacle.
Ah, the “work triangle.” Designers love to talk about this. It’s the path between your stove, sink, and fridge. The idea is to make that path as easy and efficient as possible. The island can either be a brilliant centerpiece in this dance, or it can be a giant wall you constantly have to walk around. If your island is blocking a direct path between the sink and the stove, for example, it’s going to drive you crazy.

A great island can actually improve the triangle. For example, if your sink and stove are far apart, you can put a smaller prep sink in the island. This creates a new, much more compact work zone. You can take vegetables from the fridge, wash them at the island sink, chop them right there, and then turn around to the stove. This is the ultimate shortcut: bring the function to you. Don’t make yourself walk all over the kitchen.
And to see what you’re doing in your brilliant new workspace, you need good light.
Bad lighting can ruin even the most beautiful kitchen. For an island, you need layers of light. First, you need excellent Task lighting directly over the work surface. Pendants are perfect for this. Don’t just stick one in the middle; use two or three spaced out to illuminate the whole length. You want to see what you’re chopping, not be working in your own shadow. This is a non-negotiable for safety and function.

But just as important is the mood. Every light in a kitchen should be on a dimmer. Everything. This is the secret weapon of good design. You can have the lights bright for chopping and cleaning, and then dim them down to a warm, golden glow for dinner or when you’re enjoying a glass of wine at the end of the day. It allows you to completely transform the feel of the space with the touch of a button. It’s the difference between a laboratory and a cozy taverna.
For those who crave flexibility, let’s talk about putting your island on wheels.
I confess, I used to think a mobile island felt a bit temporary. Then I designed one for a client with a beautiful but compact city apartment, and it was a revelation. Putting a beautiful, custom wood island on high-quality, locking casters gives you incredible flexibility. It can be a central prep station during the week, then be pushed against a wall to open up the floor for a party on the weekend. Or you can roll it closer to the dining table to act as a buffet server.

This is the ultimate modern take on the classic Mediterranean farmhouse table, which was often moved around to suit the task at hand. The key is to use heavy-duty casters that lock completely, so the island is perfectly stable when you need it to be. This is especially brilliant for open-concept spaces, allowing you to redefine the room’s function in an instant. It’s the smart solution for anyone who needs their space to be as adaptable as they are.
To make that island even more of a powerhouse, we can start hiding appliances inside.
This is how we get that seamless, custom look while packing in modern function. Hiding appliances in the island is a fantastic way to declutter your other countertops and walls. A microwave drawer is a game-changer. It gets the bulky box off the counter and puts it at a much more ergonomic height. You can also build in a beverage fridge, a warming drawer, or even a second dishwasher drawer just for glasses and barware if you entertain a lot.

The key to getting this right is planning from the very beginning. You can’t just decide to add a dishwasher later. The cabinetry has to be built precisely to the appliance’s specifications, and you need to have the plumbing and electrical planned and roughed-in before the island is built. It requires foresight, but the result is a kitchen that feels incredibly sleek, intentional, and custom-tailored to the way you live.
And while we’re on the subject of smart design, let’s not forget the hidden opportunities.
The space under the countertop overhang on the seating side is often wasted. But it’s a goldmine! It’s the perfect spot for discreet, shallow storage. Think a narrow open shelf for your most beautiful cookbooks, a small wine rack, or even a recessed power strip for charging laptops and phones. It’s also where you can design a spot for stools to tuck completely away, which is crucial for keeping pathways clear in a smaller kitchen.

My favorite use of this space was for a client with two adorable dogs. They were always tripping over the food and water bowls. So, we designed a custom pull-out drawer in the toe-kick area of the island that held their bowls. They could be pulled out for feeding time and then pushed away, completely out of sight. It was a simple, elegant solution that solved a daily annoyance. Look at every inch of your island and ask, “How can this space work for me?”
You’ve brought this beautiful thing into your home. Now you have to love it and care for it so it will last for generations. Like a well-tended olive grove, a little bit of regular attention will yield beautiful results for years to come.
Wood is a natural material. It breathes. It needs moisture to stay healthy, especially in a home with central heating and air conditioning that can dry it out. A good wood conditioner or, for butcher blocks, food-grade mineral oil is like lotion for your island. It keeps the wood from becoming thirsty, which is what leads to cracking and splitting. It also brings out the depth and richness of the grain, keeping it from looking dull and tired.

Think of it as a small, mindful ritual. Once a month, or once a season for less-used surfaces, take a few minutes to wipe down the island with a soft cloth and a good conditioner. It’s a way of saying thank you to the material for all the service it provides. It’s the difference between a piece that just gets old and a piece that develops a rich, lustrous patina.
But no matter how careful you are, spills happen.
Red wine, coffee, beet juice—it’s going to happen. The number one rule is: act fast. Blot, don’t rub. Rubbing just spreads the stain and grinds it into the wood. For most spills on a sealed surface, a quick wipe with a damp cloth is all you need if you catch it immediately. For an oiled surface, the spill might penetrate a little, but it can often be lifted with a paste of baking soda and water.

The biggest mistake people make is grabbing a harsh, all-purpose chemical cleaner, which can strip the finish right off. Always start with the gentlest method first. A simple solution of mild dish soap and warm water can handle 90% of kitchen messes. Test any new cleaning product on a hidden spot first, like the underside of the overhang. Having the right tools and knowledge on hand means you won’t panic when the inevitable spill happens.
Even more important than cleaning up is prevention.
Heat and water are the two biggest enemies of a wood island. A hot pan placed directly on the surface can leave a permanent scorch mark or a cloudy white blemish in the finish. A wet glass left overnight will create that dreaded white ring. This is where you need to be disciplined. Get beautiful trivets for hot pots and use them religiously. Insist on coasters for drinks. It might feel fussy at first, but it will become second nature.

I had a beautiful, thick oak island in my last home. I was diligent about trivets and coasters, and I wiped up spills immediately. After ten years of heavy daily use, it looked as good as the day it was installed. It’s not magic; it’s just consistent care. You’re not just protecting the wood; you’re preserving your investment and the beauty of your home.
Even with the best care, life leaves its marks.
A small scratch or dent is not a catastrophe. In fact, over time, a collection of small marks can give the island character. But a deep scratch that breaks through the finish is an open invitation for moisture and dirt to get in and cause real damage. For minor scratches, there’s an old trick: rub the meat of a walnut over the scratch. The oils can often make it disappear. For deeper scratches, color-matched wax sticks or touch-up markers work wonders.

For dents—where the wood fibers are compressed, not broken—steam is your friend. Place a damp cloth over the dent and gently iron it with a warm iron. The steam can cause the compressed fibers to swell back up to their original position. It feels like magic, but it works! Addressing these little things promptly keeps your island looking well-cared for and prevents small problems from turning into big ones.
Finally, know when it’s time for a refresh.
Over many years, even the best-cared-for island will start to show its age. The finish may get thin in high-use areas, or it might accumulate too many scratches to be touched up individually. Knowing when to refinish is key. The easy test is to sprinkle a few drops of water on the surface. If it beads up nicely, your finish is still doing its job. If the water soaks in quickly and darkens the wood, it’s time to refinish.

Think of it not as a failure, but as giving your island a spa treatment. A professional can sand down the surface, removing years of wear and tear, and apply a fresh, new finish. It will look brand new again, ready for another decade of life. For an island with an oil finish, you can often do this yourself with a light sanding and a few fresh coats of oil. It’s a way of honoring the material and extending its life, ensuring it remains the heart of your home for many more years of memories.
Your wood kitchen island should be so much more than a countertop. It’s a gathering place, a work surface, a buffet table, a homework station, a conversation hub. It is the piece of furniture that will witness the daily rhythm of your life. By planning with intention, choosing materials with soul, and caring for it with love, you create something that is not just beautiful and functional, but that truly anchors your home.
Don’t be afraid to create something with character, a piece that shows the marks of a life well-lived. Use these tips not as a rigid set of rules, but as a guide to help you create an island that feels authentic to you and your family. Build the island that will hold the memories of your life. It’s waiting for you.