Physical Address
304 North Cardinal St.
Dorchester Center, MA 02124
Physical Address
304 North Cardinal St.
Dorchester Center, MA 02124
Discover 18 patio pergola ideas — from climbing rose canopies to modern steel frames — to create a beautiful outdoor living space you'll actually use.
Picture yourself outside at seven in the evening. The light is golden. A breeze moves through fabric panels above your head. Warm globe lights glow between cedar rafters. This is what a patio pergola does for a backyard — it gives the space a ceiling, defines where the furniture goes, and turns a bare patio into a room worth staying in.
You don’t need to spend a fortune to get there. A simple pergola frame costs $800 to $1,200 as a DIY kit. The textiles, lighting, and plants that bring it to life cost less than most people expect. These 18 patio pergola ideas cover every style and budget, from romantic climbing rose canopies to clean-lined modern steel frames, so you can find the direction that fits your backyard.
The climbing rose canopy is the most striking of all patio pergola ideas. Blooms hang through the rafters. Petals brush your head when you stand underneath. The whole structure becomes something theatrical rather than just structural.
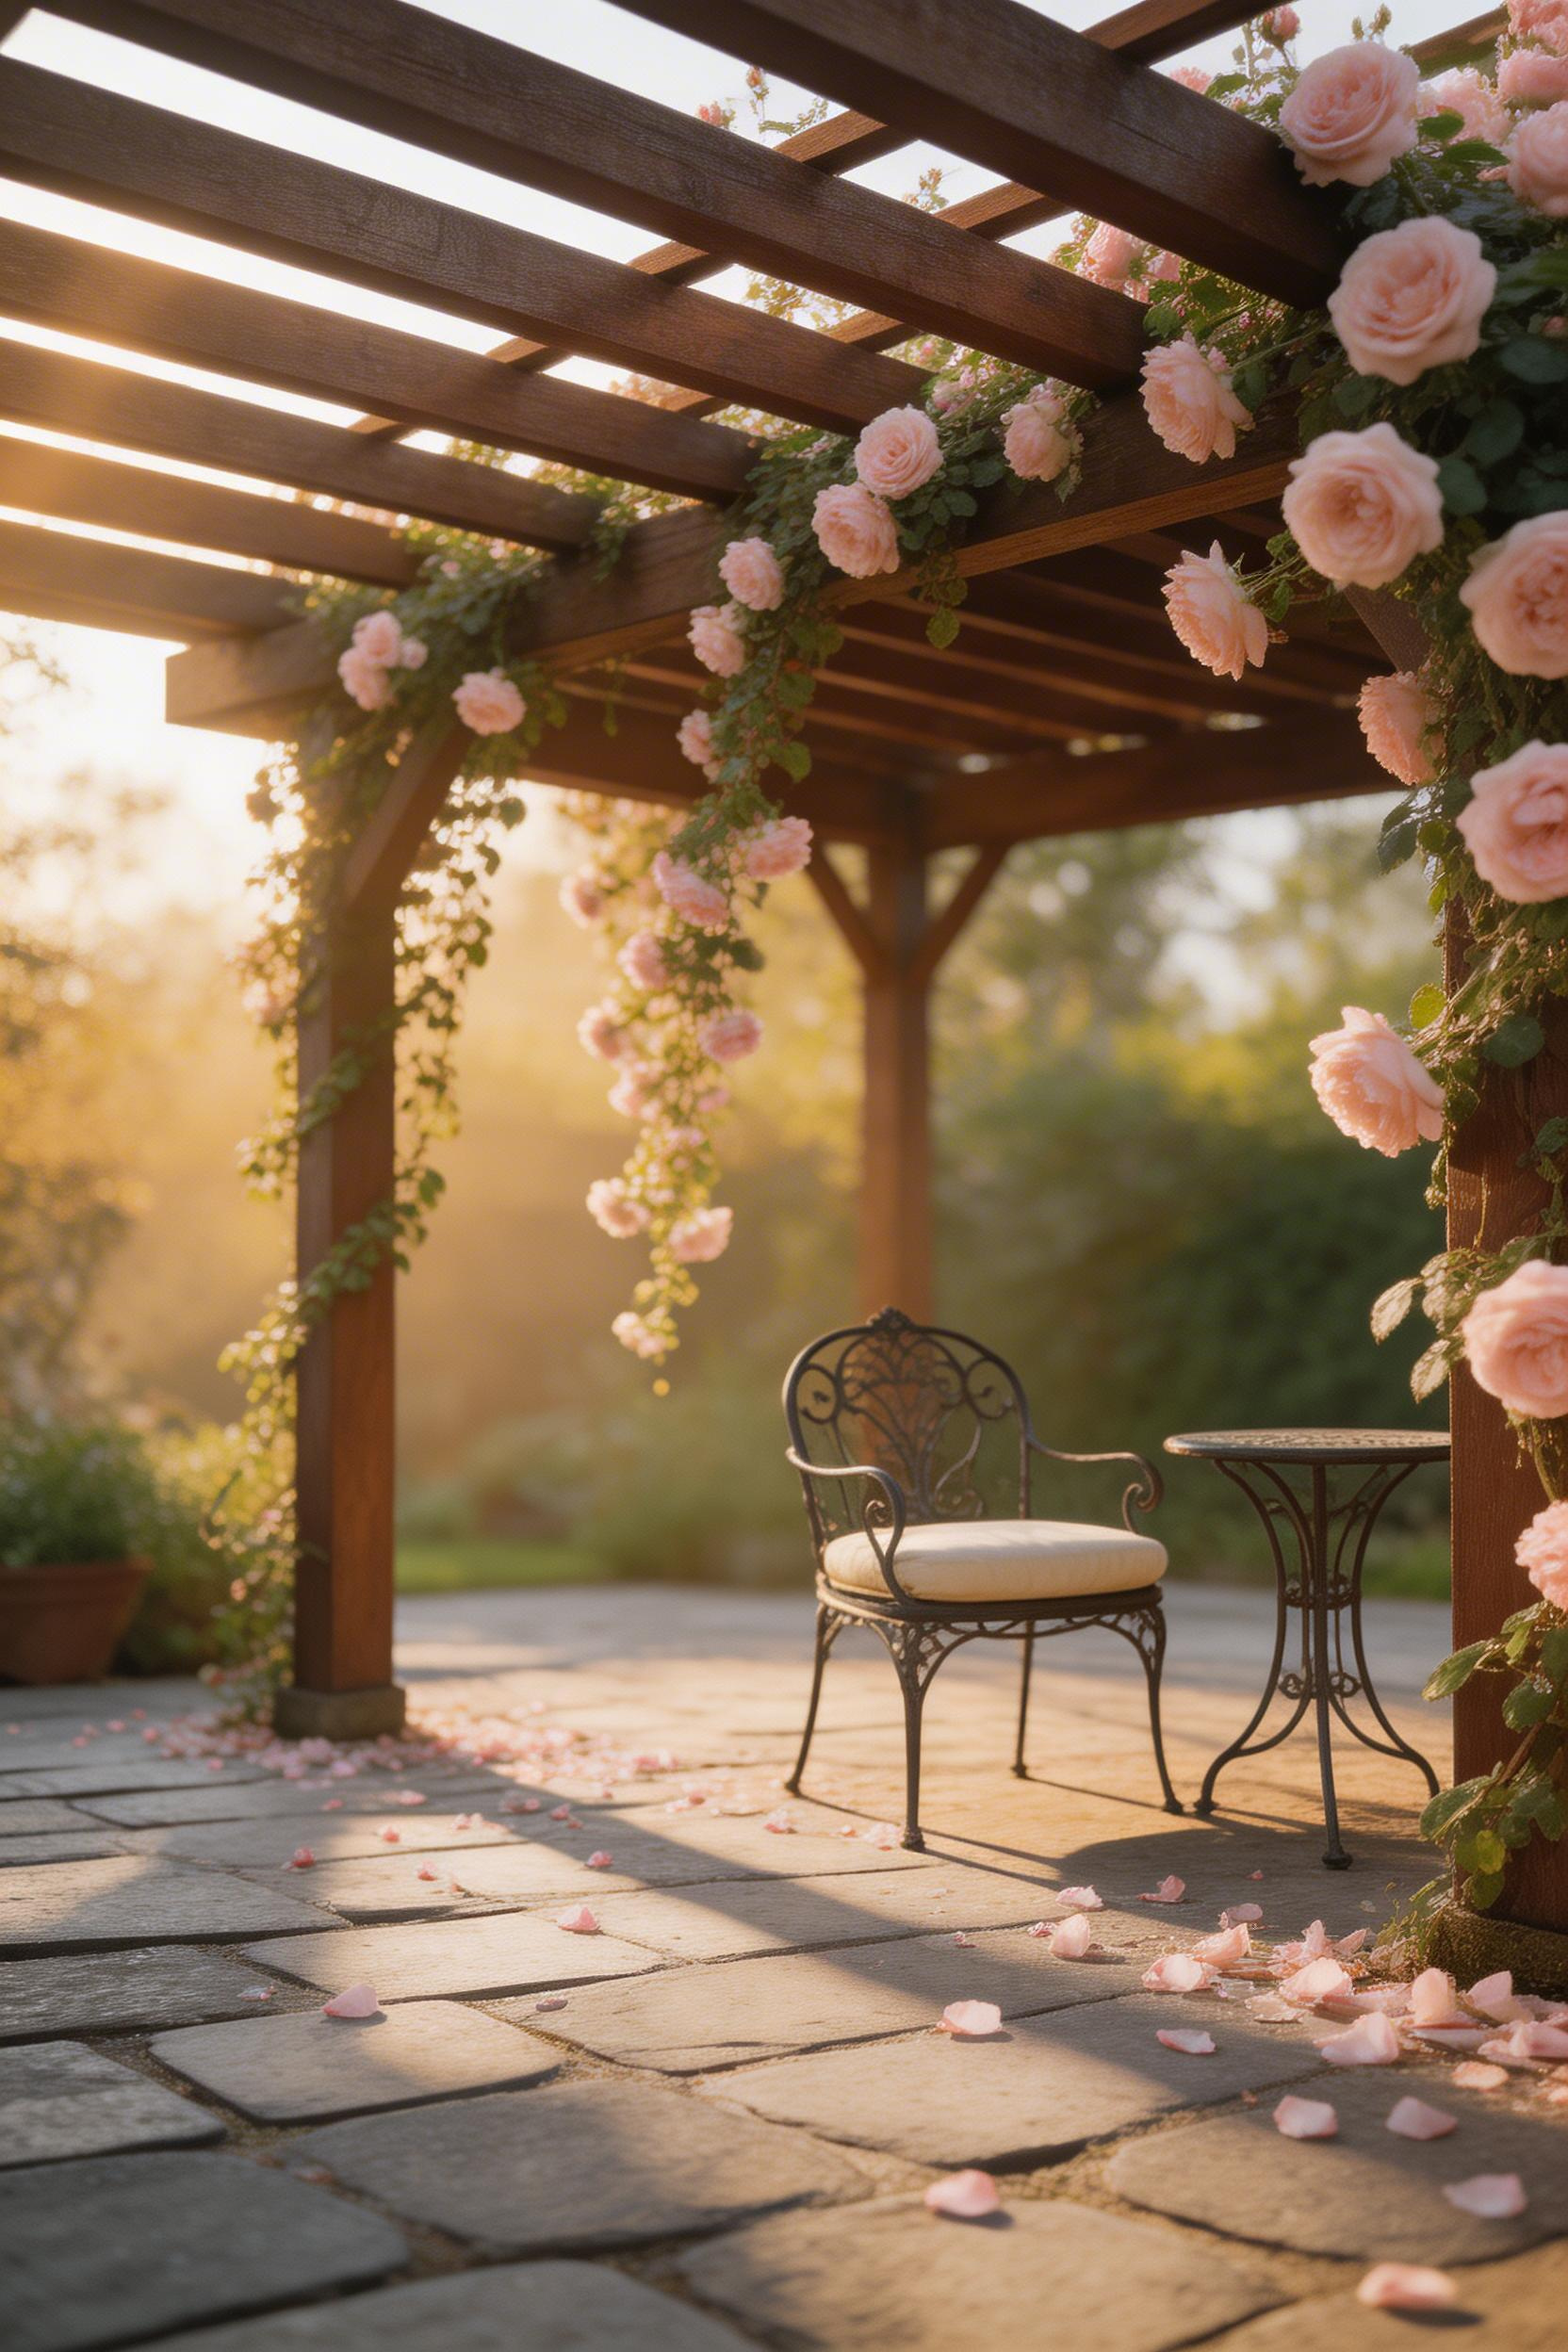
Not every climbing rose suits a pergola. You want repeat-blooming varieties that are disease-resistant and grow vigorously. ‘New Dawn’ is the most reliable: it blooms repeatedly, resists disease, and reaches 15 to 20 feet in zones 4 through 9. Bare-root plants cost $25 to $45 each. For a 10×10 ft pergola, plant two to three roses spaced 8 feet apart. Full coverage takes two to three years.
‘Zephirine Drouhin’ is a thornless variety — much easier to prune. It works in zones 5 through 9 and is the better pick for any pergola with a walkway underneath.
Run 12-gauge galvanized wire along the posts and beams at 18-inch intervals. Train new canes horizontally rather than upright — this triggers far more lateral flowering shoots. Tie canes loosely with garden twine, not zip ties. Roses grow in diameter each season. A hard tie girdles the stem before you notice it’s happened.
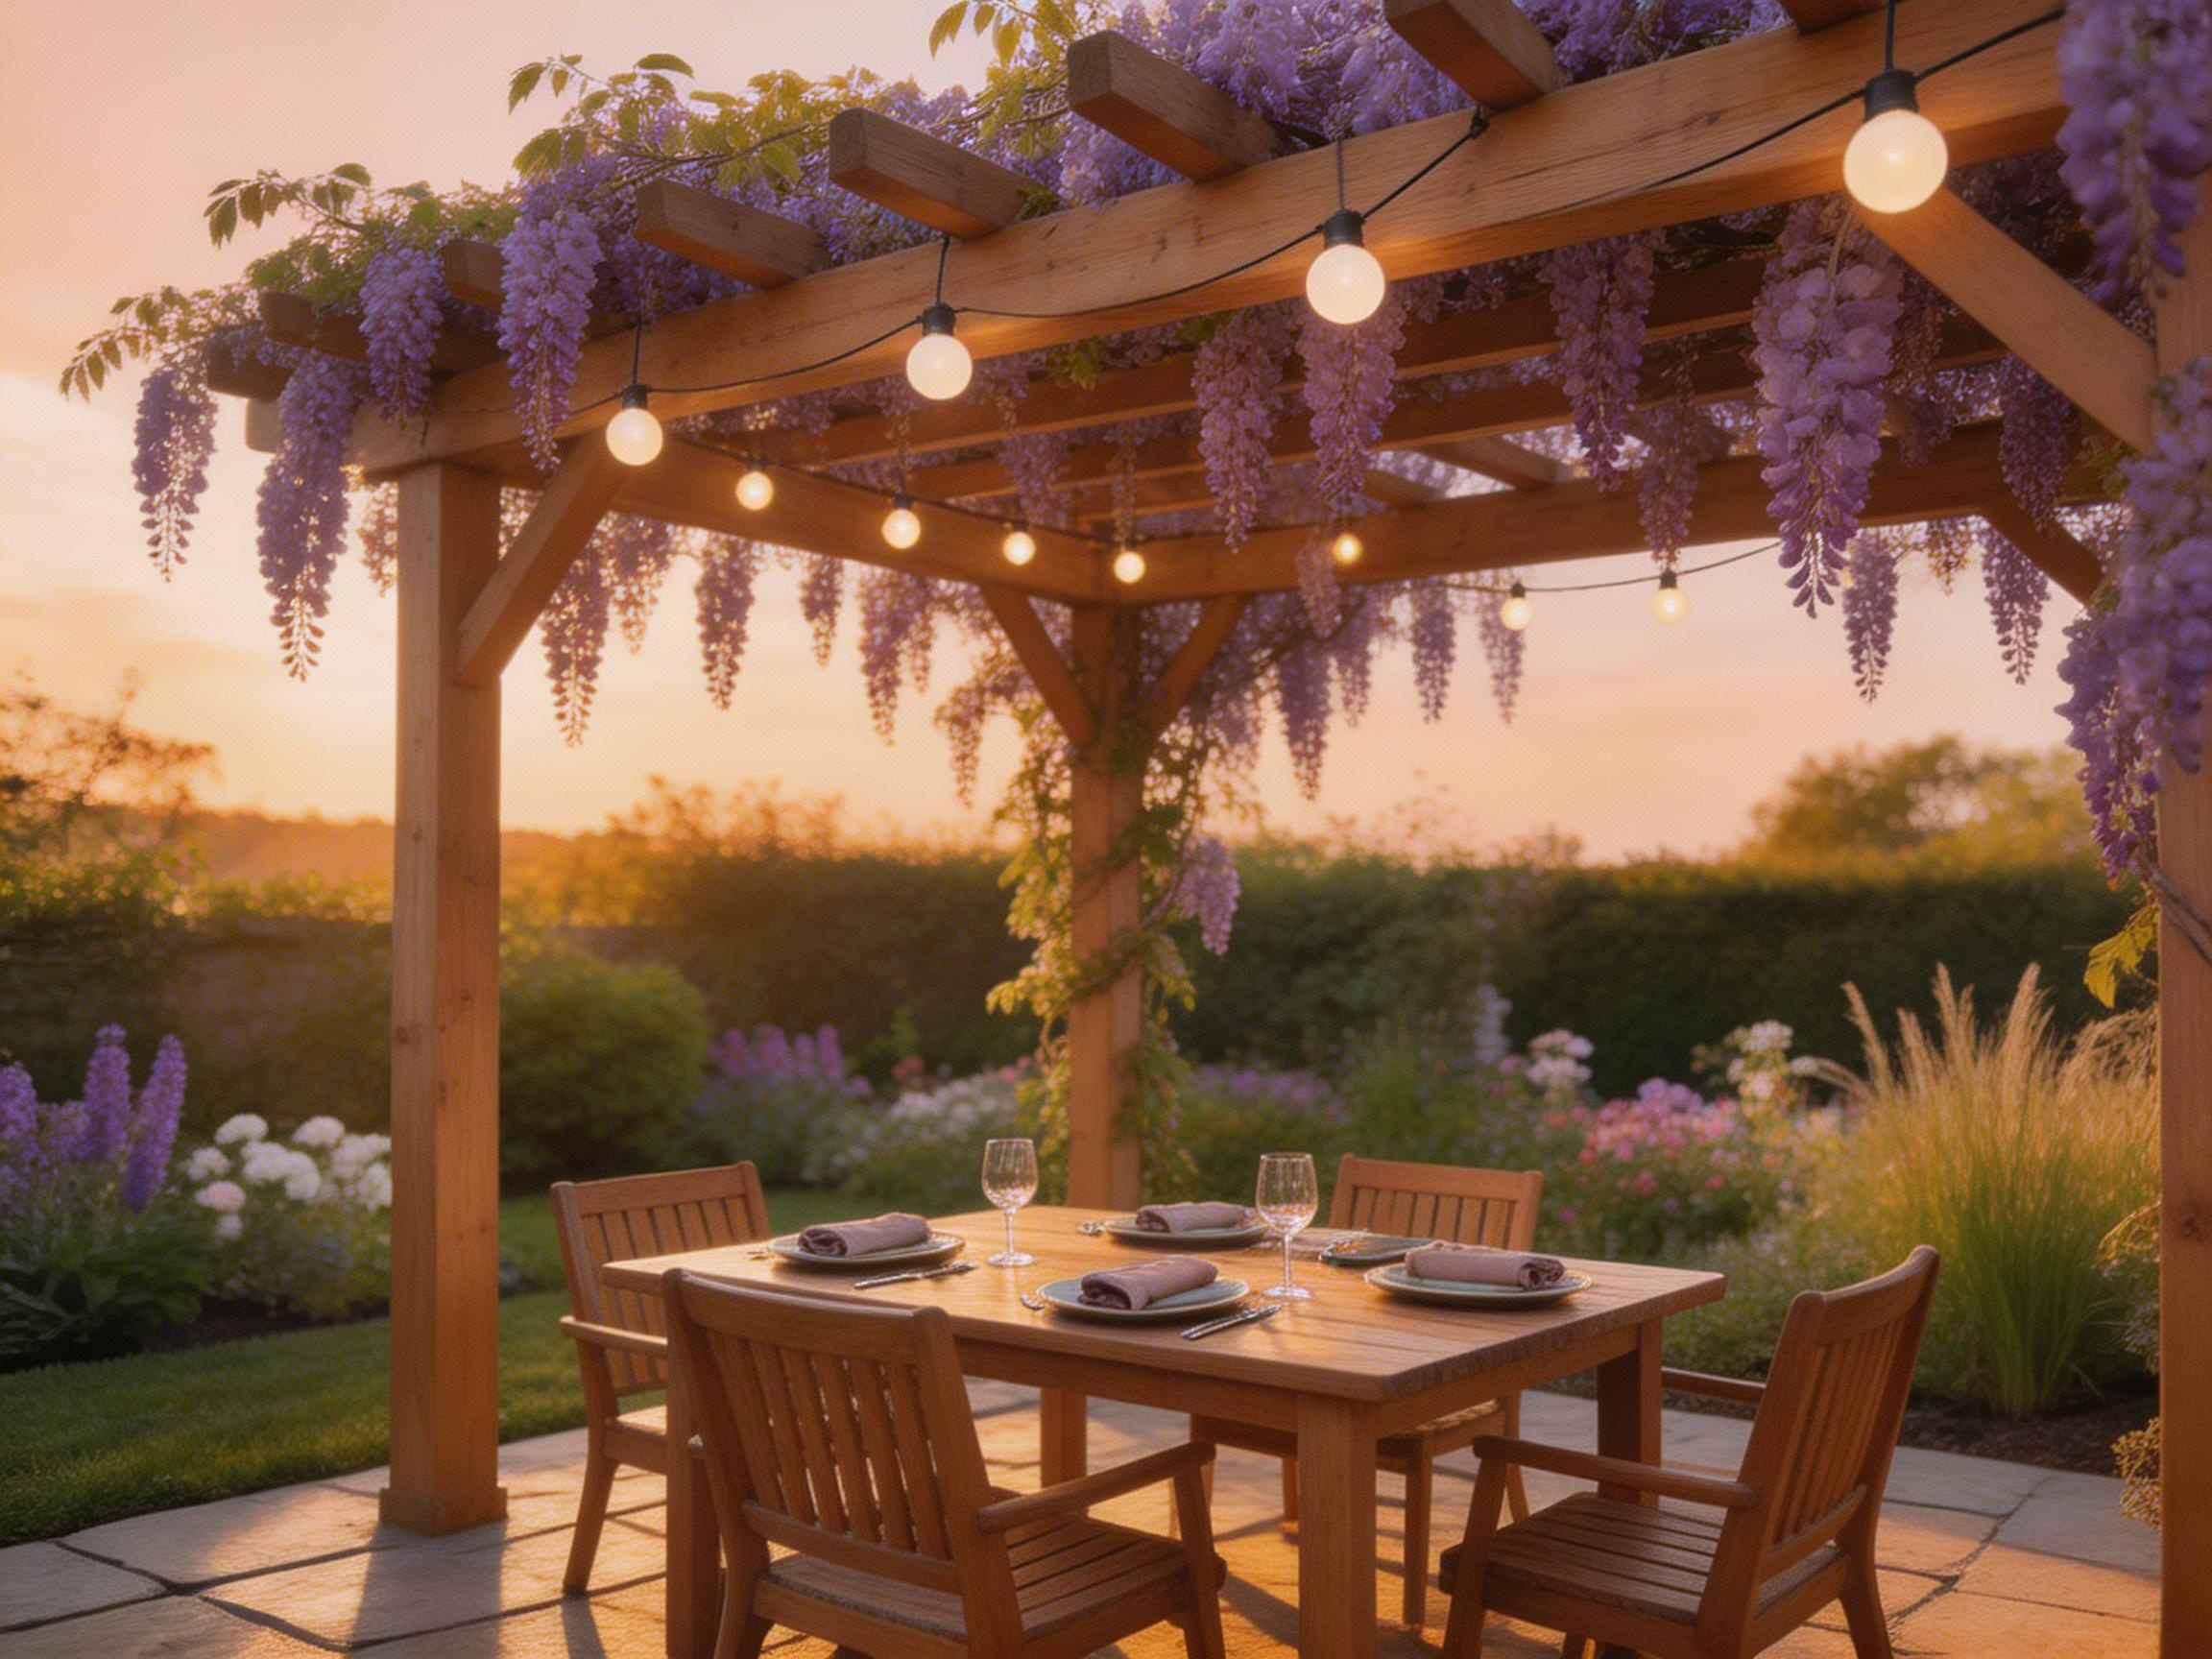
String lights transform a pergola more quickly than almost any other addition. The key is the criss-cross pattern — strands running diagonally from corner to corner, spaced 18 to 24 inches apart. The whole overhead plane glows. It makes the space feel finished at night in a way that nothing else does.
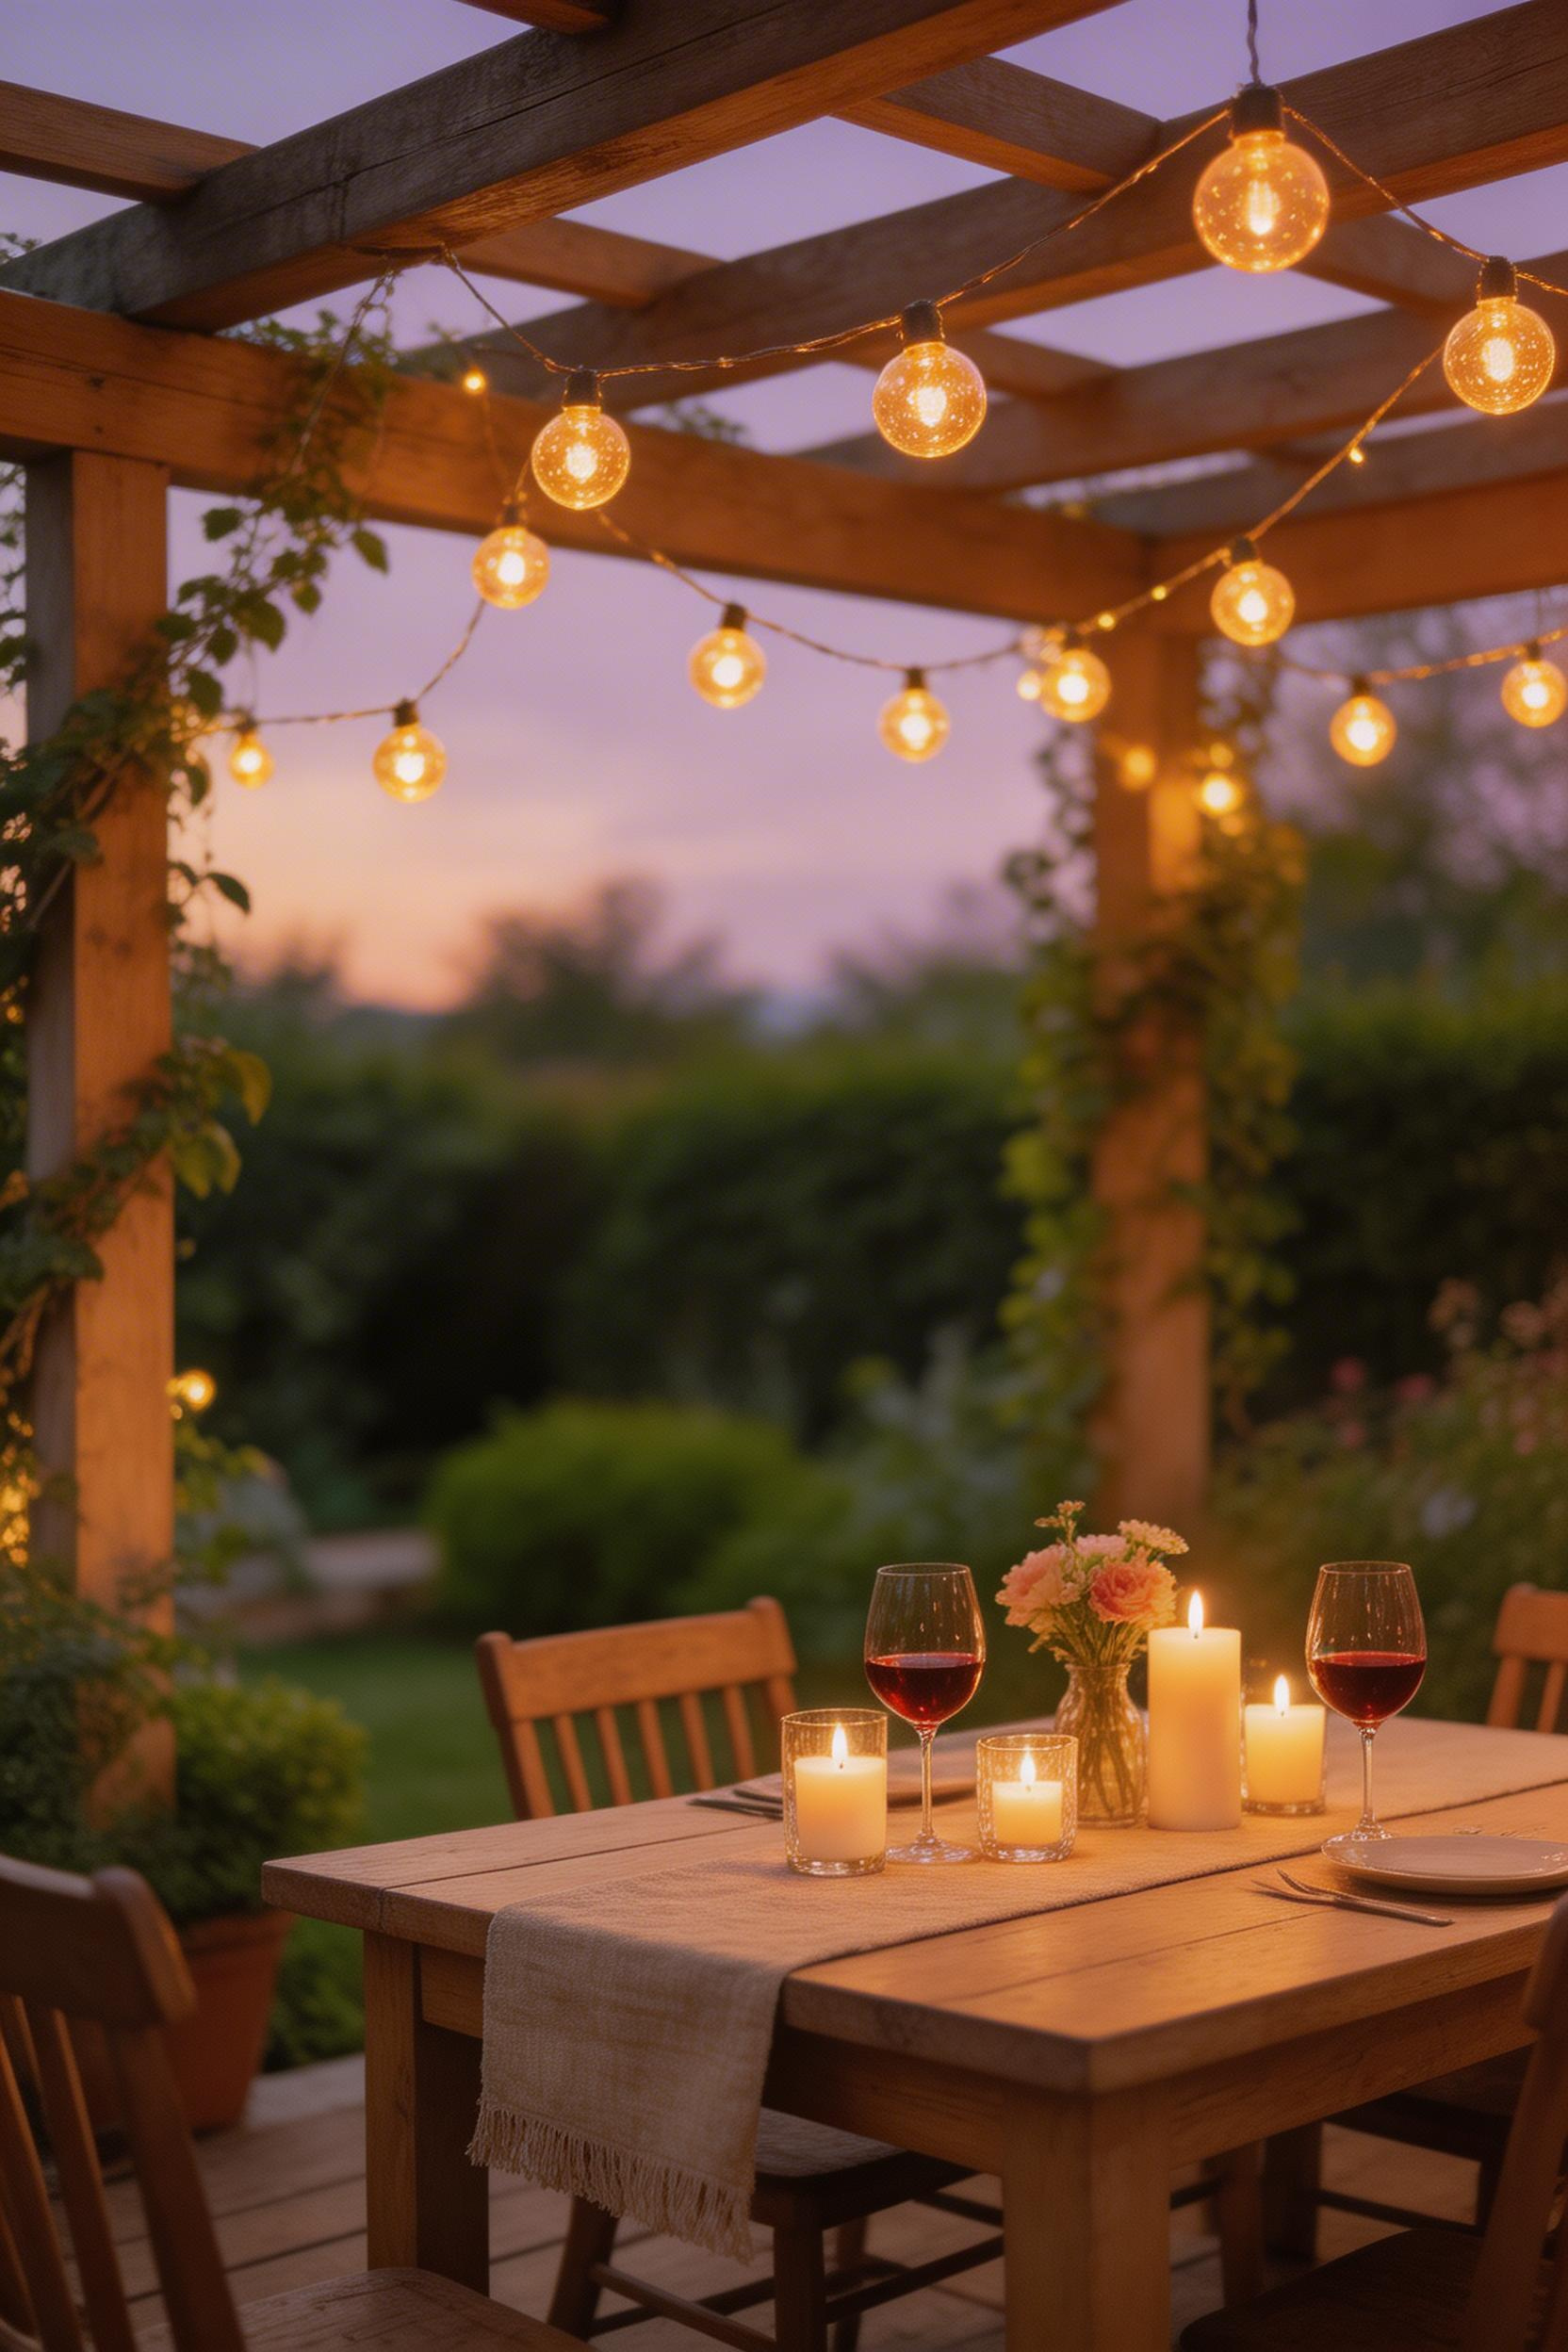
Brightech Ambiance Pro string lights are consistently the top pick: G40 globe bulbs, 48 feet, IP44 waterproof, warm white at 2,200K. A 48-foot strand costs $35 to $45. For a 12×12 ft pergola, one strand covers one criss-cross pass. Larger pergolas need two to three strands or a longer 100-foot commercial option at $120 to $180.
Color temperature matters. Stay at 2,200K to 2,700K (warm white). Avoid cool white or daylight bulbs — they flatten the outdoor atmosphere. Run a 16-gauge galvanized guide wire from post to post first. Clip the string lights to the guide wire. The lights carry no tension load, stop vibrating loose in wind, and last much longer.
Curtain panels change the feel of a pergola from open structure to outdoor room. They create enclosure without blocking airflow. When the breeze moves through them, the space comes alive.
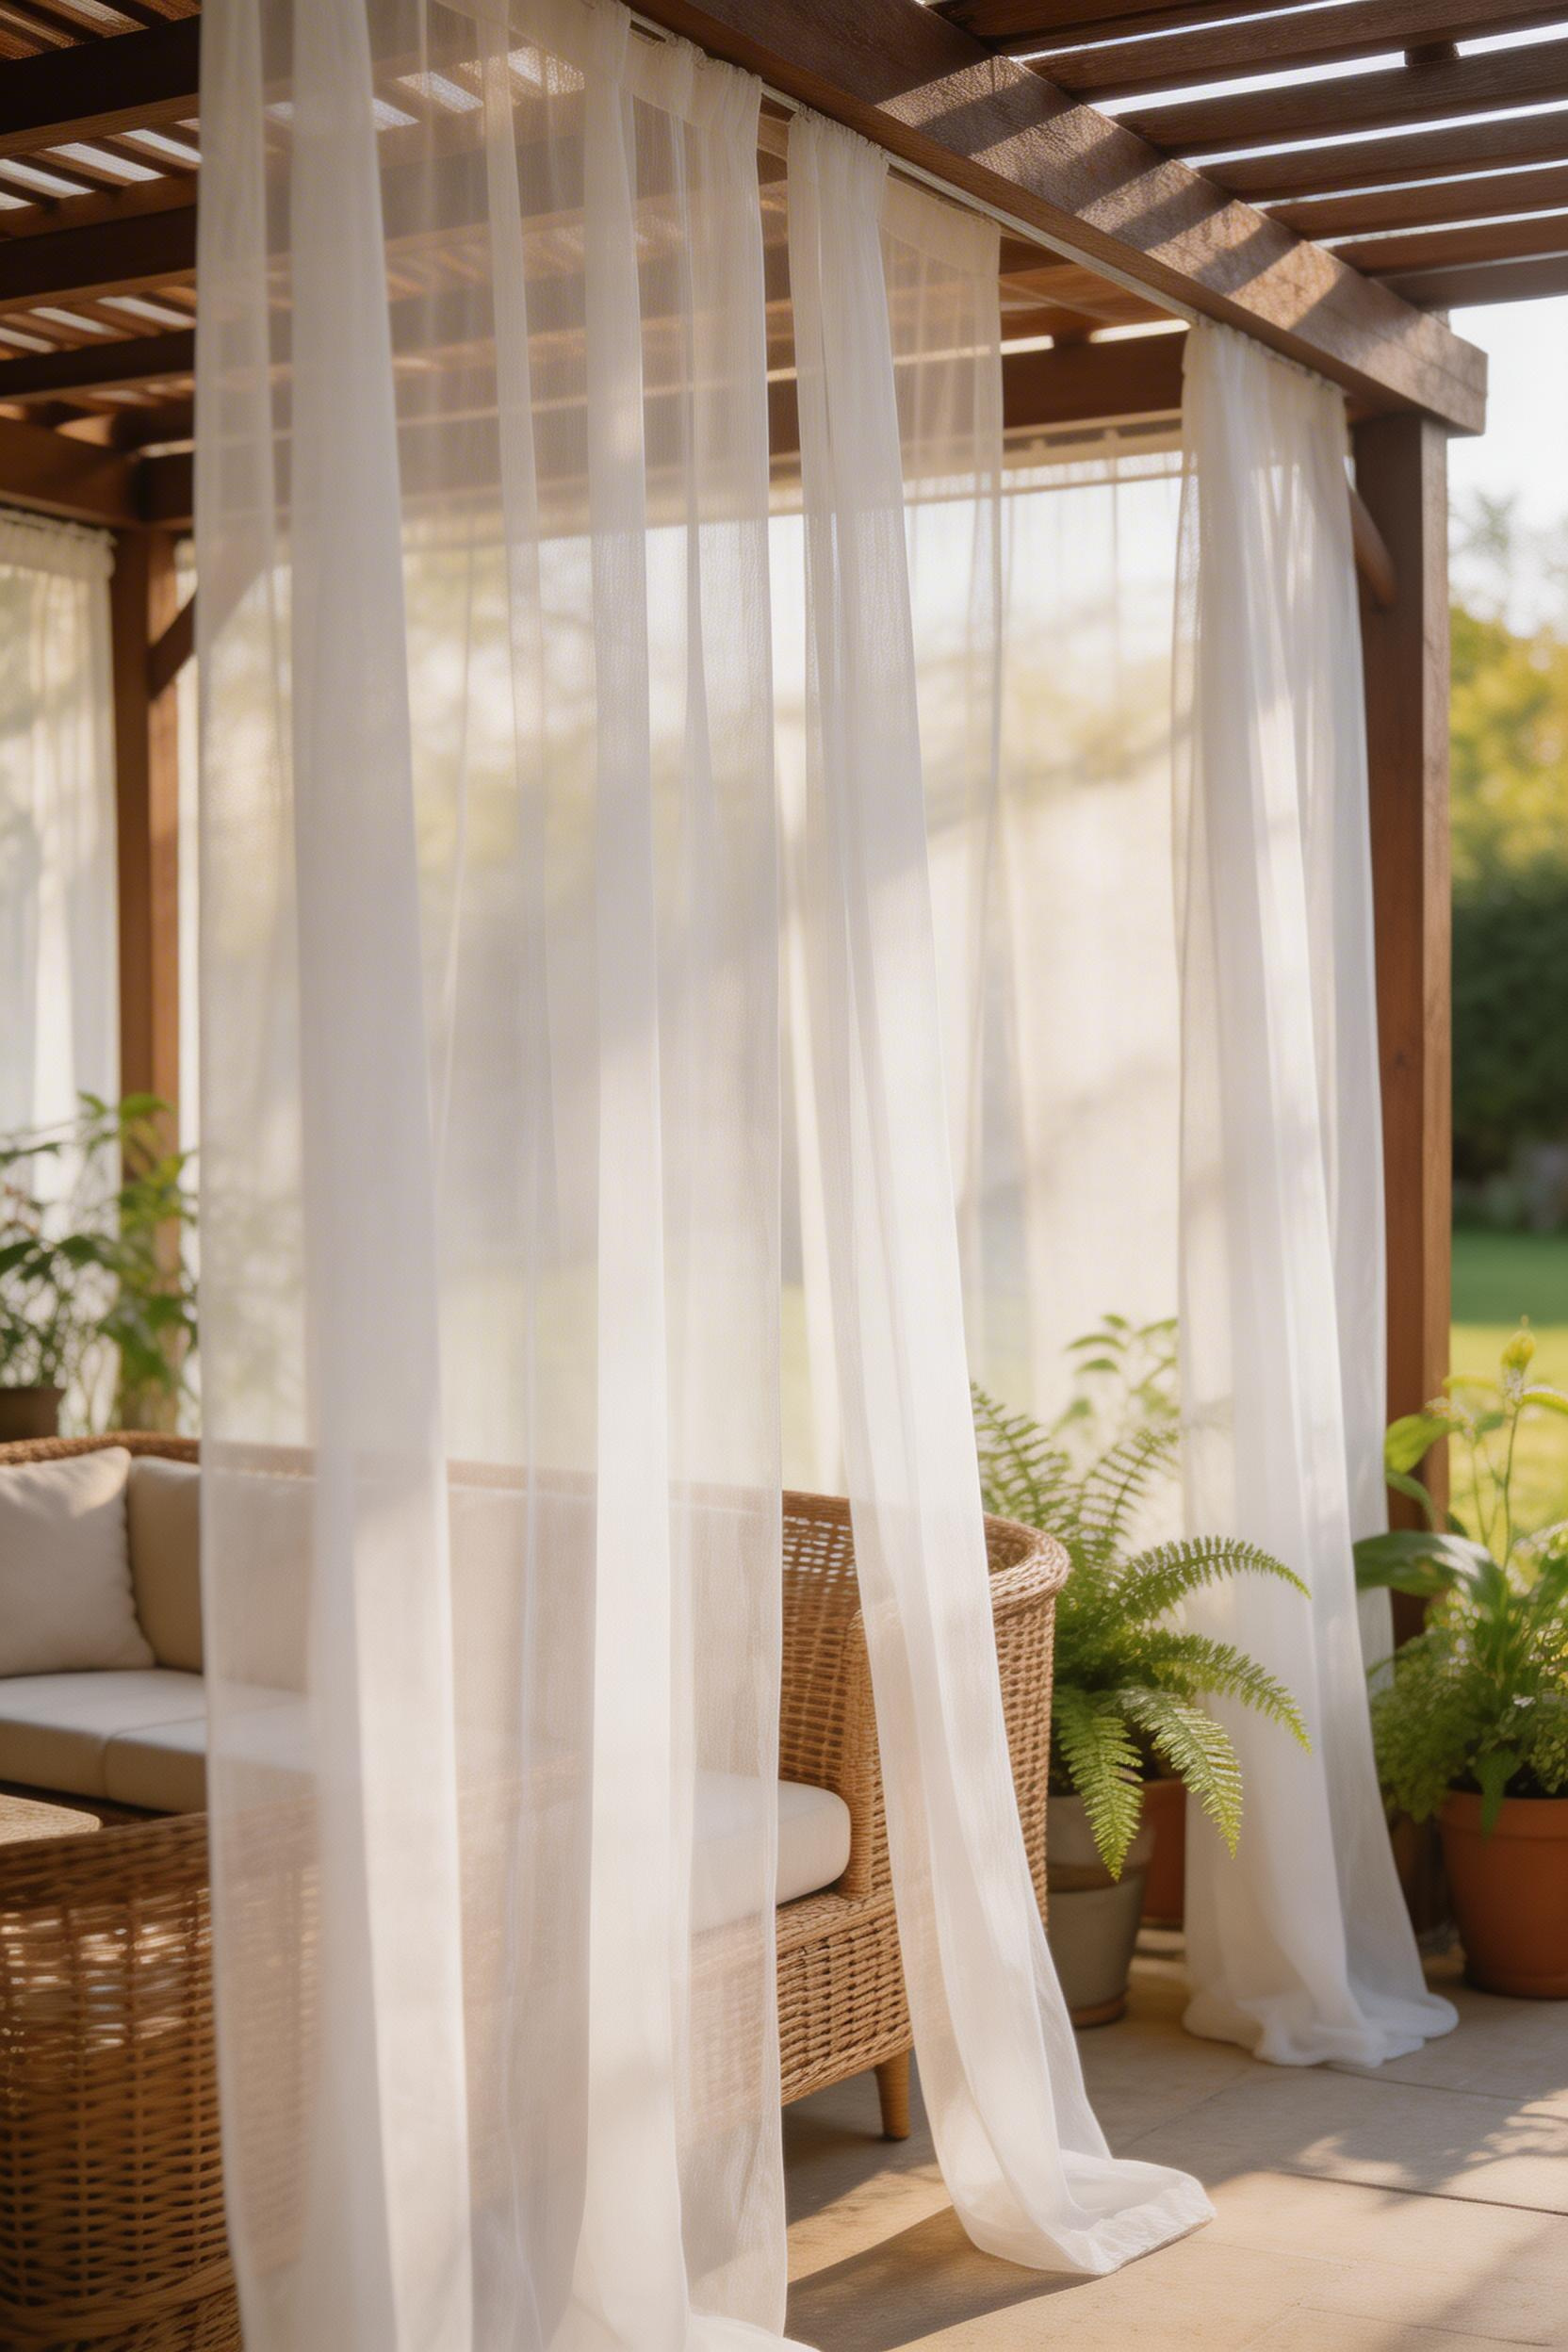
Sunbrella acrylic fabric is the best outdoor choice — it fades very slowly and cleans easily. Buying it by the yard and hemming it runs $8 to $12 per yard. For most budgets, IKEA VILDKAPRIFOL panels ($19.99 each) work well in moderate climates. Deconovo polyester grommet panels ($28 to $45 per two-panel set) come in 50+ colors and are widely available.
For 8-foot pergola posts, use 96-inch panels. Avoid cotton or linen outdoors — they rot within one rainy season.
Thread grommets onto 3/4-inch EMT electrical conduit held between post-mounted brackets. This looks cleaner than tension rods and costs under $5 per foot. To stop panels blowing up in wind, sew a deep hem in the bottom 6 to 8 inches and slide a 12-inch steel rod inside each panel hem. The weight keeps the fabric hanging straight even in a stiff breeze.
Cedar is the preferred wood for a patio pergola because it contains natural oils that resist rot and insects without chemicals. A properly sealed cedar frame lasts 20 to 30 years. It costs more than pressure-treated pine — but if you’re staying in the house, it’s worth it.
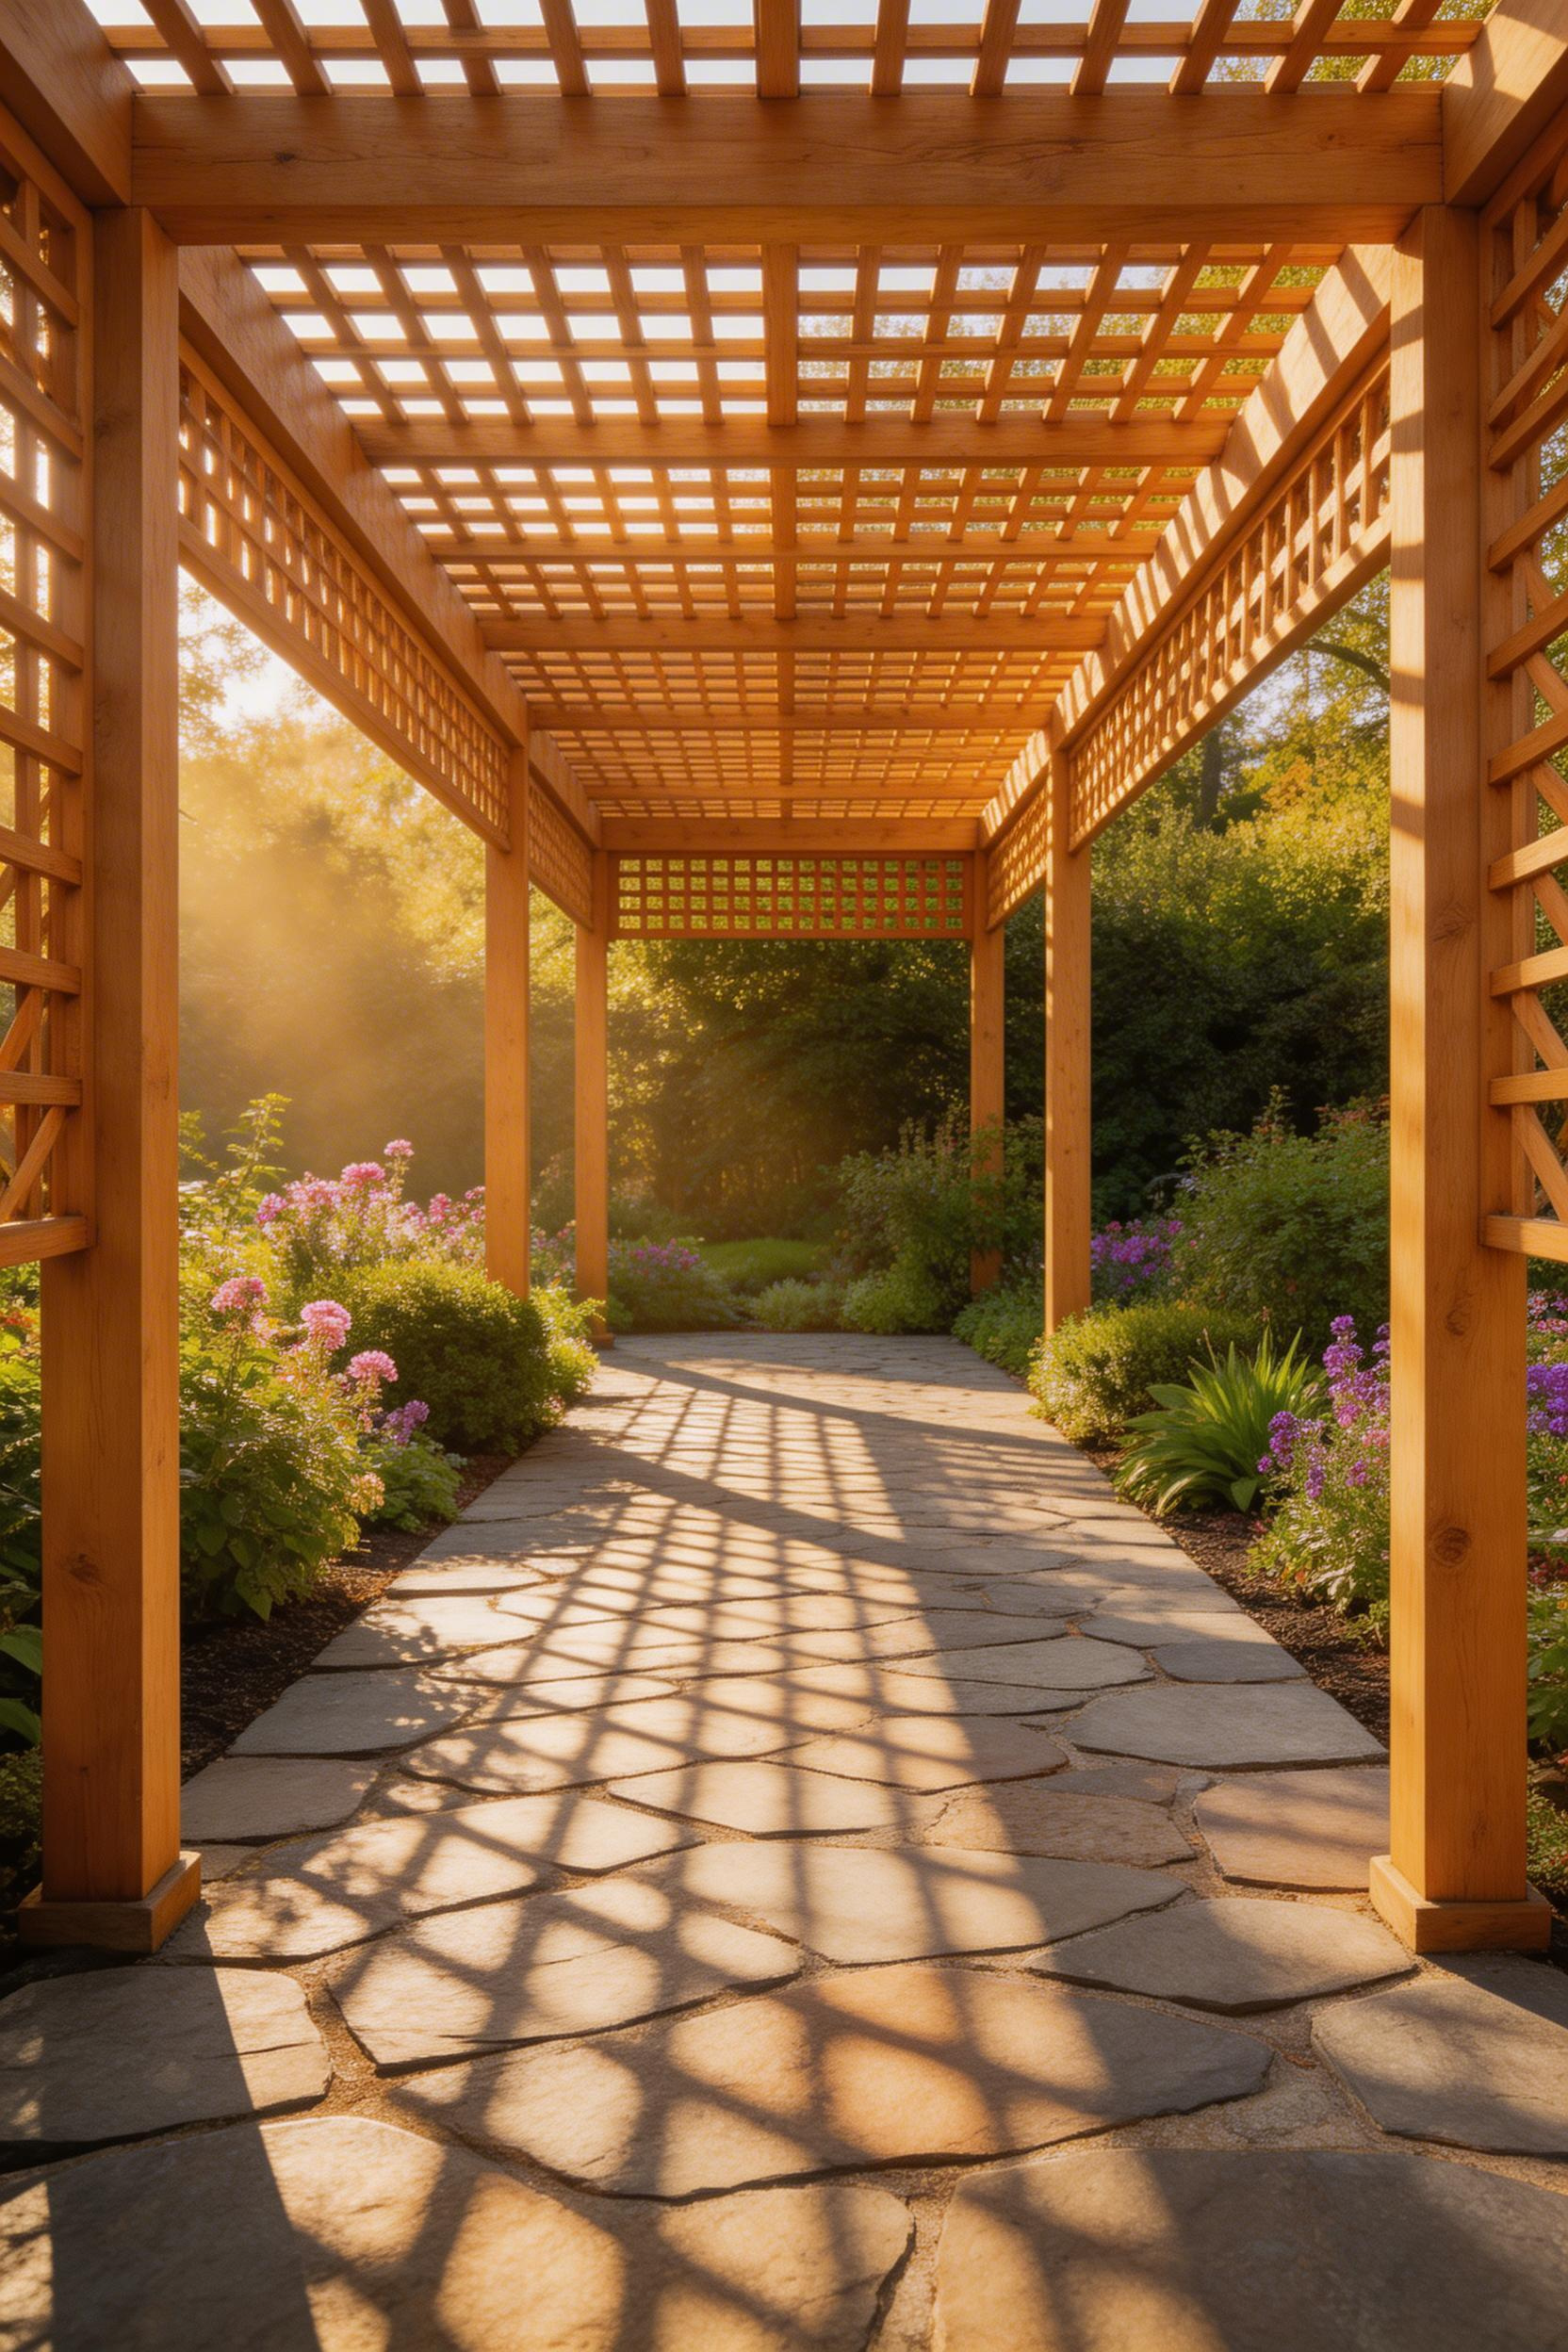
Rafters spaced 12 to 16 inches on center give you filtered shade during the day. Airflow stays open. The space doesn’t feel closed in. If you want weather protection, shade sails (item 7) or polycarbonate panels (item 18) slot between the rafters without changing the structure.
For a deck or patio transformation, a cedar pergola is the best single addition. It gives the whole area a defined focal point that plants and furniture alone can’t create.
Apply Thompson’s WaterSeal Waterproofing Stain in a natural cedar tint within two weeks of installation. Once cedar weathers to silver-gray, stain doesn’t penetrate as well. A gallon costs about $27 and covers 200 square feet. Re-seal annually in early spring.
Pre-cut cedar kits from Cedarshed or Backyard Discovery (available at Home Depot) run $800 to $1,200 for a 10×10 ft kit. A 12×16 ft version with all hardware costs $1,800 to $3,500. Two people with basic carpentry skills can build a 10×10 kit in one day on a prepared surface.
Fixed benches along the interior walls of a pergola do two things at once. They eliminate the need for freestanding chairs. And they provide weatherproof storage for cushions, throws, and outdoor equipment underneath each seat.
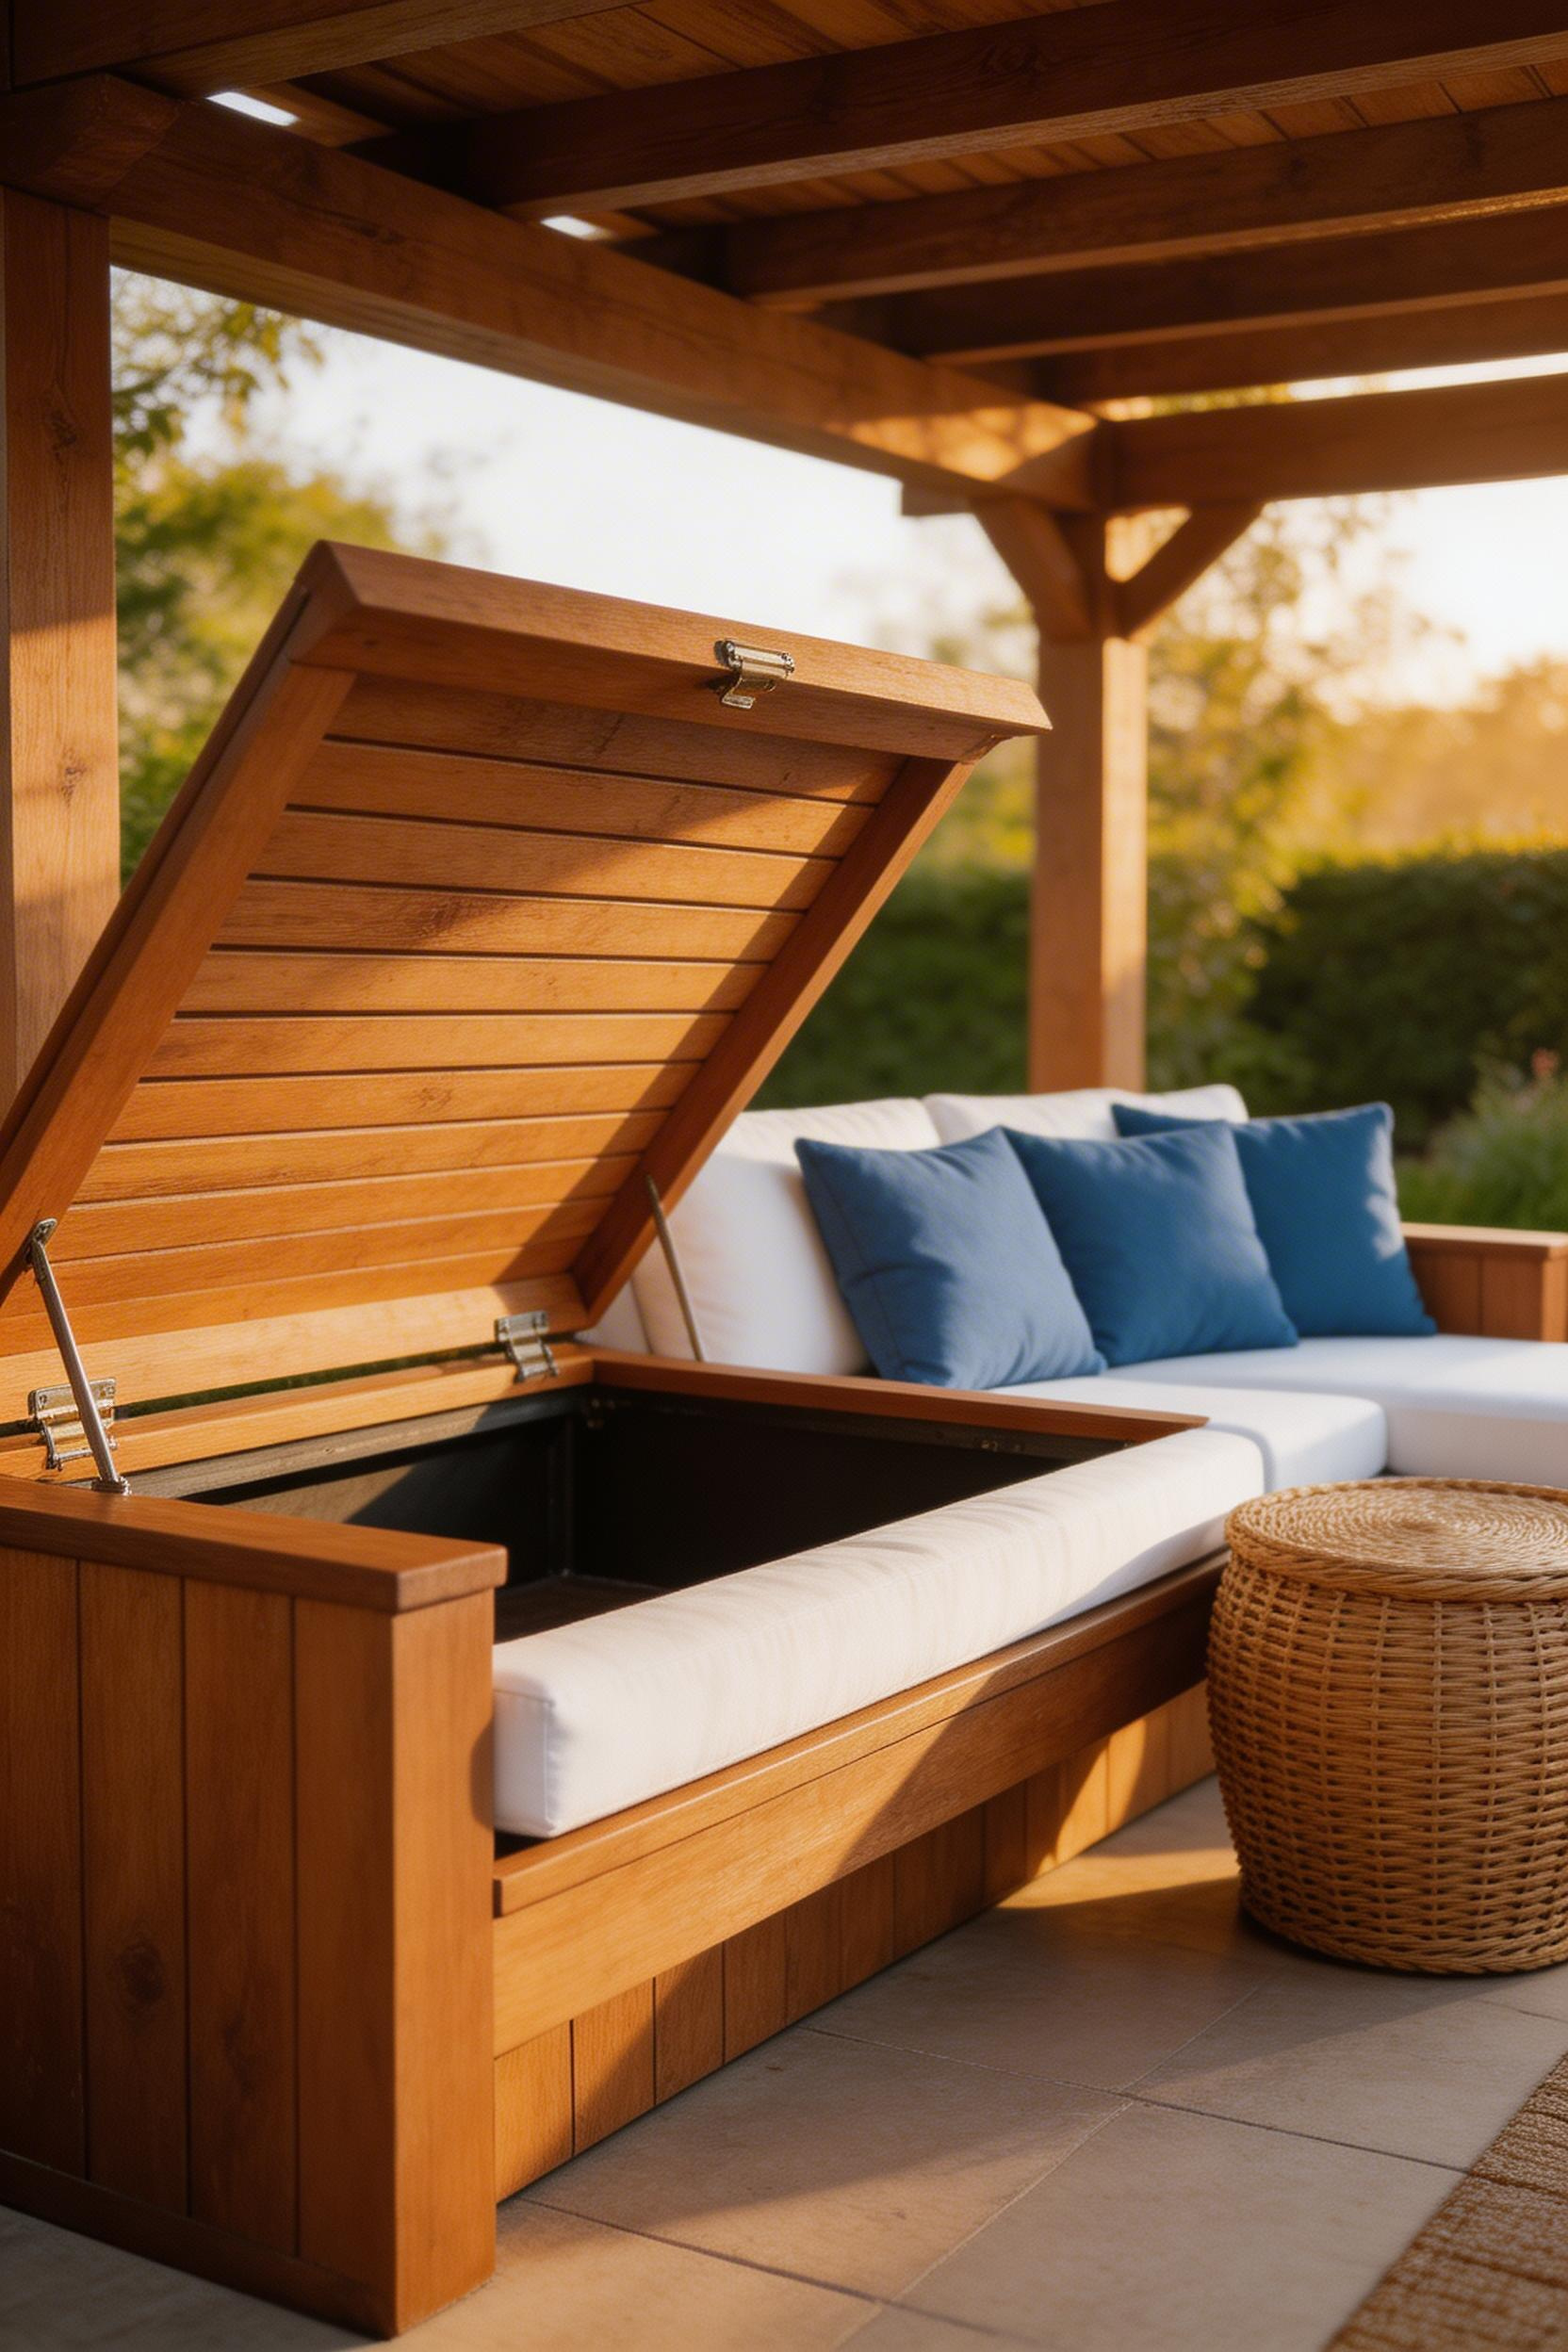
Standard bench height is 17 to 19 inches. Seat depth should be 18 to 20 inches. An L-shaped or U-shaped layout runs along two or three interior walls and creates a natural conversation zone. Just as living room layouts work best when every seat faces the center, outdoor bench seating should orient toward the middle of the pergola footprint.
Outdoor foam at 1.9 lb density is the minimum. At 2.5 lb density, it holds its shape longer under heavy use. A custom-cut slab runs $45 to $80. Cover the foam in Sunbrella or UV-resistant polyester fabric — both resist mold and fade when allowed to dry between uses.
For the storage box, build from 3/4-inch exterior-grade BCX plywood. Drill 1/2-inch drainage holes in the base every 12 inches. Line the interior with a 3-mil pond liner from a garden center — about $12. It’s completely waterproof. Use stainless steel piano hinges on the lid so it holds itself open while you’re loading and unloading.
String lights handle ambient glow. Lanterns add something different: pools of warm light at eye level that create distinct zones within the pergola. Mix candle lanterns, solar lanterns, and wired pendants at varying heights for the most interesting effect.

Hang the lowest lantern at 5 feet, the middle at 6.5 feet, the tallest at 7 feet. Use three or five lanterns — odd numbers look more natural than even groups. Mix materials: rattan, black metal, amber glass. The variety keeps the eye moving without looking chaotic.
Wrap 6 inches of jute twine around each hanging wire — it hides the hardware and ties the look in with other natural materials on the patio. It costs almost nothing and makes a visible difference in how finished the cluster looks.
Hampton Bay’s Jonquin outdoor pendant ($49 at Home Depot) is a solid wired option if you have a junction box on the pergola beam. Enbrighten solar lanterns ($28 each) require no wiring and run through a full evening on a single charge. Use outdoor S-hooks and shepherd’s crook hooks rated for at least 15 lbs at each attachment point — cheap hardware vibrates loose in wind and the whole cluster comes down.
Not all lanterns sold as “outdoor” are actually weather-resistant. Painted tin rusts within one season in humid climates. Look for powder-coated steel, galvanized iron, or natural rattan. Rattan weathers to a deeper honey tone over time rather than degrading. Candles inside rattan lanterns create a warm, dappled light pattern that looks completely different from electric options. Keep a supply of long-burn pillar candles on hand for evenings when you want the space to feel more atmospheric than practical.
Shade sails threaded through the rafters of a pergola patio solve the shade problem without closing in the space. The geometric shapes — triangles, rectangles — add a graphic modern quality. Choose deep navy, charcoal, or terracotta for a look that reads as a design feature rather than a practical afterthought.
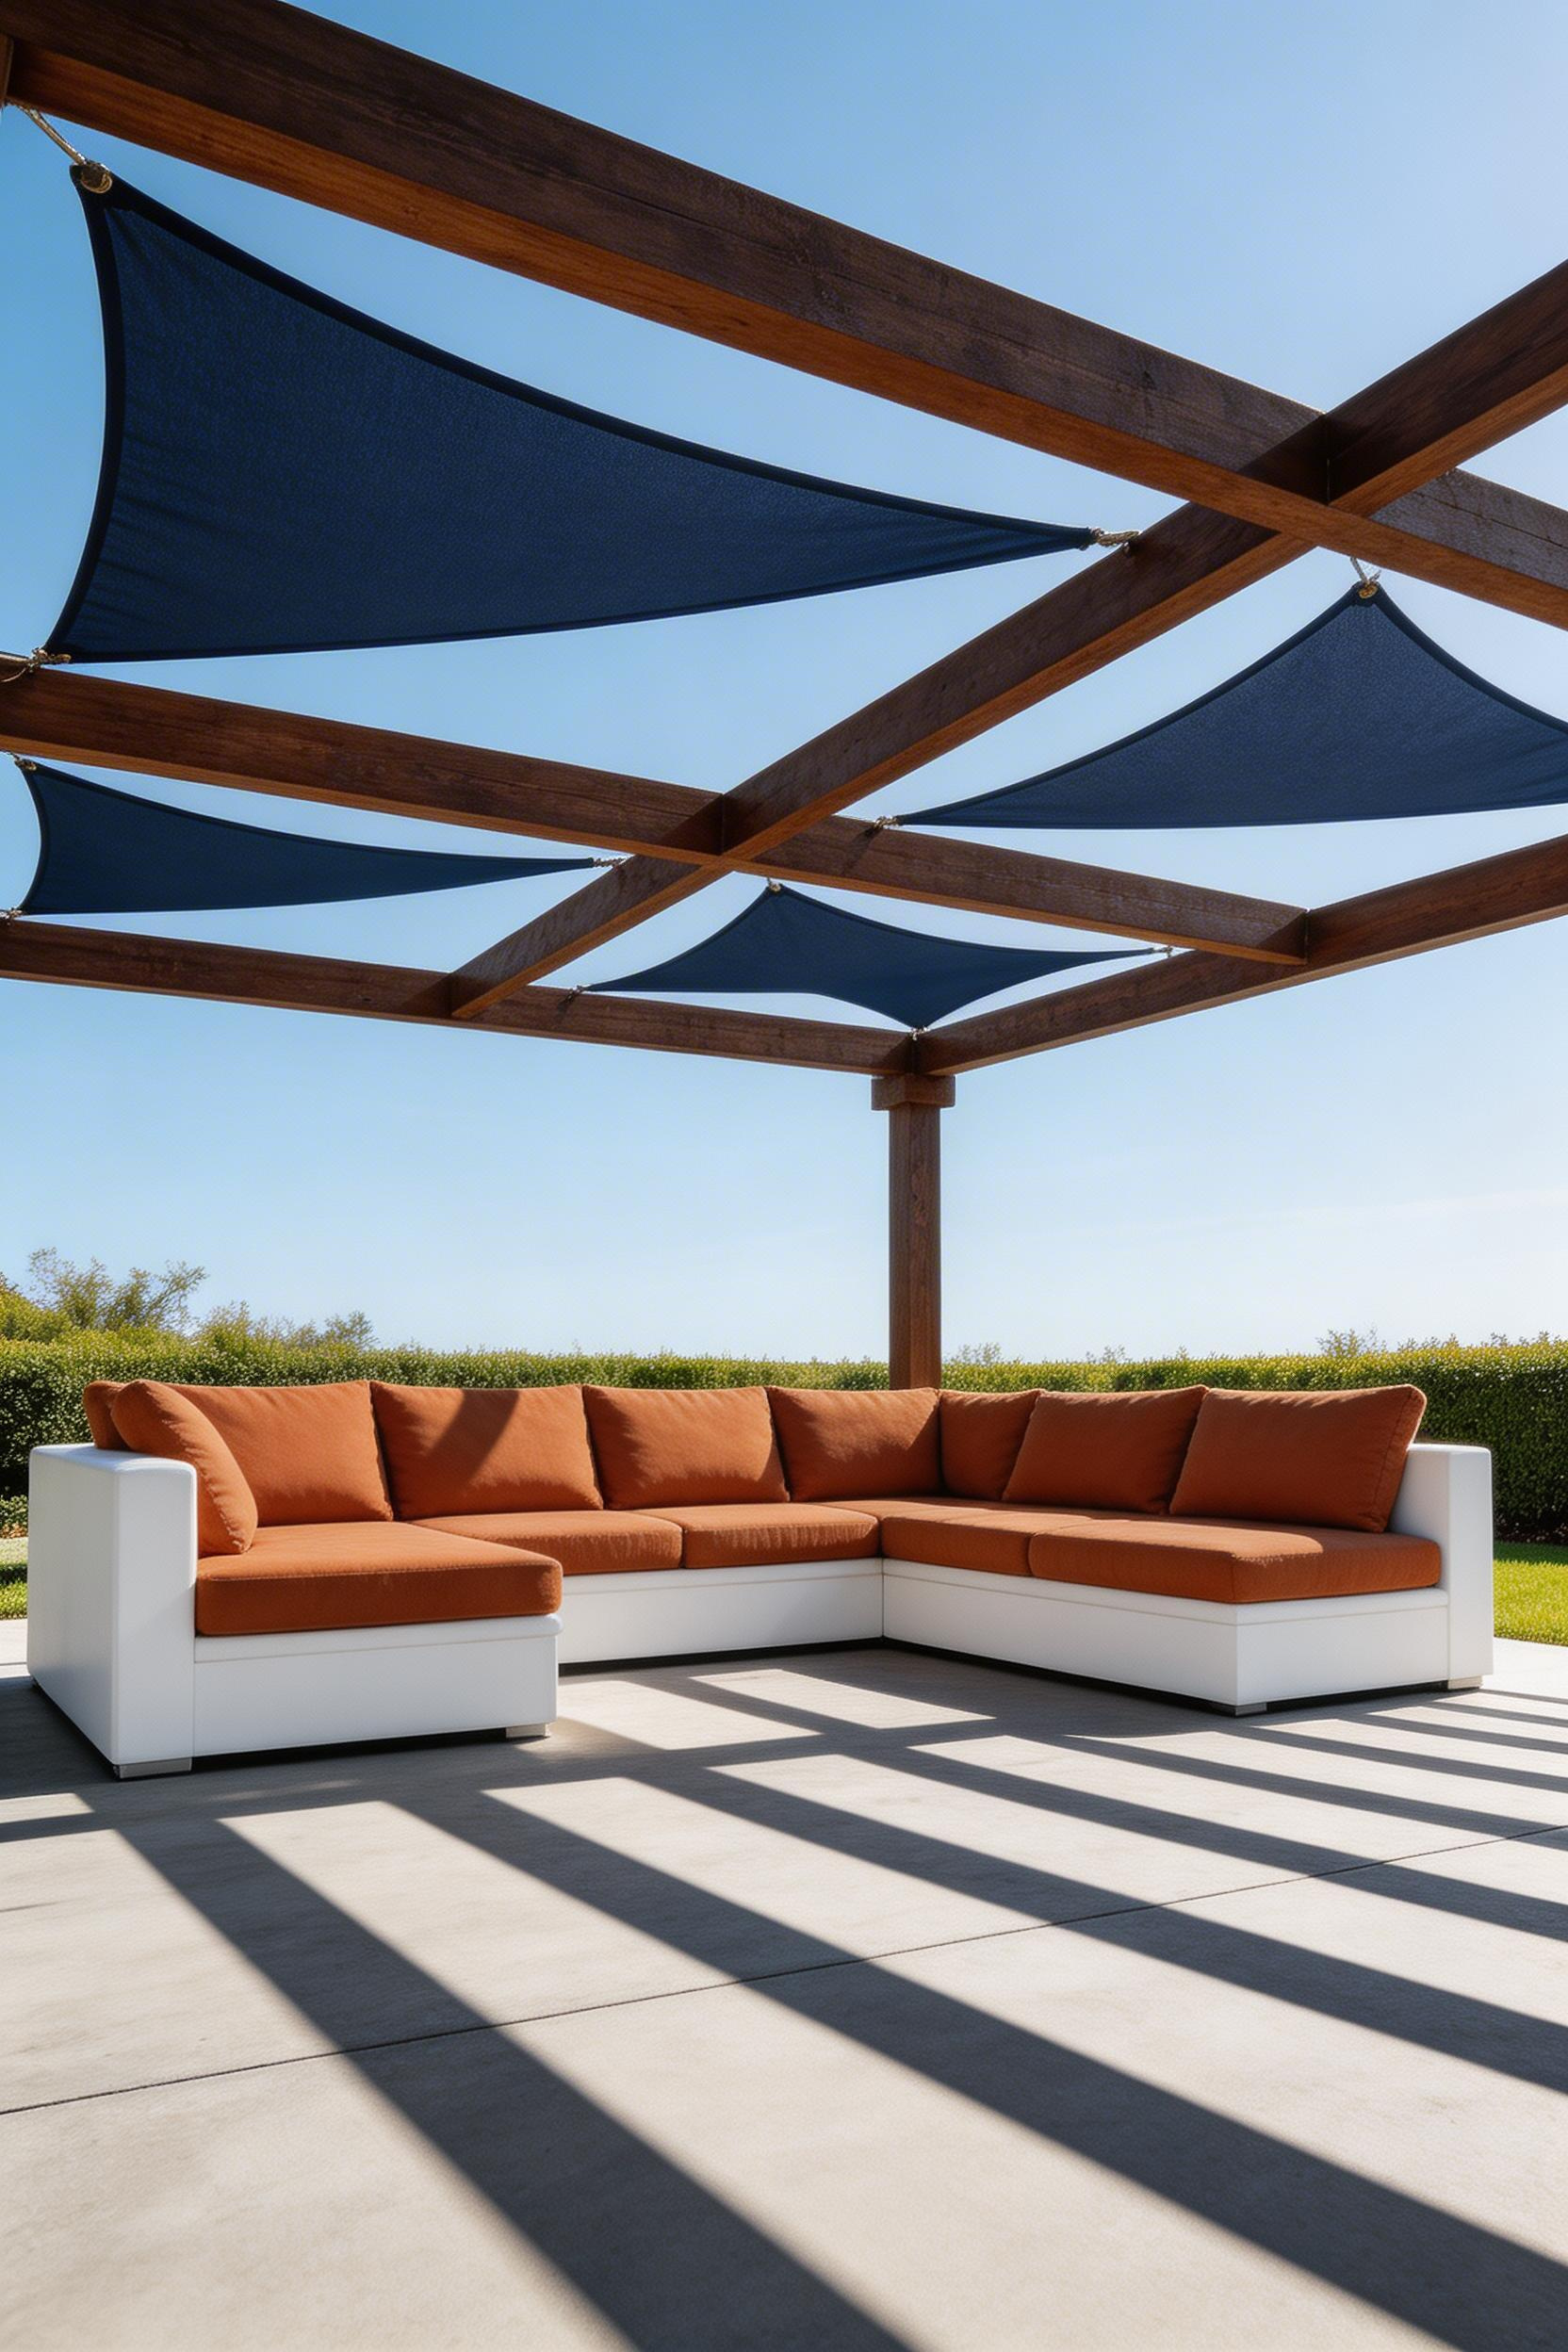
HDPE (high-density polyethylene) woven mesh is the best material. Coolaroo’s Ready-To-Hang triangle (12-foot sides, UPF 50+) costs $49 and blocks 90% of UV radiation while letting air through. Attach corner rings to 3/8-inch lag bolts screwed into the pergola beam or post. Install at a 20 to 30-degree angle so rain runs off rather than pooling in the center.
Tension the sail so it shows a slight concave curve — not tight and flat like a trampoline, and not sagging. Loose sails flap in wind, wear at the corners, and eventually tear. Use turnbuckles at each corner so you can adjust tension each spring.
Wisteria in full bloom — three-foot cascading purple panicles hanging through pergola rafters — is genuinely one of the most striking things a garden can produce. It takes patience. But after three to four years, the result is something no kit or canopy can replicate.
Wisteria floribunda ‘Multijuga’ can reach 30 feet. A mature vine adds significant weight to the structure. Ensure pergola posts are minimum 4×4 inches with concrete footings at 24-inch depth. Clematis is a more manageable alternative — it stays lighter (10 to 20 lbs at maturity) and blooms faster than wisteria. Combine Clematis montana for spring coverage with ‘Jackmanii’ for deep purple summer flowers.
Research on 19 Wellness Benefits of a Patio Pergola shows that living plant canopies specifically reduce stress response — which makes the years of establishment feel more justified.
Plant clematis with its crown 2 inches below soil level, not at grade. Clematis wilt (a common fungal condition) can kill the top growth. If the crown is buried, the plant regenerates from below. Without this, wilt means losing the whole plant.
The best use of a 12×12 ft pergola is an outdoor dining room — a full table for six, overhead canopy, rug below, lighting above. A pergola defines the entire overhead plane. An umbrella only covers one circle above the table center. They’re not comparable.
A 6-person table (36×72 inches) needs a minimum 10×12 ft pergola footprint. This gives 36 inches of clearance on all sides when chairs are pulled out. A 12×14 ft pergola is more comfortable. Match your chair height (seat at 17 to 19 inches) to the standard dining table height of 30 inches.
Start the outdoor decor with the rug first, then the table, then lighting above. A polypropylene flatweave in 8×10 size ($89 at Amazon) is fade-resistant and easy to hose off. It gives the dining zone a defined boundary. The rug should extend 24 inches beyond the table edge on all sides so chair legs stay on the rug during dinner.
A patio pergola that backs up to a neighbor’s property won’t feel comfortable if you’re visible from their yard. Privacy screens on one or two sides solve this without requiring a fence permit.
Bamboo reed fence rolls ($25 to $45 per roll) are the most versatile option. They zip-tie to the pergola frame and look intentional rather than improvised. Wood lattice panels (4×8 ft, $18 to $35) give a more structured look. For a fully custom finish, cedar fence boards screwed vertically to a 2×4 frame and attached to the post will match the pergola’s wood tone exactly.
Screen one or two sides that face neighbors. Leave at least one side fully open for airflow. Just as a small bedroom layout works best when one defining element creates privacy without shrinking the space, a single well-placed screen does more than partial screens everywhere.
Large planters at each corner post ground the whole structure visually. They connect the pergola to the garden and add seasonal interest without permanent planting.
Clipped boxwood balls are the safest year-round choice. They’re evergreen, low-maintenance, and look deliberate. A 12-inch diameter ball in a 16-inch planter costs $35 to $65. Lemon cypress gives a more upright silhouette for zones 7 to 11 ($25 to $45 for a 3-gallon pot). For seasonal interest, swap in a lollipop standard rose for spring, sweet potato vine for summer trailing color, or tall ornamental grass in autumn.
Choose self-watering fiberglass planters over terracotta for pergola posts. They’re lighter, don’t crack in freezing temperatures, and maintain soil moisture in full sun without daily watering. A 16-inch self-watering planter from Lechuza or Crescent Garden runs $45 to $85. The reservoir at the base holds enough water for 1 to 2 weeks in summer depending on the plant. That makes a real difference for planters in sunny spots that are easy to neglect during a busy week. In cooler climates, move fiberglass planters indoors for winter or leave them in place — they handle frost without the cracking risk that comes with terracotta or glazed ceramic at temperatures below 20°F.
If your home has a contemporary exterior — dark siding, large windows, minimal landscaping — a powder-coated black steel patio pergola reads far better than a traditional wood kit. The contrast is deliberate: dark frame, pale concrete, white cushions, terracotta pots. It looks designed, not assembled from stock.
PURPLE LEAF makes one of the most popular steel pergola kits. Their 12×20 ft model with a powder-coated aluminum frame and adjustable louvered roof runs about $1,200. Outsunny offers smaller 10×12 ft louvered kits at $600 to $900. Assembly takes two people four to six hours with a power drill. The louvered roof is worth the upgrade — you can adjust exactly how much sun enters at any time of day.
Keep the surrounding styling simple. White or cream cushions, raw wood accents (a teak table, cedar side table), and structural plants in terracotta (olive trees, agave) work well together. Busy patterns compete with the frame. The dark steel is the statement — everything else supports it.
A hammock slung between two pergola posts, swaying under wisteria or a shade sail, is one of the most compelling arguments for spending time outside. For families, a porch swing chair hung from a single beam gives the rocking motion without needing two good hanging points.
Use 5/16-inch lag eye bolts with appropriate working load ratings. Screw at least 3.5 inches into solid beam face grain — not end grain, which pulls out far more easily. For a double hammock with a 400 to 500 lb capacity, the hanging point must handle both the static weight and the bounce load. For a porch swing chair, use a ceiling mount rated for 500 lbs. The seat should hang 17 to 19 inches above the patio surface with 18 inches of clearance on either side.
A Vivere double Mayan hammock ($45 to $65) is comfortable and reliable. Mayan net-style hammocks without spreader bars conform to the body better than bar-spread versions for extended use. The net distributes weight more evenly across the whole back rather than concentrating it at the shoulder and hip contact points. For a spreader bar hammock with a more traditional look, Hatteras Hammocks makes solid cotton options at $80 to $140. Either way, plan to bring the hammock inside over winter or store it in the built-in bench storage (item 5) — even UV-rated cotton degrades faster than most manufacturers acknowledge when left exposed through freeze-thaw cycles.
Textiles are what turn a patio pergola from a structure into a room. A large outdoor rug sets the scale. A smaller layered rug adds depth. Outdoor throws piled on seating add warmth. The key is choosing materials that survive sun, moisture, and rain.
For a 12×12 ft pergola, an 8×10 rug is the minimum. Anything smaller makes the space feel underdone. Polypropylene is the best outdoor rug material. It doesn’t absorb water, resists fading for three to five years in direct sun, and cleans with a garden hose. nuLOOM, Safavieh, and Ruggable all make quality options at $80 to $350 for an 8×10.
Layer a smaller flatweave or kilim-style rug on top, positioned under the coffee table or in the conversational center. The contrast in texture and pattern creates visual interest. For throws, avoid cotton outdoors — it takes hours to dry after rain. Choose 100% acrylic or tightly woven recycled polyester. Both dry quickly and resist mildew.
Solar fairy lights are the lowest-effort lighting addition you can make to a patio pergola. No wiring. No extension cord. No outlet needed. Thread the strand through the rafters, clip the solar panel to a sun-facing beam, and the lights come on automatically at dusk each evening.
Brightech’s Ambiance Pro solar string lights are a reliable pick: IP65 waterproof, 200 LEDs, 48 feet, warm white at 2,700K, about $45 each. For a larger pergola, two strands in parallel rows give even coverage. Run time is 8 to 12 hours on a full charge.
Position the solar panel where it gets 6 hours of direct sun per day. The most common mistake is placing the panel in the shade of the pergola itself. Attach it above the rafter line or on an exterior post face that catches south or west exposure. A poorly charged panel gives you two to three hours of light instead of eight to twelve. In winter months, remove the strand and store it coiled — the solar controller can be damaged by sustained freezing when the panel is depleted, and the LED connectors fail faster through repeated freeze-thaw cycles if left outside. Most solar fairy light kits include a twist-off connector between the strand and the panel, which makes this a 30-second job rather than an afternoon project. Store the strand in a single loose coil and it will last three to five years rather than one or two.
A bar or serving station built into the pergola means you never have to go back inside during outdoor entertaining. Drinks, ice, glasses, and everything else is right there. A fold-down shelf on one post costs almost nothing and adds enormous practical value.

IKEA APPLARO wall section with shelf ($99, designed for outdoor use) attaches directly to a 4×4 or 6×6 post with lag screws. Folded flat, it adds almost no footprint. Folded down, it gives you 24 inches of bar surface. Seal cut edges with exterior wood sealant. For a budget version, a 1×10 pine board sealed with exterior polyurethane on two heavy-duty shelf brackets costs under $30.
For outdoor glassware, use polycarbonate or acrylic instead of glass — shatterproof and nearly indistinguishable in photographs. For budget-conscious outdoor entertaining, the same principles from kitchen decor on a budget apply outdoors: invest in one good focal point, then fill in with affordable basics.
Most people stop using their patio pergola in October. A patio heater changes that. In mild climates, a propane heater on a cool evening means you’re outside at 10pm in sweaters — which is better than being inside.

Freestanding propane heaters need 3 feet of clearance on all sides and 7 feet of vertical clearance to the nearest overhead structure. Measure from the top of the heater mushroom cap to the bottom rafter. Position the heater at the pergola perimeter — not directly under the lattice. AZ Patio Heaters pyramid-style models (46,000 BTU, $120 to $180) have an enclosed flame visible through glass rather than an exposed one, which makes them the better choice for pergola use.
For wood-burning fire pits, the minimum distance from any combustible material including wooden posts is 10 feet. A spark screen mesh is not optional.
Polycarbonate panel inserts or retractable canopy kits give a patio pergola a weatherproof roof without the look of a tarp. They slot between rafters and transmit light while blocking rain. The result is an outdoor room that works in any weather.
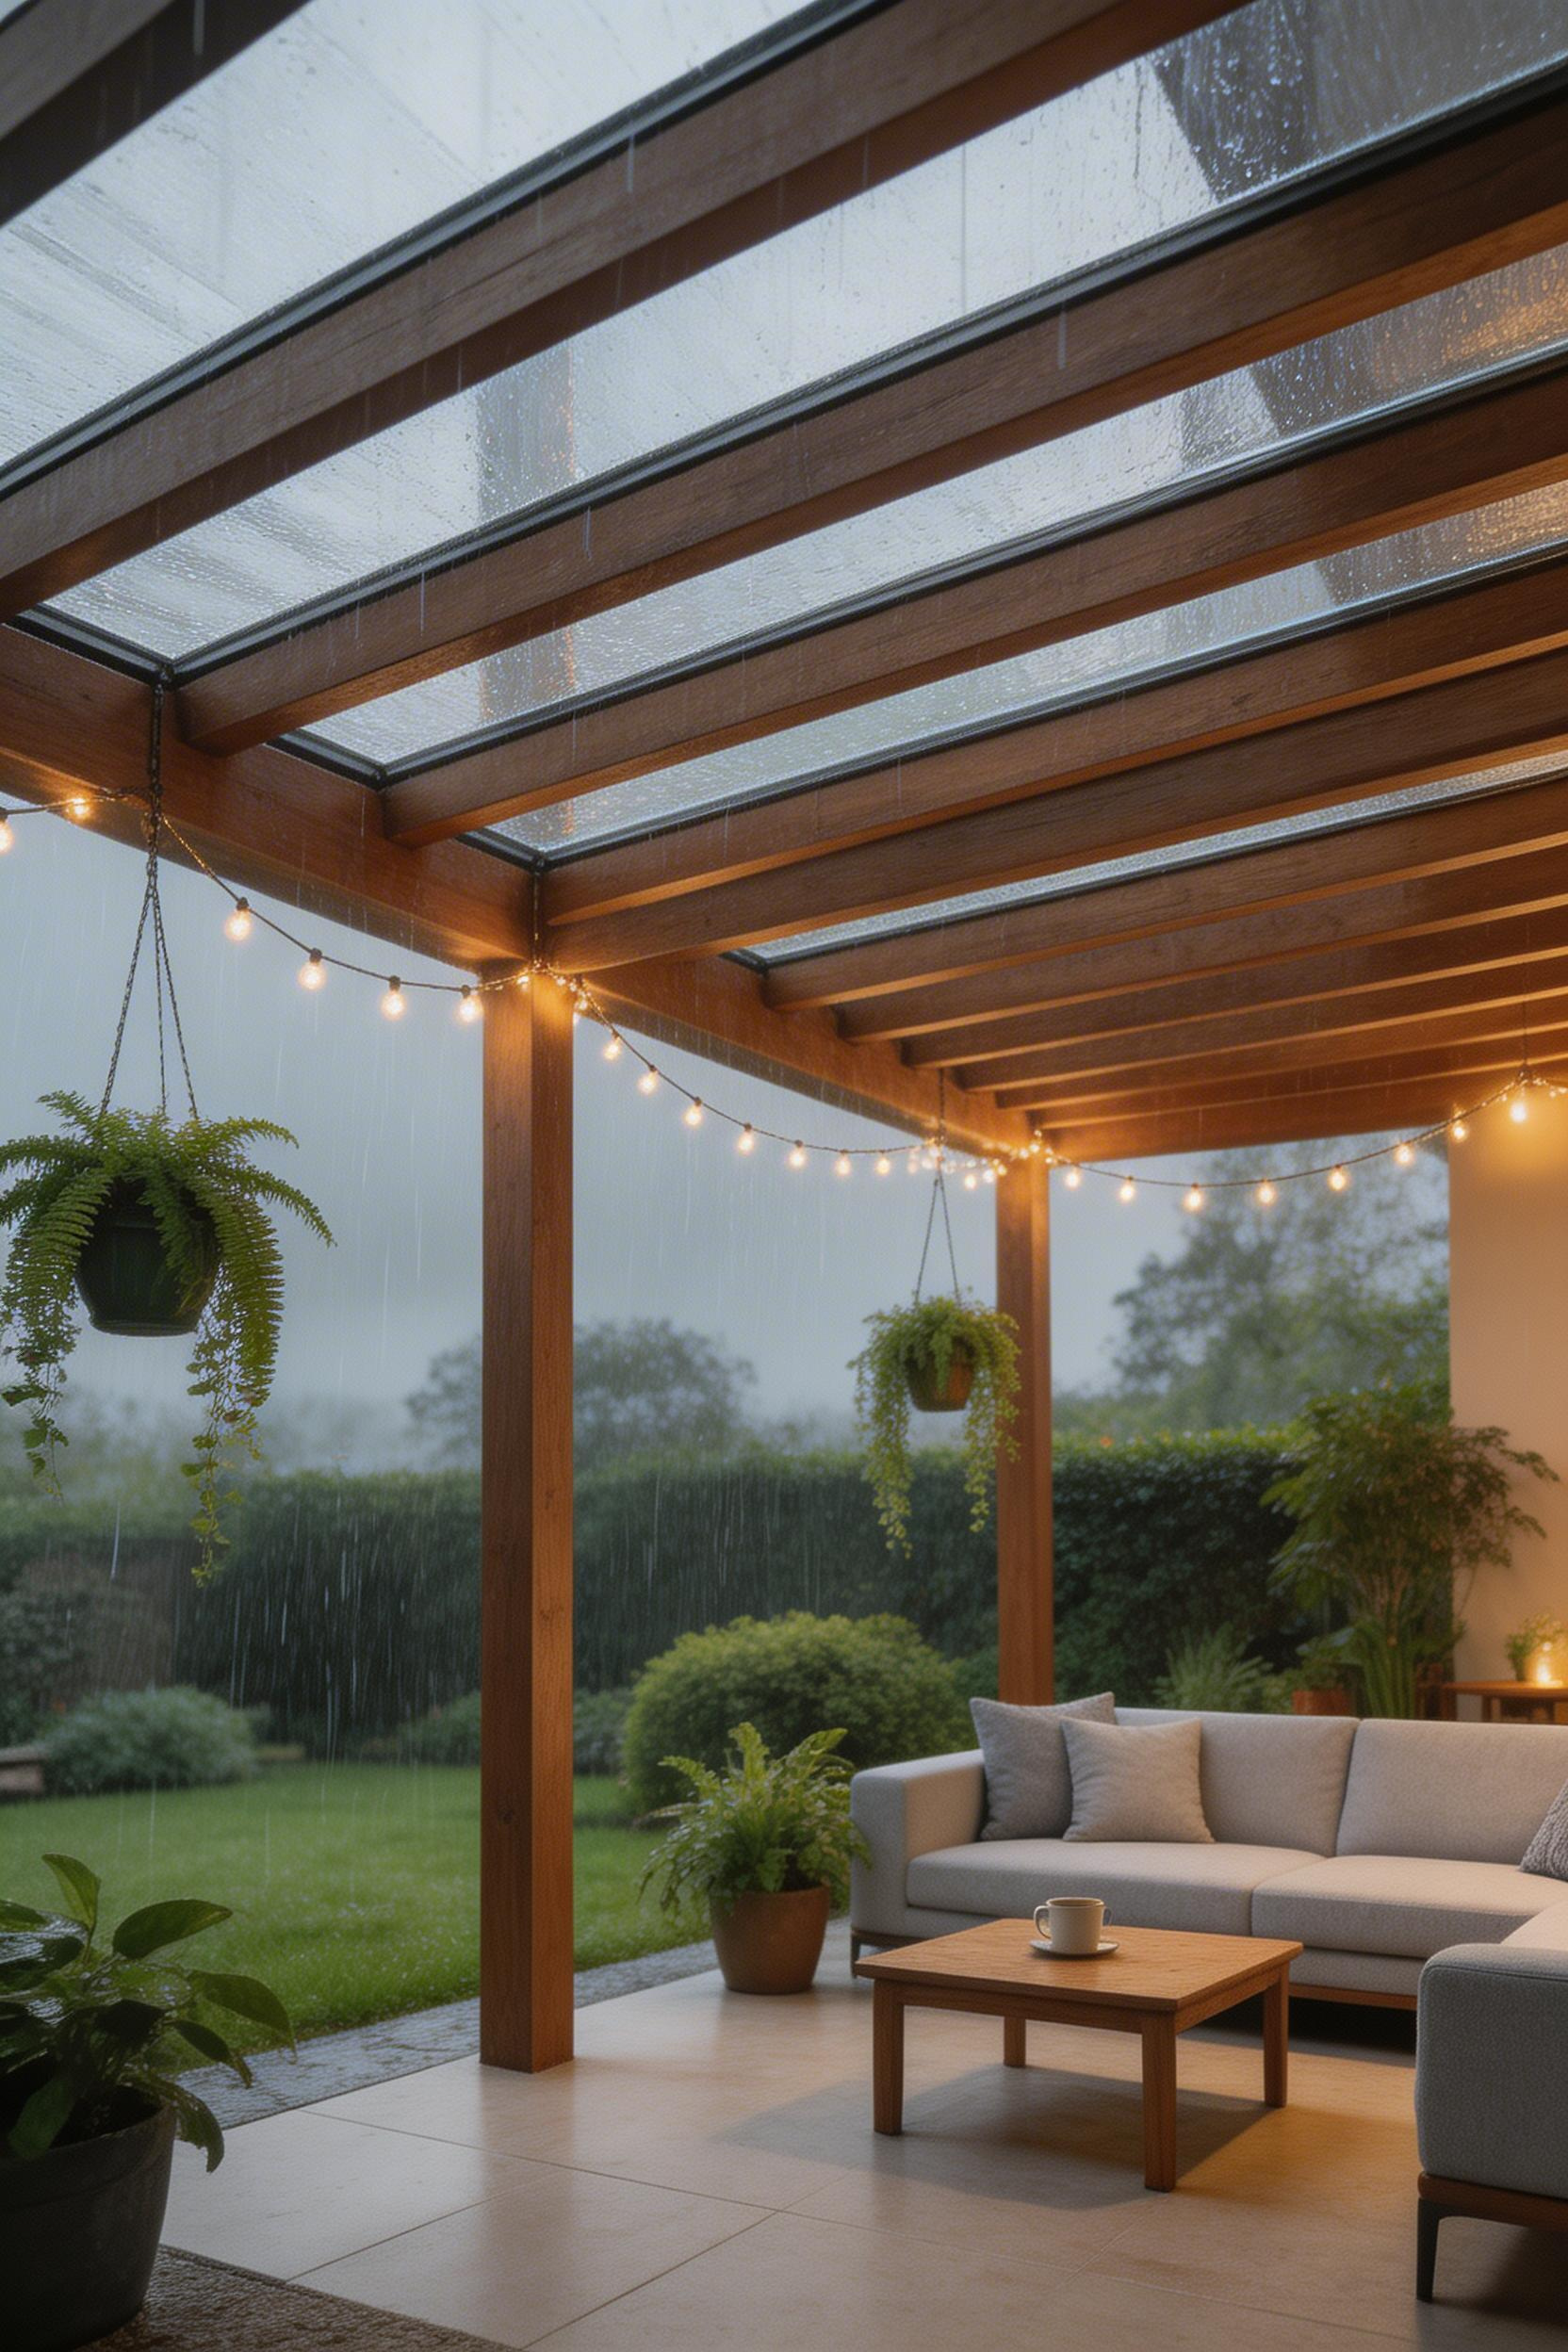
Palram multiwall polycarbonate panels (6mm) slot between rafters and cut to fit with a circular saw. They transmit about 70% of light while blocking UV and rain. A 12×12 pergola needs 10 to 12 panels at $25 to $35 each — budget $250 to $420. They’re rated for snow loads and resist yellowing for 10 years.
Coolaroo retractable fabric canopy kits ($120 to $350) let you open the roof on fair days and close it for rain. HDPE fabric blocks UV and allows some airflow. Installation means screwing track brackets to rafter tops — a two-person, two-hour job.
In snowy climates, remove retractable fabric in late autumn. Wet snow on a taut fabric canopy can damage the track hardware. The hardware stays mounted; only the fabric comes down for winter storage.
These 18 patio pergola ideas span from a $45 shade sail to a $3,500 cedar kit. The right choice depends on your backyard, your budget, and how you want to spend your time outdoors.
Start with your home’s exterior. A contemporary house pairs better with a black steel or aluminum pergola than a rustic cedar one. A traditional or cottage-style home suits cedar, painted wood, or a wisteria-covered lattice. Getting this wrong is the most common mistake in outdoor design. The backyard ends up looking disconnected from the house. Before buying any kit, also check local zoning regulations. Many municipalities require a permit for permanent structures over a certain size. Some HOAs restrict color, material, or placement. A quick call to your local planning department prevents problems later.
Pick the strongest single element first and layer everything else around it. If the pergola frame is the first investment, spend on the structure and leave textiles and planting for later seasons. If the frame is already in place, a pair of curtain panels or a set of string lights costs under $60 and changes the feel immediately.
Doing everything at once tends to produce a space that looks busy without feeling resolved. One well-executed element — a rose-covered cedar frame, a hammock under shade sails, a polished outdoor dining setup — is more satisfying than several half-finished ideas running simultaneously. Give each addition time to settle before layering the next.