Physical Address
304 North Cardinal St.
Dorchester Center, MA 02124
Physical Address
304 North Cardinal St.
Dorchester Center, MA 02124
Discover 22 essential kitchen lighting fixtures that enhance safety, functionality, and style. Expert tips for layered lighting, LED efficiency, and smart controls to transform your space.
Of all the creative spaces I design, the kitchen holds a special place in my heart. It’s more than just a room for making food; it’s a studio for culinary artists. It’s where morning coffee rituals unfold, where we connect over family dinners, and where the best late-night conversations happen, usually over a slice of cake. Your kitchen is the bustling, creative heart of your home, and like any good studio, it needs lighting that can keep up.
Poor lighting can sabotage even the most beautiful kitchen. I once had a client, a passionate home baker, who was constantly frustrated because harsh shadows across her countertops made intricate pastry work a guessing game. It wasn’t until we fixed her lighting that she realized she wasn’t a clumsy baker; she was just working in the dark! The right light doesn’t just make your kitchen work better—it brings the whole space to life, making fresh ingredients pop and showcasing the beauty you’ve so carefully chosen for your home.
Whether you’re starting from scratch with a full renovation or just looking for a weekend refresh, understanding how to use light will completely change how your kitchen feels and functions. We’re going to move beyond just screwing in a brighter bulb and learn how to build a space that truly works for you.
Think of lighting your kitchen like an artist composes a painting. You don’t just use one color, right? You build up layers to create depth, focus, and mood. It’s the same with light. We work with three distinct layers: ambient light as your base canvas, task light to focus on the action, and accent light for that final touch of drama and personality. When these three work together, your kitchen transforms from a simple room into a dynamic environment ready for anything.

The real magic happens when these layers are in harmony. The ambient light from recessed cans or a central flush-mount makes sure no one trips in a dark corner. Then, your task lighting—maybe some sleek under-cabinet strips or a trio of pendants over the island—comes in to ensure you can see every last detail while you’re chopping and cooking. Finally, accent lighting adds that sparkle. It’s the little light inside a glass-front cabinet that makes your grandmother’s china glow or the wash of light over a beautiful tile backsplash. This layered approach is what gives a kitchen soul.
So where do we begin? I always start with the layer that makes the biggest immediate impact on how you actually use your kitchen.
Honestly, under-cabinet lighting is the single most transformative addition you can make to your kitchen. It’s the unsung hero that provides focused, shadow-free light exactly where you chop, mix, and prep. Your overhead lights, no matter how bright, will always cast your own shadow over your work surface. Installing fixtures directly beneath the upper cabinets solves this instantly, flooding your countertops with clear, even light. Whether you opt for slim LED strips or individual pucks, this is the one change that will make you wonder how you ever lived without it.

The difference is immediate and, frankly, profound. Suddenly, you can actually read the tiny print on your recipe cards without squinting. You feel safer chopping vegetables because you can see everything clearly. And maybe my favorite part, as an artist—you finally see the true, vibrant colors of your ingredients. Look for fixtures with a high Color Rendering Index (CRI) rating. It makes a world of difference in making sure your salmon looks perfectly pink and your greens look garden-fresh. Beyond pure function, these lights turn your backsplash into a deliberate design feature.
Now that your counters are beautifully lit, let’s look up at the centerpiece of many modern kitchens.
pendant lights are the jewelry of the kitchen. They are hardworking task lights and stunning design elements all rolled into one, which makes them the perfect choice for islands and peninsulas. A great pendant provides the focused light you need for everything from rolling out dough to helping with homework, all while acting as a sculptural focal point that anchors your kitchen’s main gathering spot. The real trick is choosing pendants that provide enough light without overwhelming the scale of your island or the style of your kitchen.

Getting the size and placement right is everything. I have a go-to rule: hang pendants so there are about 30-36 inches between the bottom of the light and the top of your counter. This leaves enough room for conversation without blocking sightlines. For placing them, think in odd numbers—three pendants often look more balanced over a long island than two. Let the materials play off each other. Do you have brushed nickel hardware? Maybe echo that in your pendants. Have a warm, rustic vibe? A woven shade can add incredible texture.
With your island looking like a work of art, let’s make sure the rest of the room has a solid foundation.
Recessed lighting is the workhorse of a great kitchen lighting plan. These fixtures are the ultimate minimalist choice, disappearing into the ceiling to create a clean, uncluttered look that plays well with every design style imaginable, from hyper-modern to cozy farmhouse. By placing them strategically, you get beautiful, even light distribution without the visual clutter of hanging fixtures, which instantly makes your kitchen feel more spacious and open.

But please, don’t just scatter them randomly like stars in the sky. That’s a mistake I see all too often. Good recessed lighting is about thoughtful planning. Think about your kitchen in zones: prep space, cooking area, walkways. Position your fixtures to wash the front of your cabinets and countertops, which reduces shadows when you’re working. Spacing them about 4-6 feet apart is a good starting point for general ambient light. And pay attention to the trim—a gimbal trim lets you pivot the light, which is incredibly useful for highlighting artwork or a specific feature.
The modern LED versions of these fixtures are a game-changer, offering incredible control. Look for a CRI of 90+ for true color rendering, and, of course, put them on a dimmer. Sometimes, though, a fixed layout just isn’t the right answer.
Track lighting has really shed its clunky, utilitarian past. Today’s systems are sleek, sophisticated, and bring an incredible level of adaptability to a kitchen. If you have a space where needs change—maybe one day an area is for prep, the next it’s a buffet line for a party—or if you rent and can’t put holes all over the ceiling, track lighting is your best friend. It features multiple adjustable heads on a single track, giving you permission to change your mind.

The beauty of track lighting is how it can perform multiple jobs at once. You can aim one head at your cutting board for task lighting, pivot another to highlight a beautiful piece of art, and use a couple more with wider beams for general ambient light—all from one power source. And if you decide to rearrange the whole room? You just slide and aim the heads differently. No electrician needed. It’s that flexibility that I find so appealing, especially for multi-purpose creative spaces.
Now let’s move from lighting the big, open areas to the smaller spaces that are often forgotten.
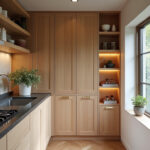
There is something so luxurious about lighting the inside of your cabinets. It transforms your storage from dark caves into beautifully illuminated showcases, and it makes finding that one specific spice jar so much easier. Usually, this means installing thin LED strips or small puck lights inside your cabinets. It’s a detail that feels custom and high-end, turning everyday dishes and glassware into curated displays.

It’s about more than just finding things. This kind of light brings out the subtle textures and colors in your favorite pieces—the delicate pattern on a teacup, the sparkle of crystal, the rich grain of a wooden bowl. If you have glass-front cabinets, interior lighting is a must. It creates a stunning focal point and adds incredible depth to the room’s design. For deep pantries, I love using motion-activated strips that turn on the moment you open the door. It’s a small touch that feels like magic.
While some lighting is subtle, other fixtures are meant to be seen and celebrated.
A statement chandelier, whether it’s over a dining nook or a large island, is like the room’s signature piece of jewelry. It’s there to provide warm, inviting light, but more than that, it’s there to create a “wow” moment that elevates the entire space. Kitchen chandeliers can range from rustic farmhouse fixtures with exposed bulbs to sleek, geometric sculptures, but they all share one thing: the power to turn a simple eating area into a place that feels special, even on a Tuesday night.

Scale and proportion are everything here. You want the fixture to feel substantial enough to anchor the space without dwarfing it. A good rule of thumb is to choose a chandelier that’s about 1/2 to 2/3 the width of the table or island below it. Height is just as critical. Hang it so the bottom is 30-36 inches above the surface. You want to create an intimate pool of light for conversation without having a fixture glaring in anyone’s eyes.
Like all good lighting, your chandelier absolutely needs a dimmer. This allows you to go from bright light for homework to a soft, romantic glow for dinner. This is your chance to really show off your personality, so pick something you love.
I’ve worked in so many older homes and apartments where the kitchen ceilings are under 8 feet. It’s a common challenge! But low ceilings don’t mean you have to settle for bad lighting. This is where flush-mount and semi-flush mount fixtures are a lifesaver. They provide that essential ambient light while keeping precious headroom and creating a clean, uncluttered ceiling plane. The best part? Modern flush mounts are gorgeous and a far cry from the boring fixtures of the past.

The trick to making low ceilings feel higher is to choose fixtures that cast light broadly and evenly. Look for designs with diffused covers (like a fabric drum shade or frosted glass) that spread the light around instead of concentrating it in a harsh downward beam. Semi-flush fixtures, which hang just a few inches from the ceiling, can offer a bit more decorative flair than a true flush mount while still keeping things safely out of the way. Don’t believe anyone who says you can’t have beautiful lights with low ceilings; you just have to choose the right ones.
From the big picture, let’s zoom back in on those critical work zones.
Directional spotlights are for the perfectionists among us, and I say that with love! They offer precise, focused light exactly where it’s needed most—think ranges, sinks, or that one corner of the counter where you do all your detailed work. Unlike a fixed downlight, you can aim and re-aim an adjustable spot as your needs evolve. This targeted approach is brilliant for eliminating annoying shadows and getting that intense brightness you need for safe and efficient cooking.

This precision is incredibly valuable over the stove, where the built-in light on your range hood is often weak or casts a strange color. A ceiling-mounted spot can be angled to illuminate your entire cooktop perfectly. The same goes for the sink. Having a dedicated light source there means you can actually see what you’re scrubbing, which is more important than most people think. It’s this kind of thoughtful, function-first lighting that defines a truly well-designed kitchen.
Sometimes the biggest impact comes from lighting the smallest, most awkward spaces.
Every kitchen seems to have them: those awkward, shadowy corners where the main lights just don’t reach. But with a little strategic accent lighting, you can turn these forgotten zones into design opportunities. Whether it’s a small LED strip, a tiny spotlight, or another specialty fixture, a little light can transform a problem area into a functional and beautiful part of your kitchen.

Think about those corner cabinets with a lazy Susan inside—a small, door-activated LED strip can make it instantly usable. Or what about the space under an overhang? A little wash of light can highlight architectural details that were previously lost in the shadows. My absolute favorite trick is toe-kick lighting. Placing a low-wattage LED strip under your base cabinets creates a soft, floating effect that doubles as the perfect pathway light for a midnight snack run. It’s these small details that elevate a kitchen from simply good to truly great.
Now, let’s get a little more technical. The kind of light you choose is just as important as where you put it.
Have you ever noticed how some light feels warm and cozy, like candlelight, while other light feels bright and energizing, like a sunny morning? That’s color temperature, and we measure it in Kelvin (K). Understanding this is so important for getting the mood right in your kitchen. The right color temperature can make your food look more delicious, enhance the colors of your cabinets and countertops, and create the perfect vibe for whatever you’re doing.

For kitchens, you’ll mostly be working in a range from 2700K to 4000K. Here’s a simple breakdown:
The key is to keep it consistent within a zone, but you can absolutely mix and match. For instance, use warmer ambient light throughout the kitchen but switch to a cooler temperature for your under-cabinet task lights. It gives you the best of both worlds.
Okay, time to clear something up. For years, we talked about “watts” to gauge brightness, but that just measures energy use. The number you really need to know is lumens, which is the actual measure of a light’s brightness. Thinking in lumens is how you make sure your kitchen is properly lit—not too dim to be unsafe, and not so bright that it feels like a hospital operating room.

Here are some good targets to aim for. For your general, all-over ambient light, you’ll want about 20-30 lumens per square foot. But for your hard-working task areas, like countertops, you should aim much higher—more like 50-100 lumens per square foot to see everything clearly. So, for a 150-square-foot kitchen, you might want 3,000-4,500 lumens for your ambient light, plus additional dedicated fixtures over your task zones. Don’t worry, you don’t need a single fixture that does it all! The idea is to build up to that brightness with your layers of light.
There’s one more technical aspect of light quality that artists and chefs both obsess over.
This one is for all my fellow creatives. The Color Rendering Index (CRI) is a scale from 0 to 100 that measures how accurately a light source reveals the true colors of an object compared to natural sunlight. And in a kitchen, this is critical. A high CRI ensures your fresh ingredients look their best, you can accurately judge the doneness of meat and fish, and your beautifully chosen paint colors and finishes look exactly as you intended.

I tell all my clients to aim for a CRI of 90 or above, especially for task lighting. A low CRI can make everything look dull and washed out. Have you ever bought a piece of fruit at the store that looked perfect, only to get it home and find it looks pale and unappetizing? That’s often the difference between good and bad lighting. When your light renders colors accurately, reds in your tomatoes are vibrant, greens in your herbs are fresh, and you can trust your eyes when you’re cooking. It’s a subtle thing that makes a huge difference.
Once you’ve chosen the perfect lights, how do you make them work for you from moment to moment?
If you only do one electrical upgrade in your kitchen, please let it be installing dimmer switches. They are the single most effective tool for transforming your lighting from static and one-note into something dynamic and adaptable. Dimmers allow you to move effortlessly from bright, focused light when you’re preparing a meal to a soft, ambient glow for a relaxed dinner or a late-night chat. They give you ultimate control over the mood, and they save energy and extend the life of your bulbs. It’s a win-win-win.

The versatility a dimmer provides is just incredible. Full brightness is for business—chopping, cleaning, reading recipes. A medium level is perfect for casual cooking and everyday meals. And a low setting creates an instant cozy, intimate atmosphere. With dimmers, a single light fixture can suddenly serve multiple purposes, giving you a huge amount of flexibility without having to add more lights. Honestly, a light switch without a dimmer feels like a missed opportunity to me.
And when we’re talking about the bulbs themselves, there’s really only one choice today.
LED technology has completely changed the game for kitchen lighting, and it’s the only way to go. Forget those old incandescent bulbs. Modern LEDs use up to 80% less energy and can last for 20 years or more. That means huge savings on your electricity bill and no more balancing on a step stool to change burnt-out bulbs in awkward places. Initially, they might cost a bit more, but the long-term savings are undeniable.

But it’s not just about saving money. LED technology is what makes so many of today’s coolest designs possible. Those paper-thin under-cabinet strips? The color-changing accent lights? Those are all thanks to LEDs. They also provide instant, full brightness (no more waiting for a fluorescent to warm up), and they run cool, which is a big bonus in a kitchen that’s already generating plenty of heat. With LEDs, you get incredible performance, longevity, and design flexibility, all while being kinder to the planet.
This is the part where the designer in me gets really excited. Creating a truly cohesive kitchen means paying attention to the details, and that includes coordinating the finish of your light fixtures with your cabinet hardware, faucet, and even your appliances. This thoughtful coordination is what elevates a kitchen’s design from just “nice” to professionally polished. You don’t have to match everything perfectly, but you do need a clear strategy.

My favorite approach is to pick one dominant metal finish and let it lead the way. For instance, if your faucet and cabinet pulls are a beautiful matte black, let that be your anchor. Then, you can bring in a second metal, like a warm brass or polished nickel, in one or two accent spots—maybe on your island pendants or a picture light over some art. The key is to make it look intentional. Test finishes in your space, too! The way a finish looks in a showroom can be completely different from how it looks in the unique natural light of your own home.
Please, please, please hear me on this one. If you’re doing any kind of renovation, plan your electrical layout before the walls are closed up. Thinking about where your lights and switches will go early in the design process will save you so much money and heartache later. There is nothing more frustrating than realizing you desperately need a light in a spot where there’s no wiring. Adding it after the fact can cost three to five times more because of the labor involved in cutting, patching, and painting drywall.

A good electrical plan is a map of your lighting vision. It details exactly where every light fixture, switch, and outlet will go. Think about convenience. You want the switch for your under-cabinet lights to be right there in your main prep zone, not across the room. You’ll want the dimmer for your dining chandelier near the table. Planning this out from the start ensures your beautiful lighting design is also perfectly functional for how you live.
Another key part of planning is getting the proportions right.
Scale is one of those design principles that can be hard to define, but you definitely know it when it’s wrong. A light fixture that’s too small for a space will feel lost and insignificant. One that’s too large will completely overwhelm the room and can even get in the way. Choosing fixtures that are properly scaled to your space is what creates that sense of balance and harmony that all great designs have.

Kitchen islands are a perfect place to practice this. As I mentioned before, your pendants should feel substantial but not bulky in relation to the island’s size. Same for a chandelier over a table. But it’s also about ceiling height. A dramatic, long pendant might look amazing with 10-foot ceilings, but it would feel completely wrong with 8-foot ceilings. You also have to consider visual weight. A delicate, open-wire fixture reads as much smaller than a solid, heavy-looking one, even if their dimensions are identical. Trust your eye, and when in doubt, create a cardboard or balloon mockup to test the scale in your space.
Smart lighting has moved from a novelty to a genuinely useful tool for the modern kitchen. The ability to control your lights with your voice, a smartphone app, or automated schedules can add an incredible layer of convenience to your daily routine. And these systems are smart enough to learn your preferences, adjusting automatically to make your life a little bit easier.

Just imagine this: you’re heading home and can turn the kitchen lights on from your car, so you walk into a welcoming space. Or your hands are covered in flour, and you can just ask your virtual assistant to brighten the lights over your counter. You can also create “scenes” for different activities. A “Cooking” scene might bring all the task lights to full brightness, while a “Dining” scene could dim everything down to a warm, inviting glow. This isn’t just about technology for technology’s sake; it’s about making your space work better for you.
Okay, let’s talk about something less glamorous but super important: cleaning. Your kitchen is a tough environment for light fixtures. Airborne grease, steam, and food particles can quickly build up on your lights, cutting their brightness and making them look grimy. Planning for maintenance when you’re choosing your fixtures will save you a lot of elbow grease down the road.

Fixtures right over the stove will need the most attention. Here, I’d suggest something with smooth surfaces that are easy to wipe down. An open-weave fabric shade might be gorgeous, but it’s going to be a nightmare to keep clean in that spot. Think about accessibility, too. Are your pendants easy to reach, or will you need a tall ladder every time you want to dust them? LED fixtures help by eliminating the need for frequent bulb changes, but the fixtures themselves still need a regular wipe-down to perform their best.
I know it’s tempting to cut costs on lighting, but I gently encourage my clients to invest in quality fixtures. This is a place where it really pays off in the long run. Well-made fixtures perform better, last longer, and save you the cost and hassle of having to replace them in just a few years. It’s about thinking about the total cost of ownership, not just the upfront price tag.

What do you get for that extra investment? You get smoother dimming without any flickering or buzzing. You get more accurate colors from high-quality LED chips. You get durable finishes that won’t chip or corrode after a few encounters with kitchen steam. Prioritize your budget on the lights you’ll use the most, like your primary task lighting. Spending a little more on these workhorse fixtures will pay you back in satisfaction and safety for years to come.
And finally, let’s tie it all together.
The final goal of all this planning is to create a lighting scheme that feels cohesive and intentional. This doesn’t mean every single light fixture has to be from the same product line. Please don’t do that! It means they should all speak the same design language, sharing common threads like materials, finish, or general shape that tie the whole room together. The most interesting designs balance a little variety with a strong, unified theme.

Start by defining your kitchen’s core aesthetic. Is it modern? Traditional? Industrial? Once you know that, you can select fixtures that fit within that world. A modern kitchen might feature clean lines and geometric shapes, while a farmhouse kitchen might lean on rustic materials and classic silhouettes. Then, use a consistent finish to create that unifying thread. Having brass pendants, a brass flush-mount, and brass picture lights will feel harmonious, even if the fixtures themselves are all different shapes and serve different functions. This thoughtful layering of styles and finishes is what will make your kitchen feel truly and uniquely yours.
And there you have it. Lighting your kitchen is a creative journey, one that blends artistry with practicality. By layering your light, paying attention to the technical details, and choosing fixtures that you truly love, you can create a space that is not only beautiful and functional but that truly supports your life and your own creative pursuits. Your kitchen is the heart of your home; it deserves to shine.