Physical Address
304 North Cardinal St.
Dorchester Center, MA 02124
Physical Address
304 North Cardinal St.
Dorchester Center, MA 02124
Discover 22 genius kitchen design on a budget hacks from a home automation expert. Transform your space with smart, affordable upgrades that deliver maximum impact without breaking the bank.
Dreaming of a kitchen that looks like it jumped off a Pinterest board, but your bank account is screaming “no way”? I’ve been there. After helping countless homeowners integrate smart technology into their kitchens, I’ve discovered something surprising – the most impressive kitchen transformations often happen on the tightest budgets.
Kitchen design on a budget isn’t about cutting corners; it’s about being clever with your resources. Think of it as the difference between throwing money at a problem versus solving it with ingenuity. Ready to transform your kitchen without emptying your wallet? Let’s dive into these 22 game-changing kitchen hacks that deliver maximum impact with minimal investment.
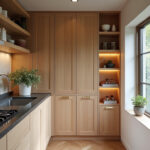
Nothing transforms a kitchen faster than painting those cabinets. The numbers don’t lie – cabinet replacement can easily hit $20,000, while a DIY paint job might cost you just $200-500 in supplies. That’s potentially saving 95% of your budget right off the bat!

When choosing paint, focus on durability. Kitchens take a beating with grease, steam, and constant touching. I typically recommend acrylic or alkyd paints specifically formulated for cabinets. They provide that perfect balance of adhesion and cleanability that you’ll appreciate six months down the road when someone inevitably touches the cabinet with pasta sauce on their fingers.
“The most expensive part of most kitchen renovations is cabinet replacement. A quality paint job can give you 90% of the visual impact at 10% of the cost.”
Here’s where it gets interesting – painting isn’t just about freshening up what’s there. Try painting your island cabinets a different color to create a focal point, or go with light colors to make a small kitchen feel more spacious.
Once your cabinets have that fresh coat of paint, the hardware becomes your kitchen’s jewelry. It’s amazing how swapping out those dated pulls can instantly modernize your entire kitchen for less than $100 total.

The key to hardware selection is thinking about both style and function. Consider the existing aesthetic of your kitchen and whether you want to enhance it or move in a new direction. Match finishes with your appliances for a cohesive look, or create intentional contrast for visual interest. Remember that larger cabinets often look best with longer pulls, while knobs work perfectly for smaller doors.
The tricky part is finding the right balance between quality and price. I’ve found that mid-range hardware often provides the best value – cheap options can look flimsy, while the most expensive ones rarely justify their premium price.
Let me paint you a picture: removing even a few upper cabinets and replacing them with simple open shelving can completely transform your kitchen’s feel. This modern look isn’t just trendy – it’s significantly cheaper than traditional cabinetry.

Open shelving costs a fraction of closed cabinets because you’re eliminating doors, complex construction, and expensive hardware. A few wooden planks and brackets might run you $50-200 total, compared to $1,000+ for equivalent upper cabinets. The visual payoff is immediate – your kitchen instantly feels more spacious and airy.
Of course, there’s a catch – open shelving demands organization and curation. Your dishes, glassware, and accessories become part of your decor, so you’ll need to embrace thoughtful arrangement and regular dusting. This isn’t just storage; it’s display space.
What many people overlook is how open shelving can highlight your personality. Those colorful bowls from your vacation, your grandmother’s teapot, or your collection of unique coffee mugs can become focal points rather than hidden treasures.
The backsplash is prime real estate for kitchen design on a budget transformation. This relatively small area makes a massive visual impact, and DIY options abound for every skill level and style preference.

Peel-and-stick tiles have revolutionized the budget backsplash game. At $5-15 per square foot, they’re a fraction of the cost of traditional tile installation. Other affordable options include Beadboard ($20-30 per panel), paint with stenciled patterns ($30-50 total), or even contact paper for temporary solutions ($10-20 total). For the truly creative, reclaimed materials like pallet wood or salvaged tiles can create a one-of-a-kind look for pennies.
The heart of the matter is durability in a splash-prone area. Choose water-resistant materials and seal appropriately. For painted options, semi-gloss or high-gloss finishes will be your best friends for easy cleaning. Whatever material you choose, proper surface preparation is essential for longevity.
Countertops can eat up a massive chunk of your kitchen design on a budget. But here’s the inside story: there are plenty of affordable materials that mimic the look of high-end surfaces for a fraction of the price.

Laminate has come a long way from your grandmother’s kitchen. Today’s options feature realistic stone patterns, textured finishes, and improved durability starting around $15-40 per square foot installed. Butcher block offers warmth and character for $30-60 per square foot, while tile can create a unique look for $10-40 per square foot if you’re willing to deal with grout lines. For the DIY-inclined, concrete countertops cost around $8-15 per square foot in materials and deliver a modern industrial look.
To make these budget-friendly options look more expensive, focus on the details. Choose thicker edges (or create the illusion with edge details), opt for undermount sinks when possible, and keep the design clean and simple. The right accessories and impeccable maintenance can elevate even the most basic countertop material.
The game-changer happened as I worked with a client who used peel-and-stick granite film over her existing laminate as a temporary solution while saving for new counters. Two years later, she was still happy with the look and had redirected her savings to other priorities!
Kitchen flooring takes a beating from spills, dropped utensils, and constant foot traffic. The breakthrough came when manufacturers developed affordable options that can handle these challenges while still looking fantastic.

Vinyl flooring stands out as the budget champion, with luxury vinyl plank (LVP) and tile (LVT) offering remarkable durability and realistic wood or stone appearances for $2-7 per square foot. Laminate flooring provides similar looks for $1-5 per square foot but requires more careful water management. For the truly budget-conscious, painted plywood subfloors with stenciled patterns can create a custom look for less than $1 per square foot plus paint.
The biggest savings come from DIY installation. Many modern flooring products feature user-friendly click-lock systems designed specifically for homeowners. If you’re not comfortable tackling the entire project, consider preparing the subfloor yourself and hiring professionals only for the installation, potentially cutting labor costs by 30-50%.
Do you see how huge that is? Flooring typically runs $1,500-3,000 for an average kitchen, but smart material choices and DIY approaches can potentially bring that down to $500-1,000 total.
My breakthrough came when I stopped looking at kitchen storage as something that had to be built-in. Old furniture pieces can be transformed into stunning, functional kitchen storage for a fraction of the cost of Custom Cabinetry.

The best candidates for kitchen repurposing are solid wood dressers, bookshelves, sideboards, and even filing cabinets. These pieces often have good bones but dated finishes, making them perfect for transformation. A dresser with a butcher block top becomes an island for $200-300 total, compared to $1,000+ for a comparable new piece. A bookshelf with a fresh coat of paint transforms into open pantry storage for under $50.
Preparing furniture for kitchen duty requires attention to detail. Clean thoroughly, sand for smooth surfaces, and apply durable paint or sealant that can withstand kitchen conditions. Replace hardware with kitchen-appropriate pulls and knobs, and consider adding casters to larger pieces for mobility.
Think of it as… giving these pieces a second act in your home’s most important room. Not only do you save money, but you also create truly unique elements that add character no store-bought solution can match.
The surprising part is how dramatically lighting affects both the function and feel of your kitchen. Poor lighting can make even an expensive kitchen feel dreary, while thoughtful, layered lighting can elevate the most budget-friendly space.

The most common lighting mistake is relying solely on a single ceiling fixture. Instead, create layers: Ambient Lighting (overall illumination), task lighting (for work areas), and accent lighting (for visual interest). Budget-friendly options include replacing outdated fixtures with modern LED alternatives ($50-150), adding under-cabinet lighting with LED strips ($20-50), and strategically placing battery-operated puck lights in dark corners ($15-30 for a set).
What complicates this is balancing energy efficiency with light quality. Look for LEDs with a color temperature between 2700K-3000K for a warm, inviting kitchen atmosphere rather than the harsh blue-white of some cheaper options. The investment in slightly better quality bulbs pays dividends in how your space feels.
Let that sink in for a moment… sometimes the smallest details make the biggest impact. Kitchen accessories aren’t just decorative – they’re the personality layer that transforms a functional cooking space into a room that feels like you.

Focus on items that serve double duty – beautiful and useful. Display colorful cookbooks on open shelving. Group similar items like olive oils in a pretty tray by the stove. Decant pantry staples into matching glass containers. These small touches create a cohesive, intentional look without requiring major purchases.
For affordable color and texture, textiles are your best friends. Kitchen towels, a small rug by the sink, or simple curtains can introduce pattern and softness for $10-30 per item. Plants add life and freshness – try herbs in pots on a windowsill for both beauty and functionality.
My experience went like this: I worked with a client who spent thousands on cabinets and countertops but still felt her kitchen lacked personality. Adding $75 worth of carefully chosen accessories – vintage wooden cutting boards, a colorful runner, and copper measuring cups displayed on open shelving – finally made the space feel complete.
It’s not unlike discovering free money – decluttering your kitchen costs nothing but delivers immediate results. A clean, organized kitchen instantly looks more appealing and functions better, regardless of your budget for other improvements.

Start by ruthlessly evaluating what you actually use. Most kitchens are filled with gadgets, dishes, and food items that rarely see the light of day. Remove duplicate tools, consolidate mismatched dishes, and donate appliances that haven’t been used in the past year. Then, organize what remains into logical zones based on your cooking habits.
“The most affordable kitchen upgrade is removing what doesn’t belong there. Clutter makes even expensive kitchens look chaotic and cheap.”
The ripple effects are enormous. Beyond the improved aesthetics, you’ll gain counter space, easier access to frequently used items, and a more pleasant cooking experience. This “free” makeover creates the perfect foundation for any other kitchen design on a budget improvements you choose to make.
Here’s the catch with kitchen appliances – they’re often the biggest budget items in a renovation, but timing your purchase right can save hundreds or even thousands of dollars.

“Open box” appliances are items that have been returned to retailers but are still in excellent condition. These can be discounted 20-40% simply because the box was opened or the item was briefly displayed. Most retailers thoroughly inspect these items and often include limited warranties, making them smart budget choices. Major holidays (especially Black Friday, Memorial Day, and Labor Day) are prime times for appliance sales, with discounts often reaching 30-40% off regular prices.
When shopping for budget-friendly appliances, focus on the features you’ll actually use rather than paying premium prices for bells and whistles that sound impressive but rarely get utilized. Consider energy efficiency as well – a slightly higher upfront cost for an energy-efficient model can translate to significant savings on utility bills over the appliance’s lifetime.
You might be wondering if these discounted appliances are reliable. In my experience, open box items from reputable retailers are just as dependable as full-price purchases, especially when backed by a warranty. The key is inspecting thoroughly before purchase and understanding exactly what is (and isn’t) covered by any warranty.
The missing piece in most budget kitchen renovations is considering pre-owned appliances. This approach can slash your appliance budget by 50-70% compared to buying new, potentially saving thousands on high-end brands.

Used appliances from private sellers (via Craigslist, Facebook Marketplace, etc.) offer the deepest discounts but come with more risk. Refurbished appliances, professionally restored by manufacturers or certified technicians, provide a middle ground – significant savings with some reassurance about condition and often a limited warranty. “Scratch and dent” appliances with minor cosmetic imperfections offer another sweet spot, with discounts of 10-40% for flaws that might not even be visible once installed.
The crucial element is thorough vetting. For private sales, test all functions before purchasing and ask about the appliance’s history. For refurbished items, understand exactly what was repaired or replaced. Consider the appliance’s age and expected lifespan – a five-year-old refrigerator (typical lifespan 10-15 years) might be worth the savings, while a ten-year-old dishwasher (typical lifespan 8-10 years) might not be.
Picture it this way… the $3,000 professional-grade range you’ve been eyeing might be available for $1,200 used, allowing you to get the cooking performance you want while freeing up budget for other kitchen improvements.
It works something like this – kitchen islands typically cost $1,000-5,000 when purchased new, but a DIY version can be created for $100-500 depending on your materials and design. That’s potentially 80-90% savings on a feature that dramatically improves both function and style.

The simplest approach is repurposing existing furniture. An old dresser with a butcher block or tile top creates an instant island with built-in storage. For a more custom solution, combine stock cabinets with a countertop of your choice. Even simpler, a kitchen cart on wheels offers flexibility for smaller spaces. The materials you choose significantly impact both cost and style – reclaimed wood, pallets, or repurposed materials offer the biggest savings while adding character.
My discovery began when I helped a client convert an old workbench from her garage into a kitchen island. With $75 in materials (paint, hardware, and a remnant piece of laminate countertop), she created a unique centerpiece that would have cost $1,500+ to purchase new.
You can think of it as the fastest way to inject personality into your kitchen. A gallon of quality paint costs $30-50 and can completely transform the feel of your kitchen in a single afternoon. That’s serious bang for your buck in kitchen design on a budget.

When choosing an accent wall, look for a wall with minimal obstructions (windows, cabinets, etc.) that naturally draws the eye. In kitchens, this is often the wall behind a dining nook, a bare wall opposite the main cabinets, or the wall surrounding a doorway. Bold blues and greens work beautifully in kitchens, adding depth without overwhelming the space. For smaller kitchens, consider a lighter accent color that adds interest without making the space feel cramped.
The stumbling block is often fear of committing to color. If you’re hesitant, remember that paint is the easiest and least expensive design element to change if you don’t love the result. Start with a sample and test it on your wall before committing to the full gallon.
Before you raise an eyebrow at this simple suggestion, consider how color affects mood. A well-chosen accent wall can make your kitchen feel more energetic, calming, or welcoming – transforming not just how it looks, but how it feels to spend time there.
Let me show you another perspective – your faucet is probably the most frequently touched item in your kitchen. Upgrading this single element delivers outsized impact for relatively minimal investment in your kitchen design on a budget.

Budget-friendly faucet options have improved dramatically in recent years. Single-handle models offer clean lines and easy operation for $75-150. Pull-down spray faucets, once considered a luxury feature, now start around $100-200 and dramatically improve sink functionality. Even basic faucets now come in trendy finishes like matte black, brushed nickel, or bronze that can complement your overall kitchen aesthetic.
The key thing to understand is that faucet installation is surprisingly DIY-friendly for those with basic tools and a bit of patience. Most come with clear instructions and require minimal specialized knowledge. If you’re not comfortable with plumbing, a plumber can typically install a new faucet in under an hour, keeping labor costs reasonable.
Perhaps you’ve already guessed that the faucet isn’t just functional – it’s a focal point. Like jewelry for your sink area, it draws the eye and sets expectations about your kitchen’s style. This makes it one of the smartest places to allocate a portion of your kitchen design on a budget.
The sink area is the kitchen’s command center, and refreshing it creates ripple effects throughout the space. The good news? Many impactful sink updates cost under $100 total.

Beyond the faucet, consider simple additions like a new soap dispenser ($15-30), a stylish dish drying rack ($20-50), or a sink grid to protect the basin ($30-60). These small upgrades improve both function and aesthetics. Even replacing an old, stained sink strainer basket with a shiny new one ($10-15) makes a difference in how clean and fresh your sink appears.
Lighting above the sink is critical but often overlooked. Adding under-cabinet lighting directed at the sink area improves visibility and adds ambiance. Battery-operated puck lights or plug-in LED strips make this an easy DIY project for $20-40.
It’s kinda like giving your kitchen’s hardest-working area the appreciation it deserves. Since you spend so much time at the sink, these small improvements deliver daily satisfaction far beyond their modest cost.
Here’s where everything changes – natural light is completely free, yet it’s one of the most powerful factors in how spacious, clean, and inviting your kitchen feels. Maximizing what you already have costs nothing but delivers dramatic results.

Start by removing obstacles. Trim back outdoor landscaping that blocks windows. Replace heavy window coverings with lighter options that allow maximum light while still providing privacy when needed. Clean windows thoroughly inside and out – you’d be amazed how much more light comes through spotlessly clean glass compared to dirty windows.
My experience went like this: A client complained about her “dark” kitchen and was considering expensive recessed lighting. Before making that investment, we simply trimmed the overgrown shrubs outside her kitchen window, thoroughly cleaned the windows, and replaced dark burgundy curtains with light filtering blinds. The transformation was immediate and cost less than $100, saving thousands on unnecessary electrical work.
The potential here is enormous. A well-chosen rug can visually separate cooking zones from dining areas, add color and pattern, and make standing at the sink or stove more comfortable – all for $50-200, depending on size and quality.

For kitchen rugs, prioritize practicality alongside style. Flatweave rugs ($30-150) offer durability and easy cleaning. Outdoor rugs ($40-200) are specifically designed to withstand moisture and heavy traffic, making them perfect for kitchen use. Indoor/outdoor options typically resist stains and can often be hosed off for cleaning. Look for machine-washable varieties for the ultimate in kitchen practicality.
The tricky part is sizing and placement. For under a dining table, ensure the rug is large enough that chairs remain on the rug even when pulled out. For cooking areas, smaller 2×3′ or 3×5′ rugs in front of the sink or stove add comfort without becoming obstacles. Secure rugs with non-slip pads to prevent dangerous slipping on hard kitchen floors.
You may have noticed how a rug instantly makes a kitchen feel more “finished” and intentionally designed. It’s one of those elements that signals your kitchen isn’t just functional – it’s a thoughtfully created space within your home.
Window treatments often feel like an afterthought in kitchen design on a budget, but they’re actually one of the highest-impact, lowest-cost elements you can update. Custom window treatments from retailers can cost hundreds, but DIY versions often run $20-75 total.

The simplest DIY window treatments require minimal or no sewing. Café curtains, which cover just the lower portion of windows, provide privacy while allowing light through the top. These can be made from tea towels, tablecloths, or even drop cloths with just a curtain rod and clip rings. No-sew Roman shades can be created using fabric glue or iron-on hem tape. For a modern look, roller shades can be customized with fabric and wallpaper paste.
I can sense your skepticism about DIY window treatments looking “homemade” rather than “custom.” The secret is in the details – precise measurements, careful ironing, and quality materials make all the difference. Take your time with these finishing touches, and your DIY window treatments will look surprisingly professional.
Here’s what happened when I started helping clients prioritize their kitchen upgrades – they stopped feeling overwhelmed and started seeing real transformation, even with limited budgets. The secret is identifying which specific changes will deliver the biggest visual and functional improvements for your unique kitchen.

Start by honestly assessing your kitchen’s biggest pain points. Is it lack of storage? Poor lighting? Dated aesthetics? Create a list ranking issues from most to least problematic. Then, evaluate potential solutions based on both impact and cost. High-impact, low-cost improvements should top your priority list. For most kitchens, cabinet updates (paint and hardware) deliver the biggest visual transformation for the least money. Lighting improvements and decluttering/organizing typically rank next in the impact-to-cost ratio.
The breakthrough came when my clients stopped trying to do everything at once and instead tackled their kitchen design on a budget in phases, starting with the changes that would make the biggest difference. This approach not only makes the process more financially manageable but also allows you to adjust your plan as you go, responding to how each change affects the overall feel of your kitchen.
Let me paint you a picture… Professional labor often accounts for 30-50% of kitchen renovation costs. By tackling suitable projects yourself, you can potentially cut your overall budget in half while gaining valuable skills and a sense of accomplishment.

For DIY beginners, start with projects that require minimal specialized skills. Painting cabinets, replacing hardware, installing a simple backsplash, or building open shelving are all achievable for most homeowners with basic tools and patience. YouTube tutorials, online guides, and even in-store workshops at home improvement retailers can provide the guidance you need to tackle these projects successfully.
Safety should always be your priority when embracing DIY. Wear appropriate protective gear (safety glasses, gloves, dust masks) when needed. Disconnect power before working with anything electrical. Read and follow all product instructions carefully. And most importantly, know your limits – plumbing, gas lines, and complex electrical work are best left to professionals unless you have specific training.
Things took an interesting turn when I started seeing clients’ pride in their DIY accomplishments. Beyond the financial savings, there’s something deeply satisfying about pointing to an element in your kitchen and saying, “I did that myself.” That sense of ownership and accomplishment adds value that can’t be measured in dollars.
The game-changer happened as I discovered that the most stylish kitchens often incorporate items from surprisingly affordable sources. The key isn’t where you shop but how you curate what you find.

Look beyond traditional kitchen retailers to stores like HomeGoods, TJ Maxx, and Marshalls for unique accessories, lighting, and even small appliances at 30-60% below typical retail prices. Dollar stores are treasure troves for organizational items, basic glassware, and even some decorative elements. Online marketplaces like Facebook Marketplace and Craigslist offer gently used cabinets, countertops, and appliances at dramatic discounts. Even big box stores like IKEA, Target, and Walmart have significantly upped their kitchen design game in recent years.
When shopping these budget-friendly sources, focus on quality over quantity. One well-chosen piece makes more impact than several mediocre items. Look for simple, classic designs rather than trendy patterns that might quickly look dated. Consider how items from different sources will work together – a cohesive color scheme or complementary materials can unify pieces from diverse retailers.
Do you see how huge that is? By shopping strategically, you can create a kitchen that looks custom and high-end while spending a fraction of what you might expect. It’s not about where you shop – it’s about training your eye to recognize quality and potential regardless of price tag or source.
Kitchen design on a budget isn’t about settling for less – it’s about being smarter with your resources and more creative with your solutions. By focusing on high-impact changes like cabinet paint, hardware updates, and strategic accessories, you can transform your kitchen without emptying your savings account.
Remember that the most beautiful kitchens aren’t necessarily the most expensive ones. They’re the ones that reflect the personality and needs of the people who use them daily. By embracing DIY projects, shopping smartly, and prioritizing changes that matter most to you, you can create a kitchen that feels both personal and polished.
I’ve seen it happen countless times – homeowners who thought their dream kitchen was financially out of reach discover that with these budget-friendly approaches, they can create a space they truly love. Your perfect kitchen might be just a few strategic upgrades away.