Physical Address
304 North Cardinal St.
Dorchester Center, MA 02124
Physical Address
304 North Cardinal St.
Dorchester Center, MA 02124
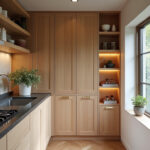
Discover 23 clever kitchen storage ideas that maximize every inch of space. From hidden drawers to vertical organizers, transform your kitchen into an efficient, organized haven.
As an artist, my studio is my sanctuary. It’s where I can spread out, make a glorious mess, and bring ideas to life. But I’ve realized over my years of designing creative spaces for others that my kitchen is my other studio. It’s where I mix flavors instead of paints, where I assemble a meal instead of a collage. And just like a traditional studio, when it’s cluttered and chaotic, the magic just… stops.
I’ve seen it time and again: countertops buried under appliances, cabinets overflowing with mystery boxes, and that one drawer we all have—the black hole for mismatched utensils. It’s impossible to feel creative when you’re wrestling with your own stuff. But here’s the secret I’ve learned from designing hundreds of workspaces: you don’t need a massive renovation to fix it. You just need to see your kitchen with an artist’s eye and a designer’s logic.
So, let’s roll up our sleeves. We’re going to walk through 23 ways to reclaim your kitchen, making it a place that truly fuels your creativity. Think of it less as cleaning and more as curating your most important creative space.
Before you buy a single bin or divider, you have to do the most satisfying job of all: the great purge. Honestly, this is my favorite part. It’s like scraping an old, muddy painting clean to reveal a fresh canvas. You can’t create a masterpiece on a cluttered surface, and you can’t organize a kitchen that’s full of expired, forgotten, and unloved items.
So, put on some music, grab a trash bag, and start with just one cabinet or one drawer. Be ruthless. Check every date. That jar of paprika from 2017? It’s lost its fire. The can of water chestnuts you bought for a recipe you never made? Let it go. I once helped a client reclaim nearly a third of her pantry space this way. The sigh of relief when she saw the empty shelves was so real. You’re not just making space; you’re getting rid of the visual noise that drains your energy before you even start cooking.
What to toss without a second thought:
Once you’ve cleared the decks, take a moment. Feel that? It’s the feeling of possibility. Now your kitchen is ready for some real, functional artistry.
And now that you have this beautiful, empty space to work with, let’s talk about the first place the chaos usually creeps back in: the utensil drawer.
That tangled mess of spatulas, whisks, and can openers is a classic creativity killer. Rummaging for the right tool mid-sauté is stressful, not inspiring. This is where drawer dividers become your best friend. But please, don’t just grab the first plastic tray you see. The goal isn’t just to separate—it’s to create a system that flows with how you work.
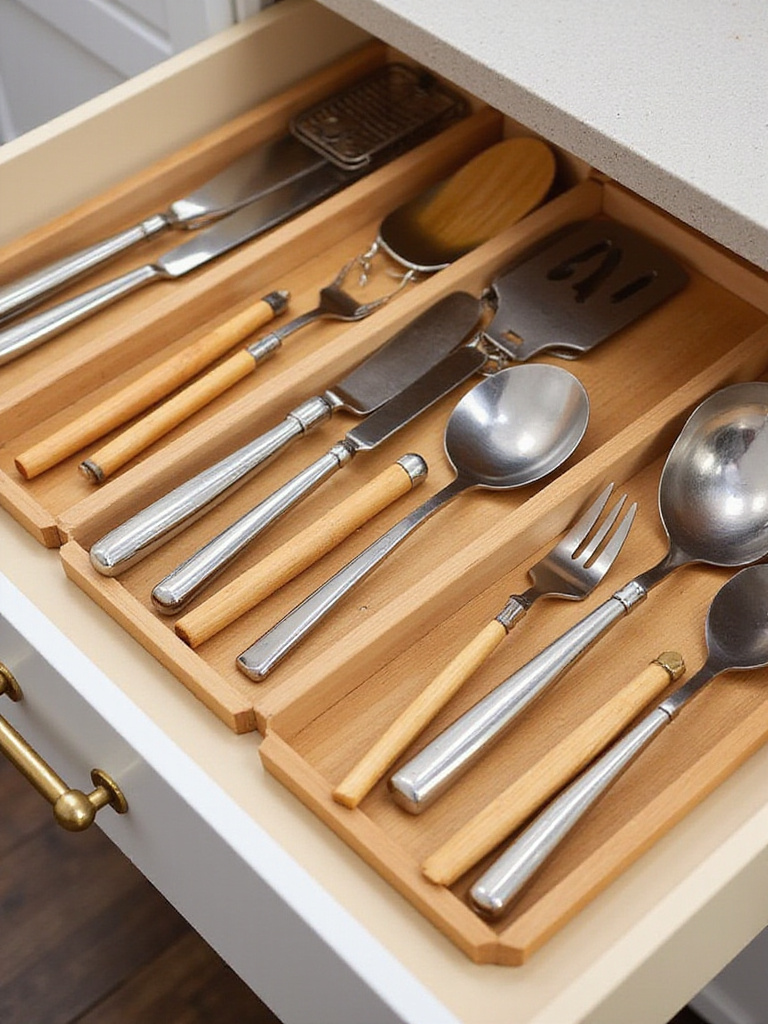
I think of it like setting up a watercolor palette. You don’t mix your blues in with your yellows. I always tell my clients to group their utensils by task. Put the tools you use for breakfast prep—your favorite spatula for eggs, your coffee scoop—in the most accessible spot. The baking tools can live together, and the specialty gadgets you only pull out once a month (I’m looking at you, melon baller) can go in the back. Adjustable bamboo dividers are fantastic because they feel warm and natural, and you can shift them around as your cooking habits evolve.
My rule of thumb is this: if you can’t find it in five seconds, the system isn’t working for you—it’s working against you.
This simple change ends that frantic morning search for a teaspoon when you’re half-awake and just want your coffee. It’s a small act of kindness to your future self.
And speaking of small things that cause big frustration, let’s tackle that spice collection.
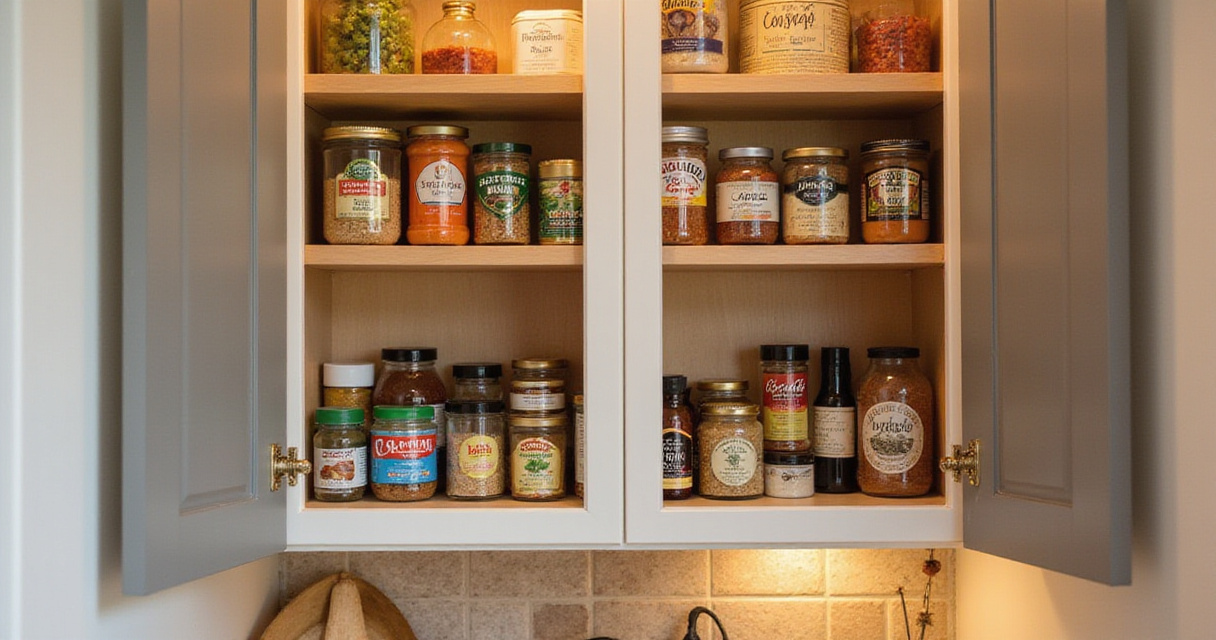
Spices are the paint pigments of the culinary world, but for most people, they’re stored in a way that feels more like a shoebox of broken crayons. You can’t see the colors, you don’t know what you have, and you end up using the same three every time. A tiered spice rack is the solution. It puts your entire flavor palette on display.
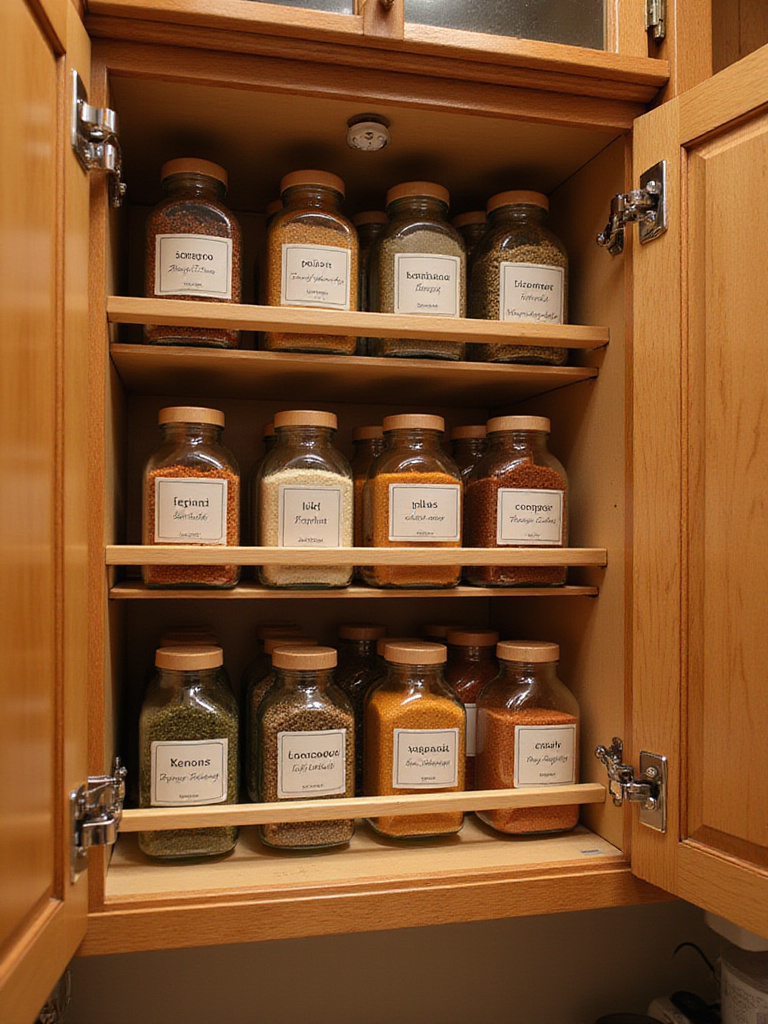
When I work with clients, I notice a huge shift in their cooking once their spices are visible. At first, many want to alphabetize them, but I find that’s rarely the most intuitive way. Instead, try organizing them like an artist’s palette—by function or flavor profile. Group your warming spices (cinnamon, nutmeg, cloves), your Italian herbs (oregano, basil, rosemary), and your go-to grilling rubs. Suddenly, when you’re making chicken, your eyes will land on the whole family of potential flavors, not just the salt and pepper.
If you really want to level up, transfer them to small, uniform glass jars. It’s not just about looking pretty; it’s about instantly seeing when you’re low on cumin before you start making chili. It turns the act of seasoning from a rummage into a deliberate, creative choice.
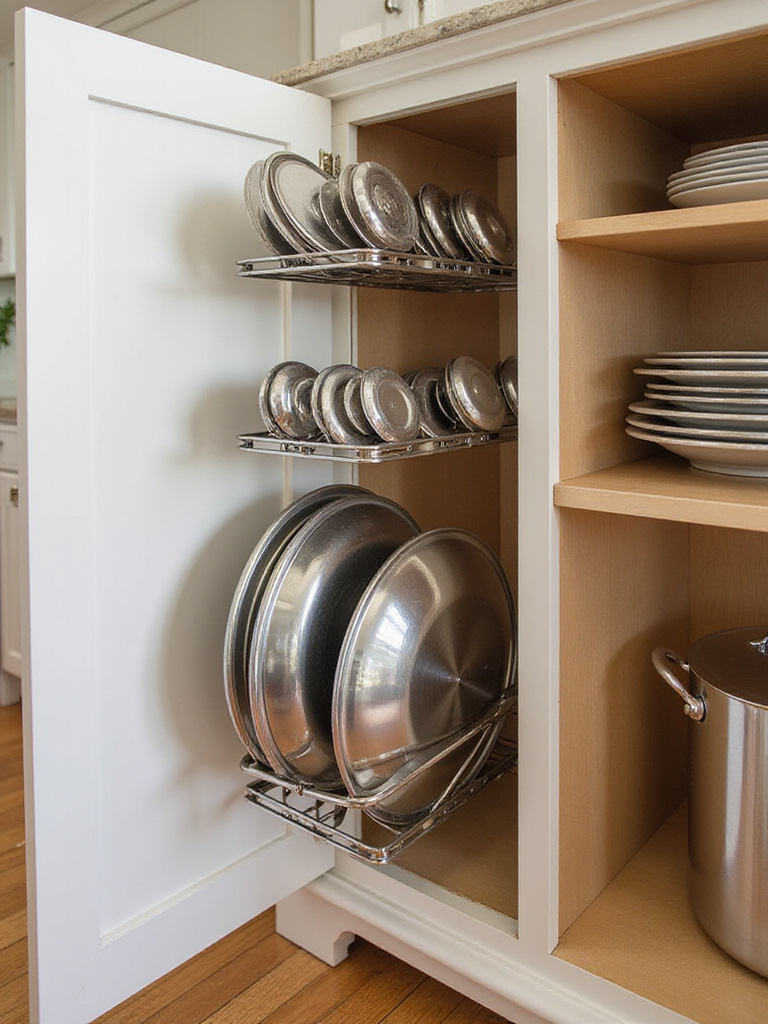
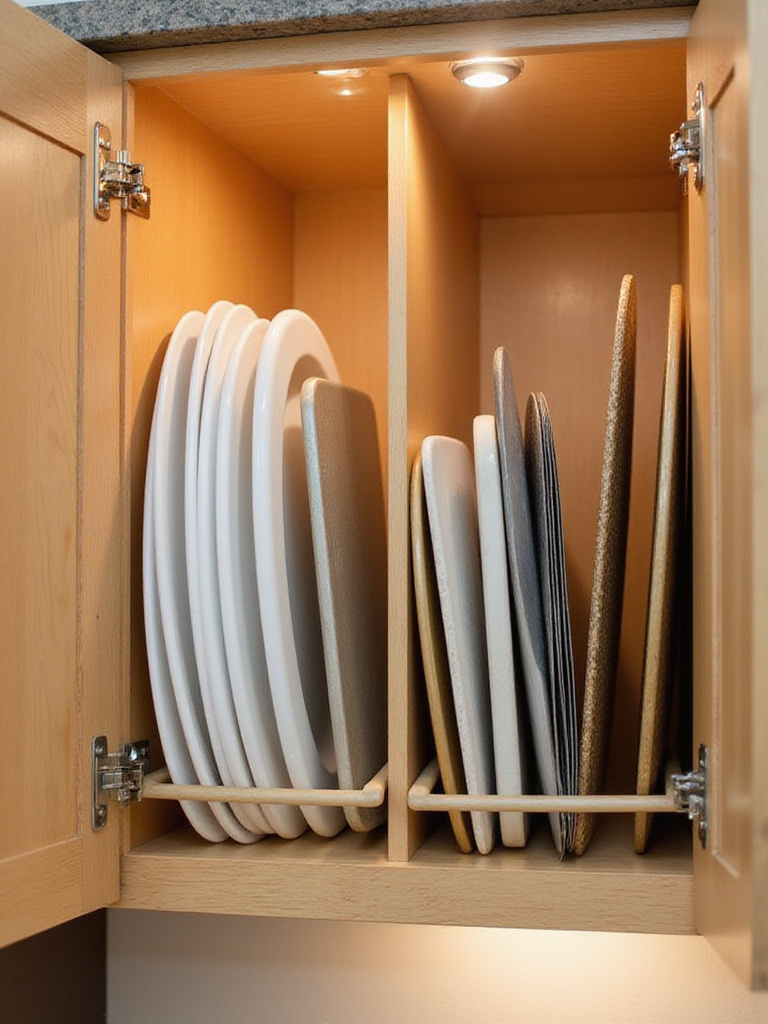
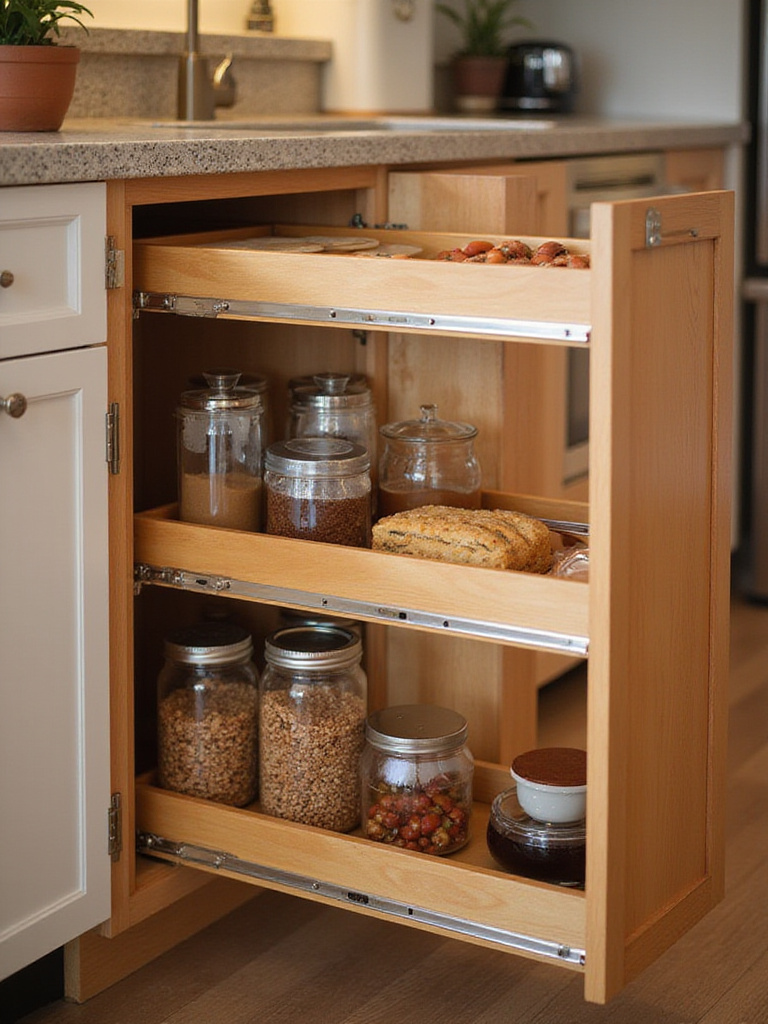
From tiny spice jars, we move on to the giants of the kitchen: your pots and pans.
That crashing sound of stacked pans sliding around as you try to pull out the one at the bottom? I think we can all agree it’s the worst. It’s not just loud and annoying; it’s bad for your cookware. Stacking pans, especially non-stick ones, is a recipe for scratches and scrapes. The solution is simple: store them vertically.
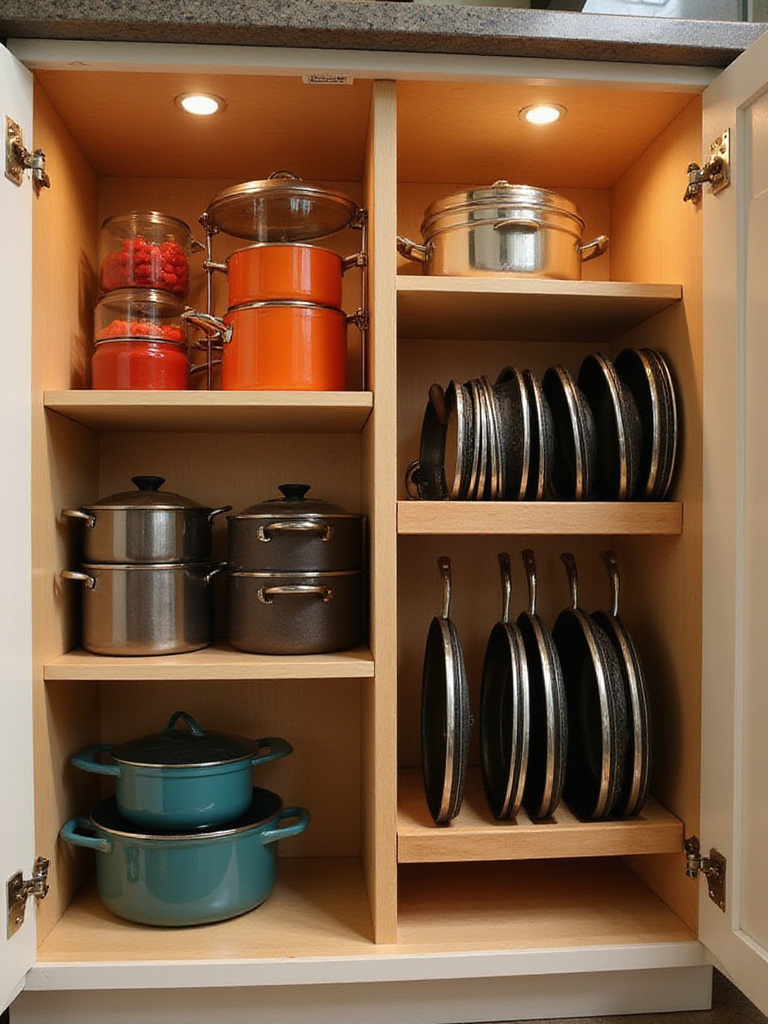
Think about how you’d store precious records or paintings—not in a wobbly, heavy stack. Vertical pan organizers are brilliant because they let each pan stand on its own. You can grab exactly what you need without unstacking three others first. This also works wonders for baking sheets, cutting boards, and those flimsy muffin tins. Suddenly, that deep, awkward cabinet becomes one of the most efficient spots in your kitchen.
You can find simple, inexpensive wire racks almost anywhere. It’s a five-minute change that will make you feel like a genius every single time you reach for a skillet without causing an avalanche.
Now, let’s move to the most dreaded space in the entire kitchen.
Ah, the cabinet under the sink. It’s dark, it’s awkward, it has a giant pipe in the middle… it’s a design nightmare. For most, it becomes a graveyard for half-empty bottles of cleaner and soggy sponges. But with a little creative thinking, this space can be surprisingly useful. The trick is to use vertical space and modular pieces.
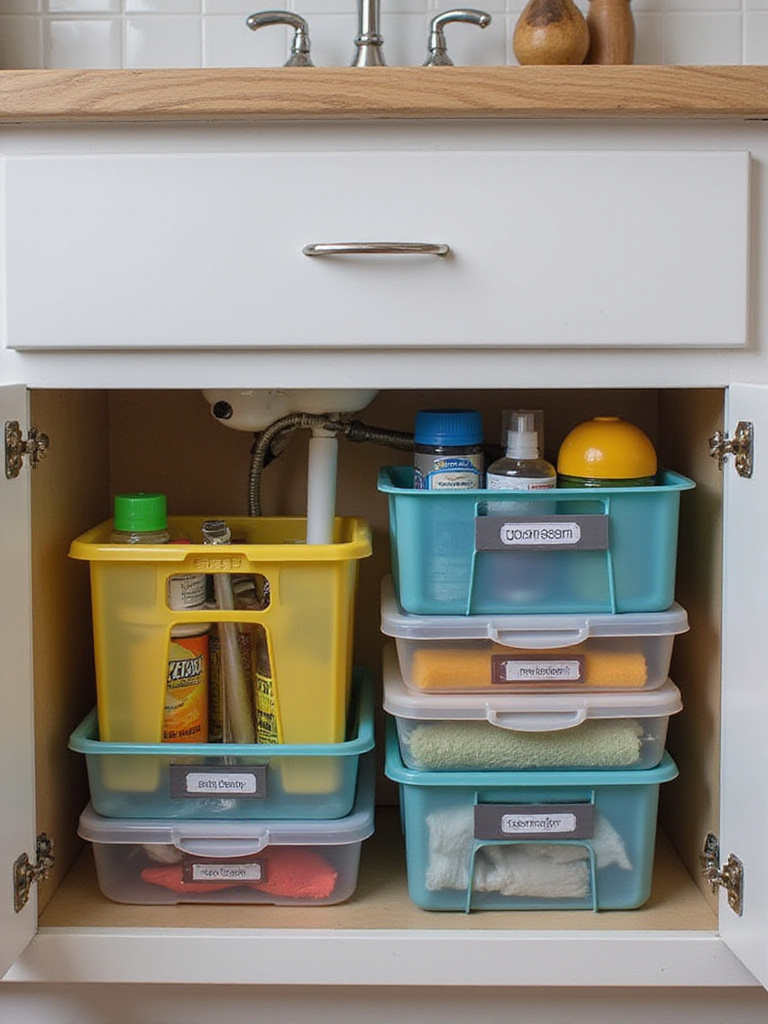
Forget trying to find one perfect organizer. Instead, get a collection of stackable, pull-out bins. Use one for your daily essentials—dish soap, sponges, dishwasher pods—and put it right at the front. Use another, perhaps a deeper bin, for your backup supplies. Clear bins are your friend here, so you can see what’s inside without pulling everything out. A small tension rod installed across the top is also a game-changer for hanging spray bottles and cleaning cloths, keeping them dry and out of the way.
It’s about working with the awkwardness, not against it. By corralling the chaos into a few smart containers, you can transform that black hole into a surprisingly orderly and functional part of your kitchen.
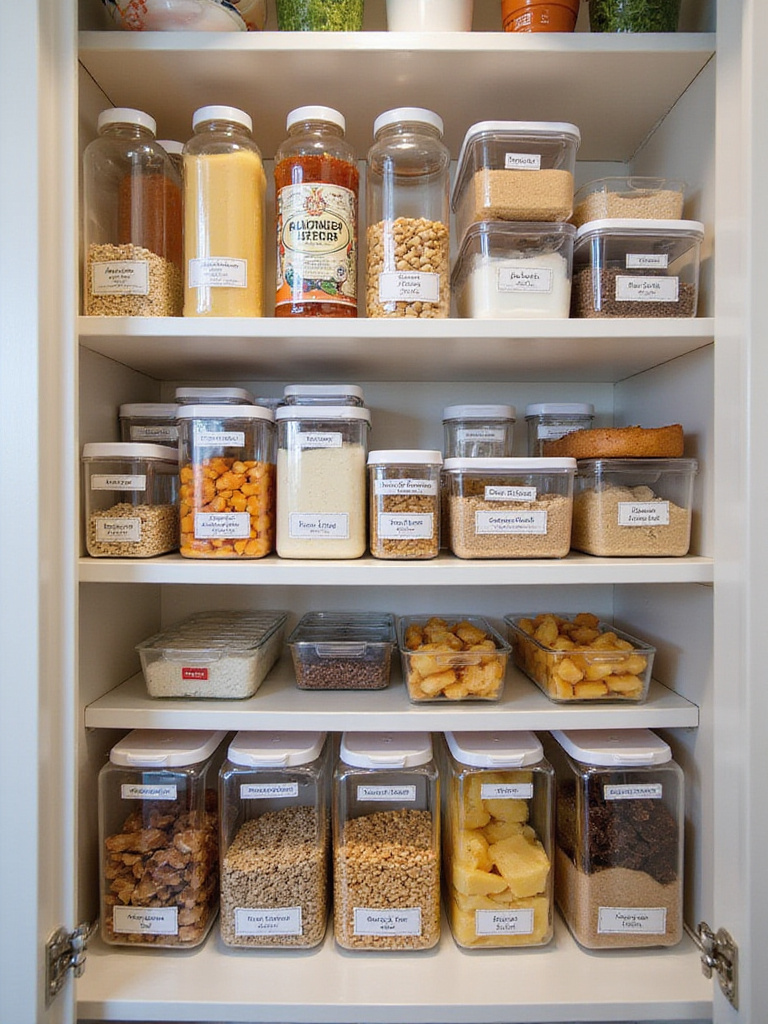
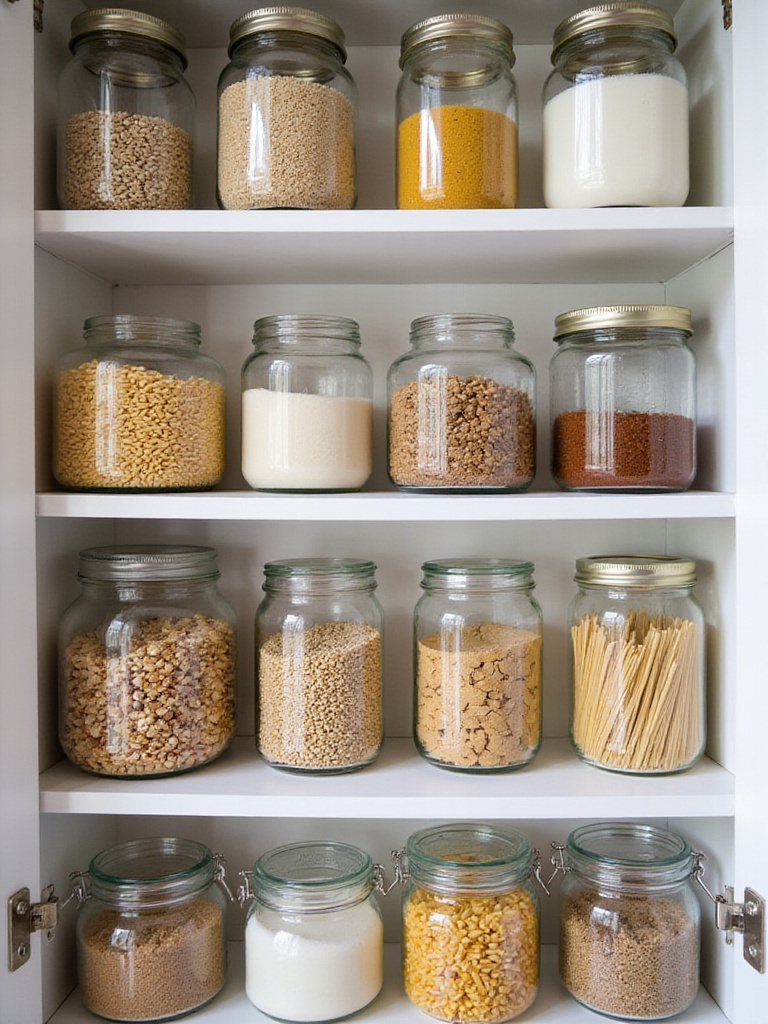
The same principle of visibility applies to the food you actually eat, which brings us to the pantry.
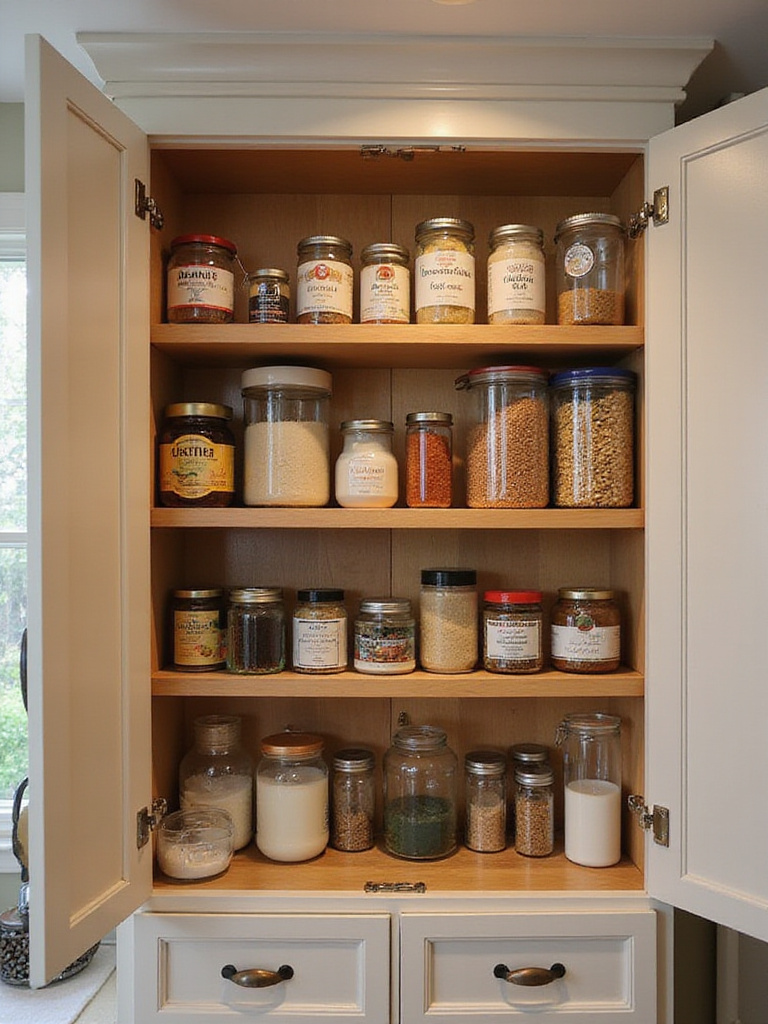
Decanting pantry staples like flour, sugar, rice, and pasta into clear, airtight containers feels like a big trend, but it’s one I stand by completely. It’s not just about getting that picture-perfect pantry look. It’s one of the most practical, waste-reducing things you can do. When your ingredients are hidden in a mess of half-open bags and mismatched boxes, you can’t see what you have.
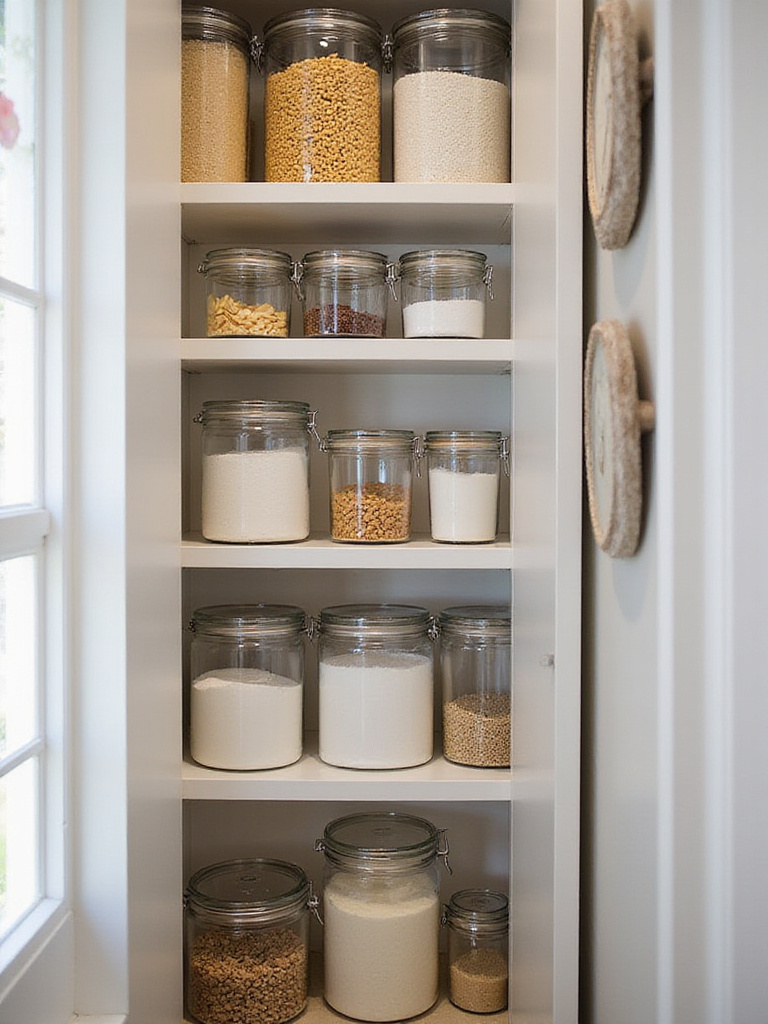
The result? You end up with three bags of quinoa and no rice. Or you discover that box of crackers you bought went stale because the bag wasn’t sealed properly. Transferring everything to clear containers solves this instantly. You can see your inventory at a glance, you know when to restock, and your food stays fresher, longer. It also creates a sense of calm. The visual chaos of brand packaging is gone, replaced by a clean, unified system that lets the ingredients themselves be the star.
Start with your most-used items. Label everything with the contents and the “use by” date. You’ll be amazed at how this simple switch inspires you to cook more, because you can actually see the delicious possibilities right in front of you.
Speaking of things that create chaos, what about those runaway pot lids?
Pot lids are the socks of the kitchen—they’re always getting separated from their partners and creating a jumbled mess. Stacking them is a disaster, and letting them slide around loose in a cabinet is just asking for frustration. The solution is hiding in plain sight: the inside of your cabinet doors.
This is some of the most underused real estate in the entire kitchen. A simple, inexpensive set of stick-on or screw-in lid holders can instantly solve the problem. Your lids will be visible, easy to grab, and perfectly matched to the pot you just pulled out. And by getting them out of the main cabinet, you’ve just freed up a huge amount of shelf space for the pots themselves, or even for that stand mixer you’ve had sitting on the counter.
This is a perfect example of a small, targeted solution that has a huge impact on your daily workflow. It’s elegant, efficient, and just plain smart.
Now let’s get another bulky item off your countertop.
That clunky knife block takes up a shocking amount of valuable counter space. For years, it was just accepted as a kitchen essential, but I’m here to tell you there’s a better way. Mounting a Magnetic Knife Strip on the wall is one of my favorite upgrades for both form and function. It frees up your prep area and, frankly, looks incredibly cool.
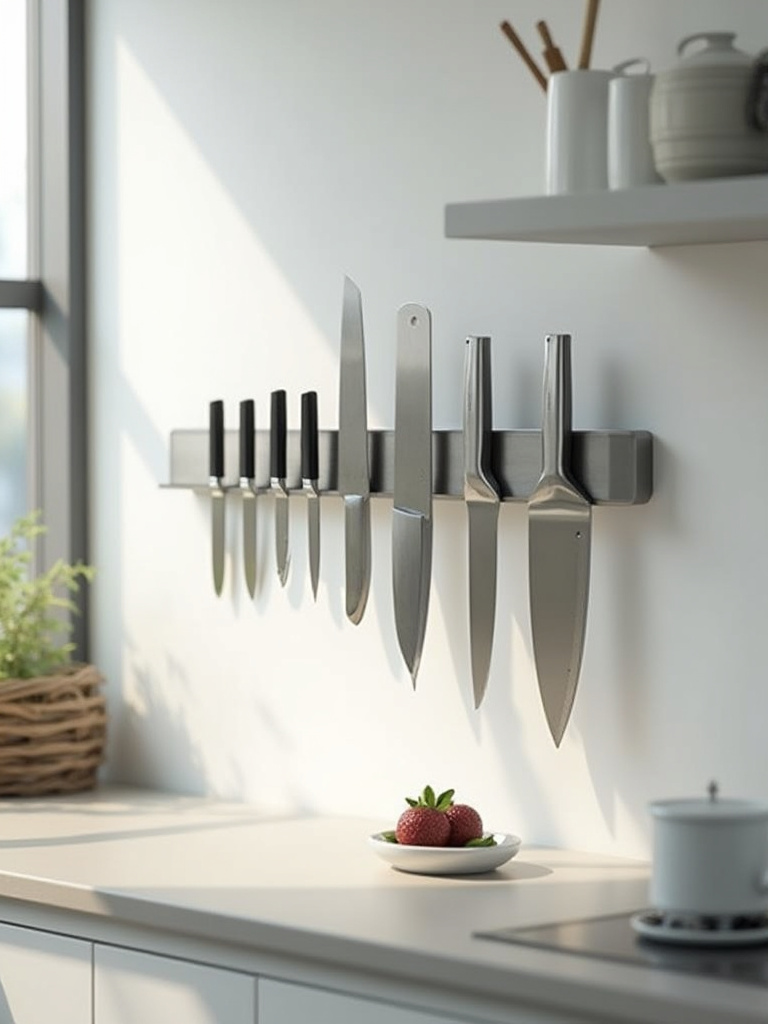
Having your knives displayed on a magnetic strip turns your tools into a piece of functional art. You can see your whole collection at once, making it easy to grab the right knife for the job. It’s also more hygienic than a traditional block, where moisture and crumbs can get trapped in the slots. You can even use it to hold other metal tools like your kitchen shears or a metal-handled whisk.
Find a spot on your backsplash that’s easy to reach but safely out of the way of your main work zone. It’s an instant upgrade that makes your kitchen feel more professional and spacious.
And while we’re mounting things to the wall…
If you have a collection of beautiful or meaningful mugs, why are you hiding them in a dark cabinet? Free them! Using a section of wall to create a mug display is a wonderful way to add personality to your kitchen and free up an entire shelf of cabinet space.
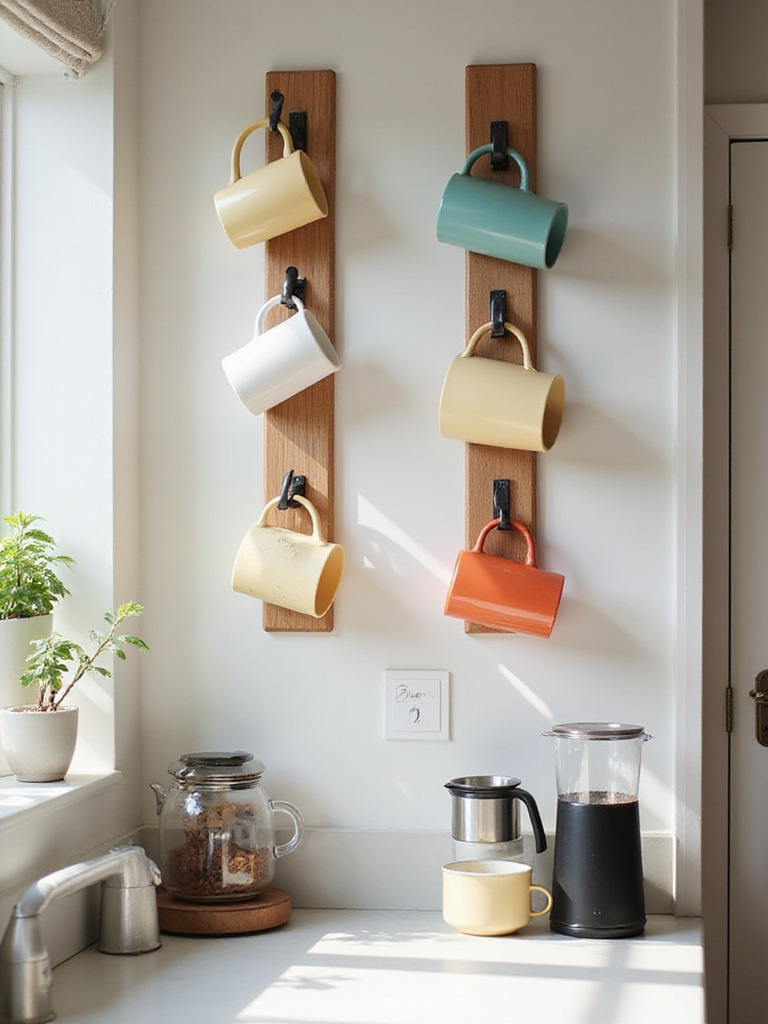
This works especially well if you create a dedicated coffee or tea station. A few simple, sturdy hooks installed under an upper cabinet or on an open patch of wall can turn your collection into a rotating display of your favorite pieces. It’s functional art. You get to enjoy seeing your mugs every day, and your morning routine becomes just a little bit more delightful.
It’s about finding these little opportunities to blend personality with practicality. That’s what makes a space feel truly yours.
The next step is to apply this kind of intentional thinking to your entire pantry.
Professional kitchens are run on a system called “mise en place”—everything in its place. You can bring that same efficiency into your own home by creating zones in your pantry. Instead of having a random assortment of cans and boxes, you group items by how you use them. This little mental shift can radically streamline your meal planning and grocery shopping.
So what does this look like?
Organizing by category means you “shop your pantry” first and stop buying duplicates. It takes the guesswork out of “what’s for dinner?” because you can see your building blocks grouped together, ready for inspiration to strike.
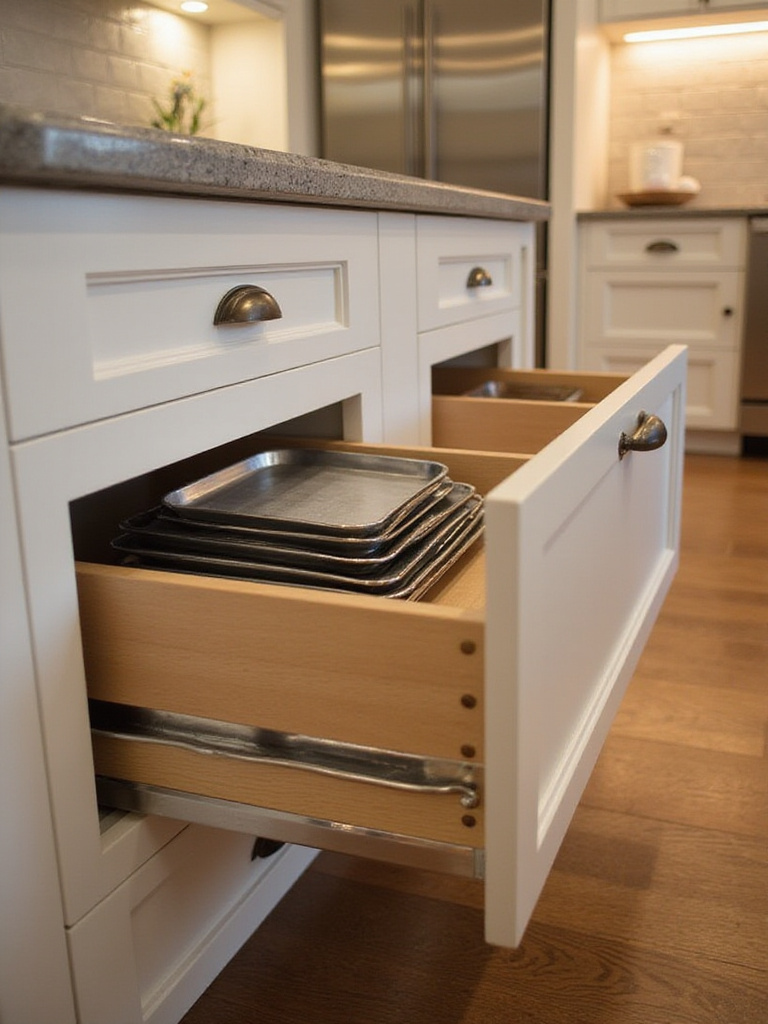
This logic of vertical separation and function applies just as well to your bakeware.
We talked about this for pans, but it bears repeating specifically for that wobbly stack of baking sheets, cooling racks, and muffin tins. Storing these items vertically is a non-negotiable for a functional kitchen. Trying to wrestle the one you need from the bottom of a heavy stack is a task that has made many an aspiring baker give up and order takeout.
Slim cabinet dividers are the key. They are inexpensive, easy to install, and will instantly transform that mess into a tidy file system. You can slide out the exact sheet or rack you need with zero friction. It also protects your bakeware from getting warped and scratched.
You can often fit these dividers into that narrow, “what-do-I-do-with-this?” cabinet above the fridge or oven. It’s the perfect home for these flat, awkward items.
Now let’s talk about another awkward cabinet: the deep corner.
Ah, the deep corner cabinet. A place where Tupperware lids and obscure small appliances go to die. It’s a vortex of lost items. But this is where an old-school invention comes to the rescue: the Lazy Susan. A simple turntable, or a more integrated multi-level one, makes every single item in that corner accessible with a simple spin.
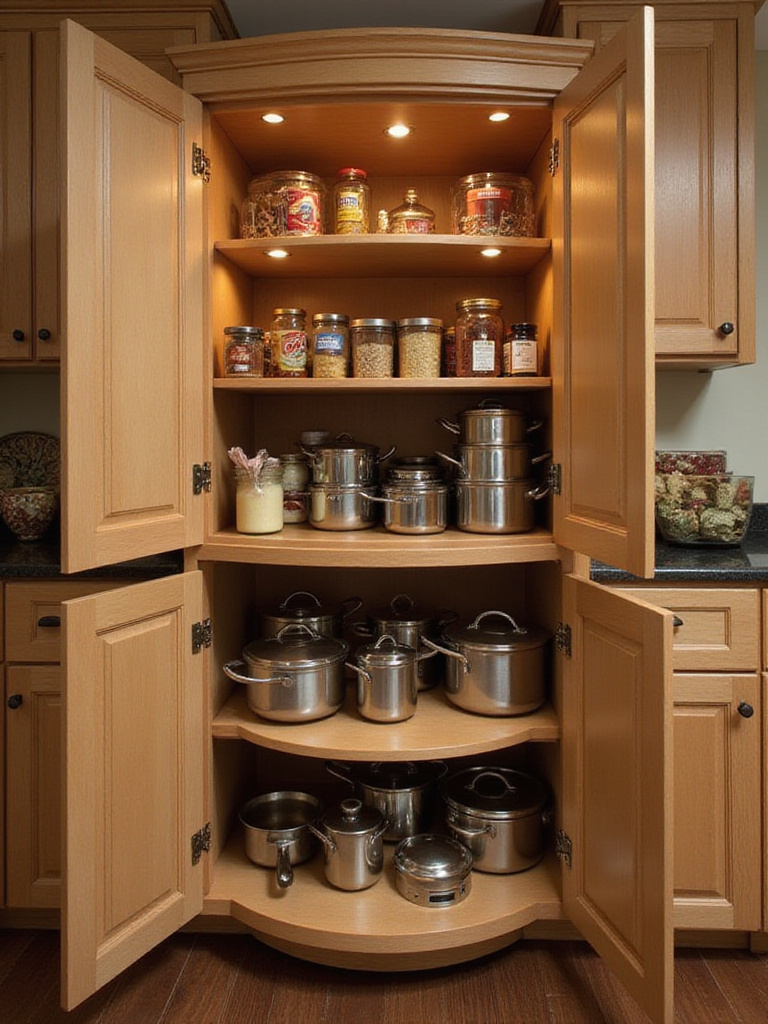
Nothing gets lost in the back because, well, there is no back anymore. It’s all front! Use it to store things like mixing bowls, small appliances, or even your oils and vinegars. For an extra level of organization, you can use clear, pie-shaped bins on the turntable to keep smaller items from toppling over when you spin it.
It’s such a simple mechanism, but it completely solves one of the most common and frustrating kitchen design flaws.
Let’s look for another piece of hidden real estate.
The back of your pantry door is prime real estate just waiting to be claimed. A simple, hook-on over-the-door organizer can add a huge amount of storage without you needing to pick up a single power tool. This is an amazing solution for renters or anyone who’s a bit shy about drilling into their walls.

This space is perfect for all the little things that get lost on deep shelves. Think spice packets, small jars of mustard, boxes of tea, rolls of foil and plastic wrap, or even your collection of reusable shopping bags. By moving these items to the door, you free up your main shelves for bulkier things like cereal boxes and cans.
It keeps your most-used small items visible and easy to grab, making your whole pantry system work smarter, not harder.
But what if you don’t have a pantry door, or you just need a little more?
I absolutely love a slim rolling cart. It’s the ultimate problem-solver for tiny kitchens or for that awkward 6-inch gap between your fridge and the wall. These little carts are the Swiss Army knives of storage, capable of transforming a sliver of useless space into a functional, mobile pantry.
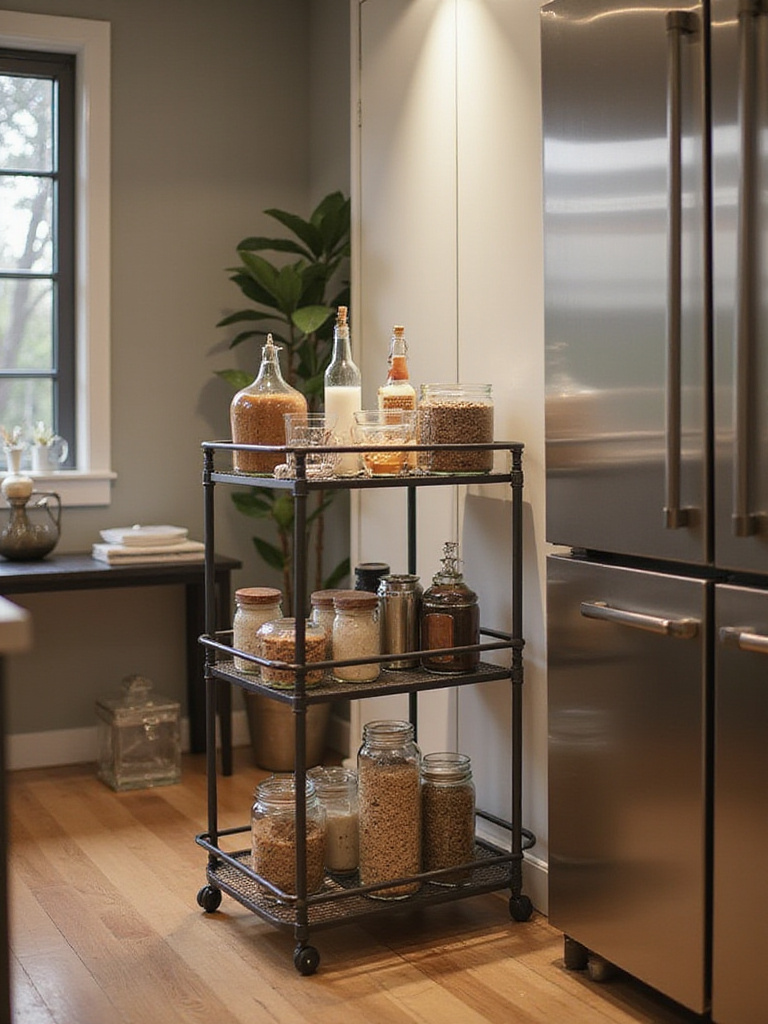
Use it to create a mobile coffee bar that you can roll out of the way when you’re not using it. Load it up with your most-used oils, spices, and a crock of utensils to create a prep station that you can pull right up next to your cutting board. Or, use it for things that don’t quite have a home, like potatoes and onions (which need air circulation) or your collection of fancy cocktail bitters.
Its flexibility is its superpower. It can be whatever you need it to be, exactly where you need it, and that’s the essence of smart design.
While we’re talking about produce, let’s keep it fresh.
Not everything belongs in the crisper drawer. In fact, many fruits and vegetables will last longer and taste better when stored at room temperature. A beautiful tiered wire or woven basket on the counter isn’t just for looks; it’s a functional tool for keeping your produce fresh.
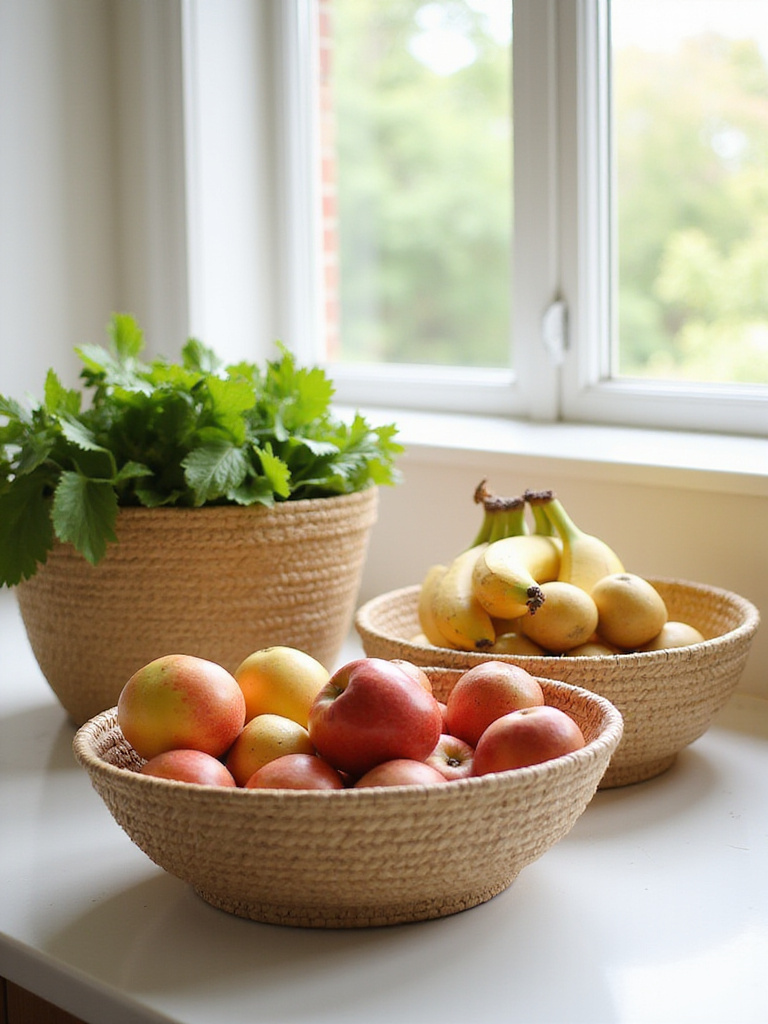
This method is perfect for things like tomatoes (refrigeration kills their flavor and texture), onions, garlic, potatoes, bananas, and avocados. Not only does it provide the air circulation they need, but it also keeps these healthy options front and center. When you see a beautiful bowl of apples on the counter, you’re a lot more likely to grab one for a snack than if they’re hidden in the fridge.
Just a quick pro tip: Keep your bananas, apples, and tomatoes separate from other produce if you can, as they release ethylene gas which can cause other nearby fruits and veggies to ripen (and spoil) faster.
Now for a different kind of container chaos.
Is there any more frustrating kitchen task than trying to find a matching lid for your food storage container? That deep drawer stuffed with a jumble of plastic and glass is a universal pain point. The solution is to stop thinking of it as one big space and start segmenting it with bins and dividers.
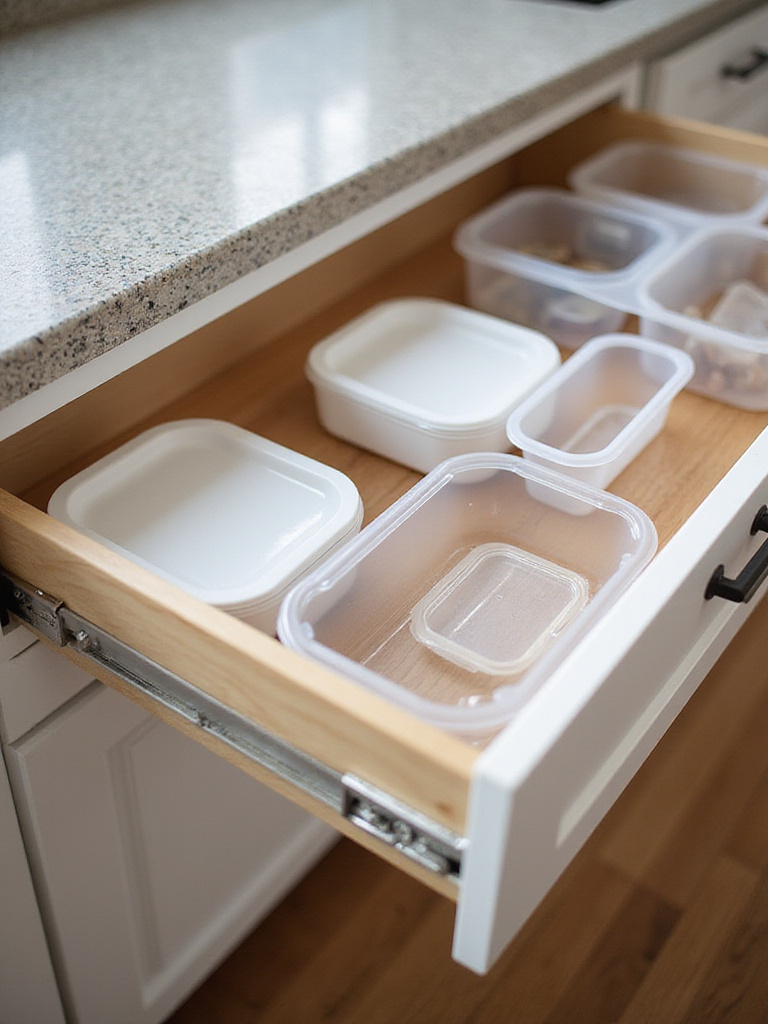
Create a system. Dedicate one section of the drawer to the containers themselves, nested by size. Then, use a narrow, upright file-style organizer for the lids. Storing lids vertically, like little records, means you can flip through and find the right size in seconds. No more avalanches. No more despair.
I had a client who was ready to throw out all of her containers and start over. Instead, we spent 20 minutes inserting a few tension-rod dividers into her drawer. It completely changed her relationship with leftovers. It’s proof that sometimes the most elegant solutions are also the simplest.
And you don’t always need to buy new containers to get organized.
Before you recycle that lovely glass jar from your pasta sauce or pickles, take another look. With a good scrub and a new label, it can be a fantastic, free, and eco-friendly storage container for your pantry. Storing bulk-bin items like nuts, seeds, grains, or lentils in upcycled glass jars is a win-win-win.
You’re reducing waste, saving money, and creating a pantry that has a cohesive, rustic-chic vibe. The key is to get them truly clean (a soak in hot, soapy water with a little baking soda usually gets the label residue off) and then label them clearly. A simple piece of masking tape and a Sharpie works, or you can get creative with a paint pen.
There’s a certain satisfaction that comes from creating a beautiful, functional system out of something you were about to throw away. It’s resourceful, practical, and a nod to a more sustainable way of living.
For a different kind of custom storage, look to the walls.
As a designer of creative studios, the pegboard is one of my all-time favorite organizational tools. Its power lies in its total, unending customizability. A pegboard transforms a blank wall into a dynamic storage system that you can change and rearrange to your heart’s content. And it’s not just for garages anymore.
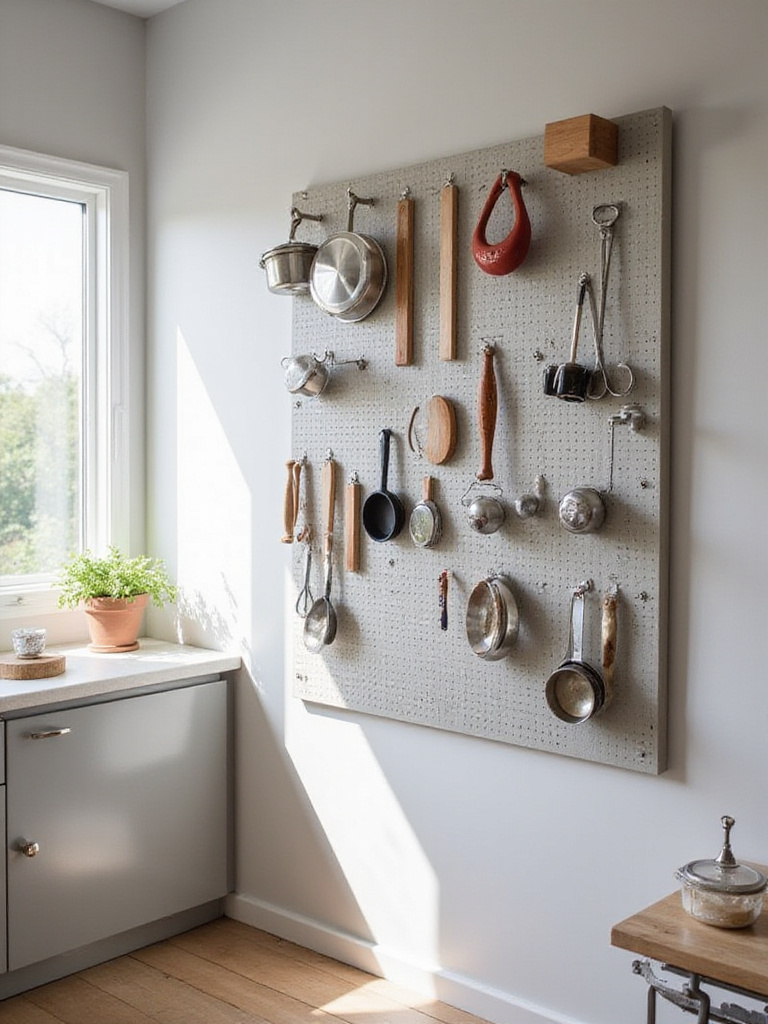
A well-placed pegboard in the kitchen can be a stunning and intensely practical feature. Use hooks to hang everything from measuring cups and spoons to whisks and small pans. Add small shelves for spices or a little plant. Hang wire baskets to hold garlic or your collection of tea bags. As your tool collection grows or your needs change, you can move things around in seconds.
It’s the opposite of fixed, permanent shelving. It’s a living system that adapts with you, ensuring your most-used tools are always visible and within arm’s reach.
If a whole pegboard feels like too much, you can get a similar effect with a more minimalist approach.
Open shelving can be a contentious topic—some people love it, some fear the dust. I think the key is to use it strategically. A couple of simple floating shelves can break up a solid wall of upper cabinets, adding a sense of airiness and a perfect spot for a little “kitchen shelfie” moment.
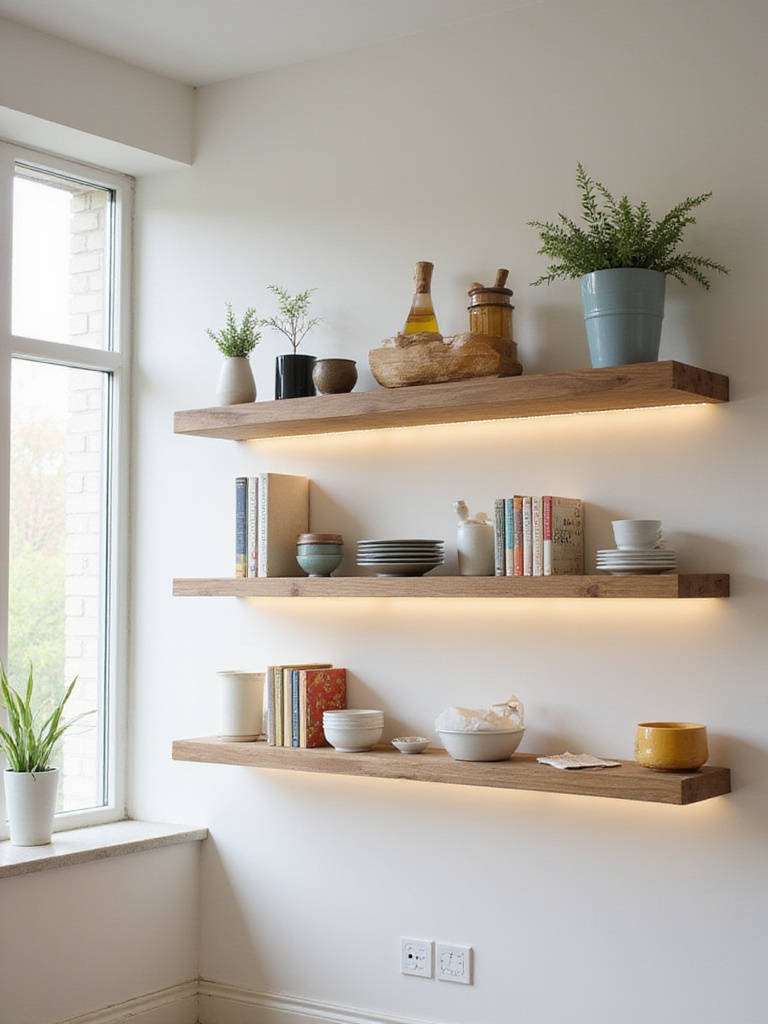
This is your chance to mix function with beauty. Use floating shelves to store your everyday dishes and glasses for easy access. This forces you to be curated and not over-clutter. Then, mix in a few decorative objects: a favorite cookbook, a small piece of art, a trailing plant. It’s a space to show off your personality.
The trick to making them look great and not cluttered is to leave a little breathing room. Don’t pack them full. Group items by color or material to create a cohesive look. When done right, floating shelves are less about pure storage and more about creating a beautiful, personal moment in your kitchen.
Now, let’s look down low for a major upgrade.
Bending down and digging through a deep, dark lower cabinet is a recipe for a backache and lost items. This is where pull-out shelves are an absolute game-changer. Retrofitting your existing cabinets with sliding shelves is one of the single best investments you can make for your kitchen’s functionality.
Suddenly, everything in that cabinet is accessible. With a gentle pull, the entire contents of the shelf glide out to meet you. No more getting on your hands and knees with a flashlight. No more forgetting about the crockpot you stored in the very back. It’s life-changing for storing heavy items like pots, pans, and small appliances like your stand mixer or blender.
While it’s a bit more of an investment than a simple bin, the ergonomic benefit and daily convenience it provides are worth every penny. It makes your kitchen a more accessible, enjoyable place to be for cooks of all ages and abilities.
Islands can benefit from this kind of thinking, too.
A kitchen island shouldn’t just be a big block in the middle of your room. It should be the hardest-working piece of furniture you own. Too often, its storage potential is an afterthought. But with a bit of planning, you can pack an incredible amount of function into it.
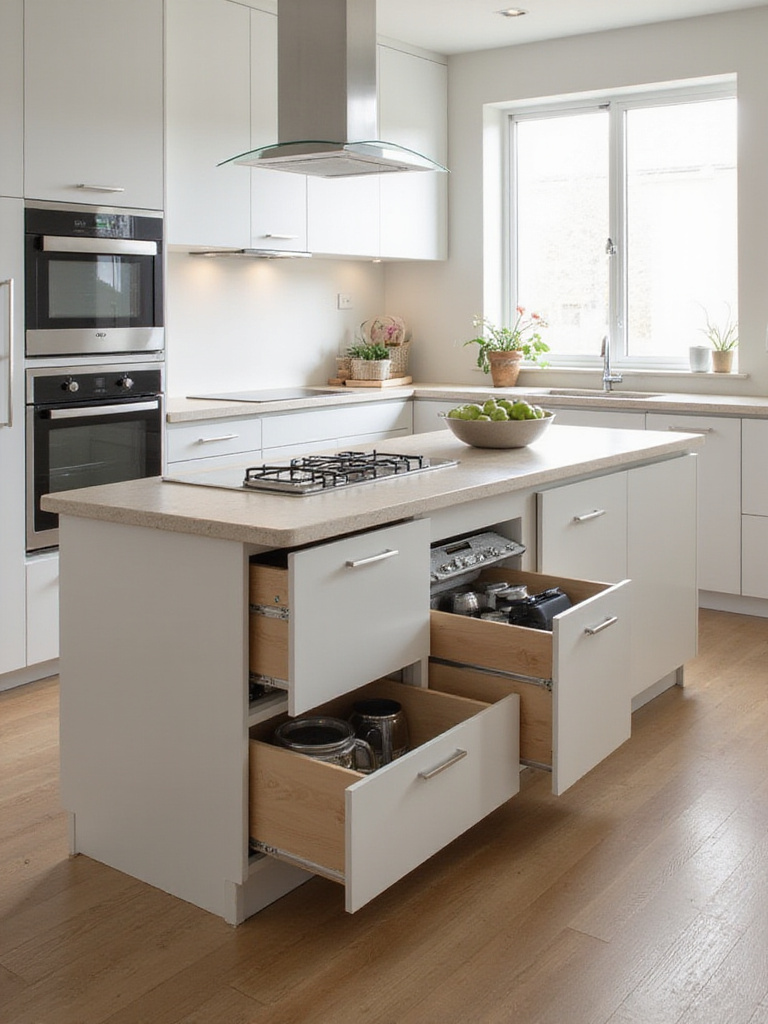
Think about how you use your island. Is it your main prep space? Then it needs drawers for your knives and cutting boards. Do you serve appetizers there when guests are over? A built-in wine rack or shelving for serving platters would be perfect. Does it face the living room? Use the front side for open shelving to display cookbooks and pretty bowls.
My favorite trick is to use deep, wide drawers instead of cabinets in an island. They are far more efficient for storing pots, pans, and even stacks of dishes. You’re using every cubic inch, and it’s all completely accessible.
Next, let’s talk about hiding things in plain sight.
The toaster, the blender, the coffee maker… these everyday workhorses are essential, but they can make a countertop feel cluttered and chaotic. Enter the “appliance garage”—a dedicated cabinet space, usually sitting on the counter, designed to hide these items away while keeping them plugged in and ready to go.
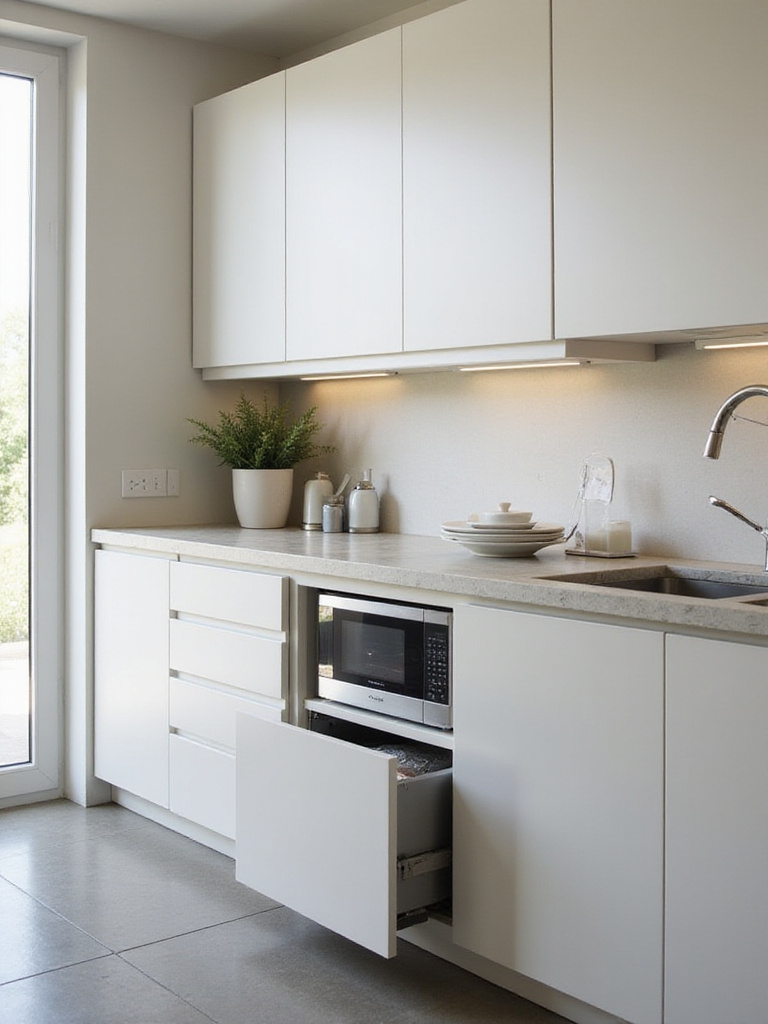
A simple roll-up or lift-up door conceals the appliances when not in use, giving you back that clean, uninterrupted sweep of counter space. The key is to have an electrical outlet installed at the back of the garage. This way, you can use the appliance right where it is without having to haul it out and plug it in every time.
It’s the perfect compromise between accessibility and aesthetics, giving you a calm, uncluttered kitchen without sacrificing the convenience of your favorite gadgets.
And for our final trick, we’re going to find space where you never thought you had any.
Look down. That 4-inch-high space under your base cabinets? The toe-kick? Most people assume it’s just decorative trim. It’s not. It’s a goldmine of hidden storage potential just waiting to be tapped.
Installing shallow, touch-latch drawers in this space gives you the perfect spot for all those flat, awkward, or infrequently used items. Think serving platters, baking sheets, cooling racks, your emergency stash of candles, or even the dog’s food bowls. It’s a genius hack that utilizes every last square inch of your kitchen.
This is the kind of detail that separates a good kitchen from a truly great, thoughtfully designed one. It’s a little bit of magic, hiding function in a place no one ever thinks to look.
See? Transforming your kitchen isn’t about one giant, overwhelming project. It’s about a series of small, intentional choices. It’s about seeing your space not just for what it is, but for what it could be.
Start with the one thing that drives you the most crazy. Is it the pan avalanche? The utensil black hole? Tackle that first. Feel the win. Then, move on to the next. The best organizational system is one that grows with you, one that feels natural to your own creative rhythm. You’re not just organizing your kitchen; you’re crafting a workspace that will inspire you every single day. You’re making room for joy.